2
3
PRECAUTIONS
• Always exercise care when operating and handling the Medical-Grade Integrated LCD
System.
• Never disassemble any portion of the enclosure, as this will void any product warranty on
the Medical-Grade Integrated LCD System.
• Do not use any AC/DC adapter other than the one provided with the device or a replacement
acquired from the manufacturer.
• In the unlikely event that smoke, abnormal noise or strange odor is present, immediately
power down the Medical-Grade Integrated LCD System and disconnect all power sources.
Please report the problem to your device provider immediately.
BASIC FEATURES
The Medical-Grade Integrated LCD System integrates a bright 23.8” or 27” display with a high
performance system and USB ports for a comprehensive point-of-care solution.
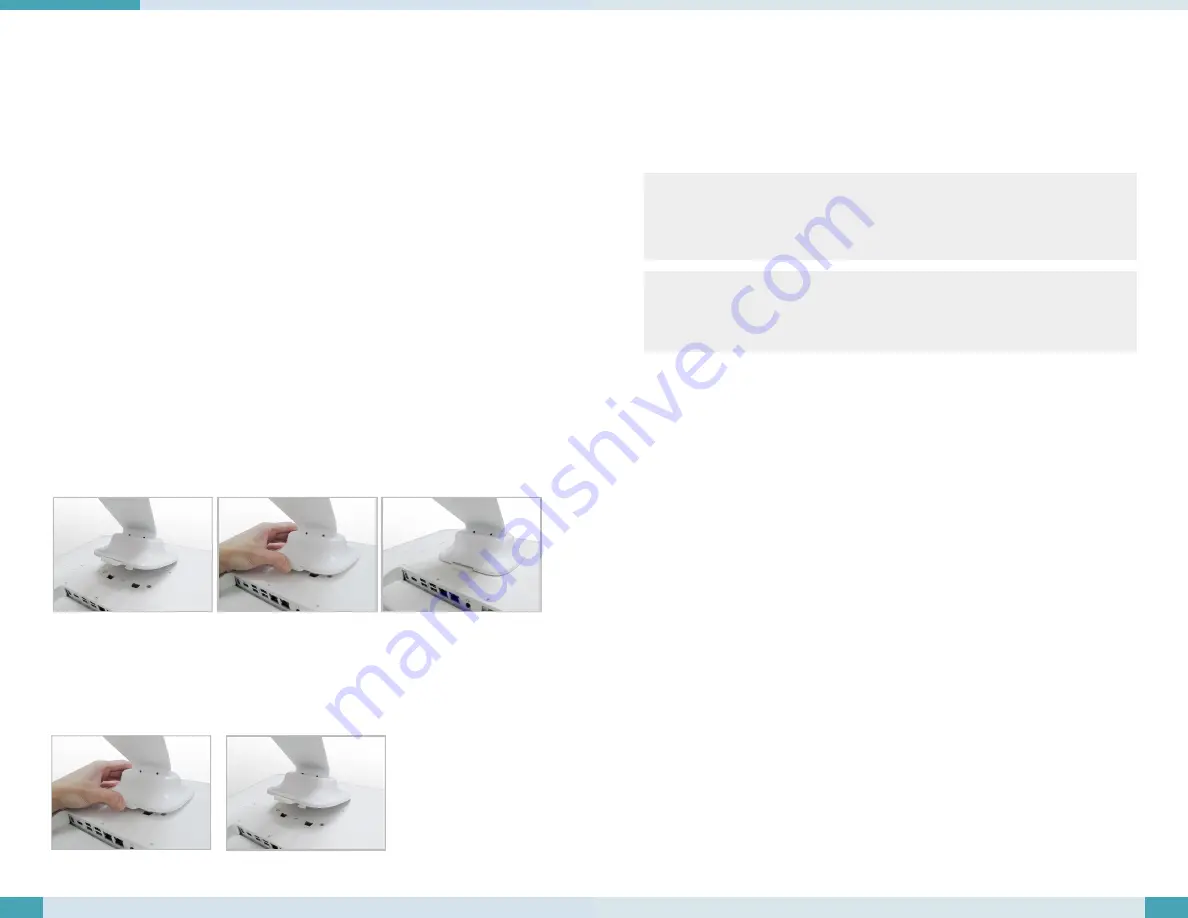
Attach The Tabletop Stand (Optional)
1.
Insert the top two tabs of the tabletop stand into the top two open slots on the 504T/ 507T
back panel.
2.
Push the latch to pivot the two lower tabs of the tabletop stand.
3.
Push the two lower tabs into the two lower slots on the 504T/ 507T back panel. Make sure the
latch locks back into position so the stand is securely attached.
Detach the Tabletop Stand (Optional)
1.
Push the latch to pivot the two lower tabs.
2.
Pull out the two lower tabs, then the two upper tabs from the 504T/ 507T back panel.
Powering ON and OFF
Please use the AC-DC adapter with the Medical-Grade Integrated LCD System for the power
supply. To activate the Medical-Grade Integrated LCD System, push and quickly release the Power
Button and the display will come on in a few seconds. To put in Standby mode, push and quickly
release the Power Button. To turn off for extended storage, power off the device safely using any
software function that “shuts down computer” provided in the software operating system.
Wireless Networking
Wireless LAN
The Medical-Grade Integrated LCD System is often delivered with an embedded (user-
inaccessible) 802.11ac WLAN adapter equipped with a hidden custom antenna.
• Through the support of typical WLAN adapters, the Medical-Grade Integrated LCD System
should be able to detect all 802.11 access points in the vicinity for you to select the access
point of your choice for connection.
• The SSID and WEP/WPA/WPA2 (if enabled) parameters on the Medical-Grade Integrated LCD
System and the access points have to match. The SSID is case-sensitive and it is recom-
mended that you enable WEP/WPA/WPA2 encryption (or advanced alternatives) for secure
access.
• When WEP/WPA/WPA2 is enabled, you may need to consult your network administrator
or your networking equipment literature to properly configure associated settings such as
Authentication mode, etc.
• Refer to the access point operating manuals for setting up the 802.11 access points.
NOTE:
To conserve power, use (push and quick release) the Power Button to put the device in
“Standby” mode while not in use. Pushing briefly on the same button will wake up the
system within seconds.
NOTE:
Avoid using the Power Button (“hold 4+ seconds” feature) to turn off the device — this form
of hardware shutdown is intended to be a means of recovery from device lockups, and not as
normal operation.