background image

10

AMB500W

 OPERATION

SiriusXM Vehicle Tuner Connections

Connecting the 

SiriusXM Vehicle Tuner 

(sold separately)

SiriusXM Satellite Radio 

Overview

Tuner Activation

SiriusXM Satellite Radio operation requires the connection of the 

SiriusXM Connect Vehicle Tuner

 (sold separately). 

Note

: The SiriusXM Connect Vehicle Tuner must have the SiriusXM logo 

to be compatible with the AMB500W.

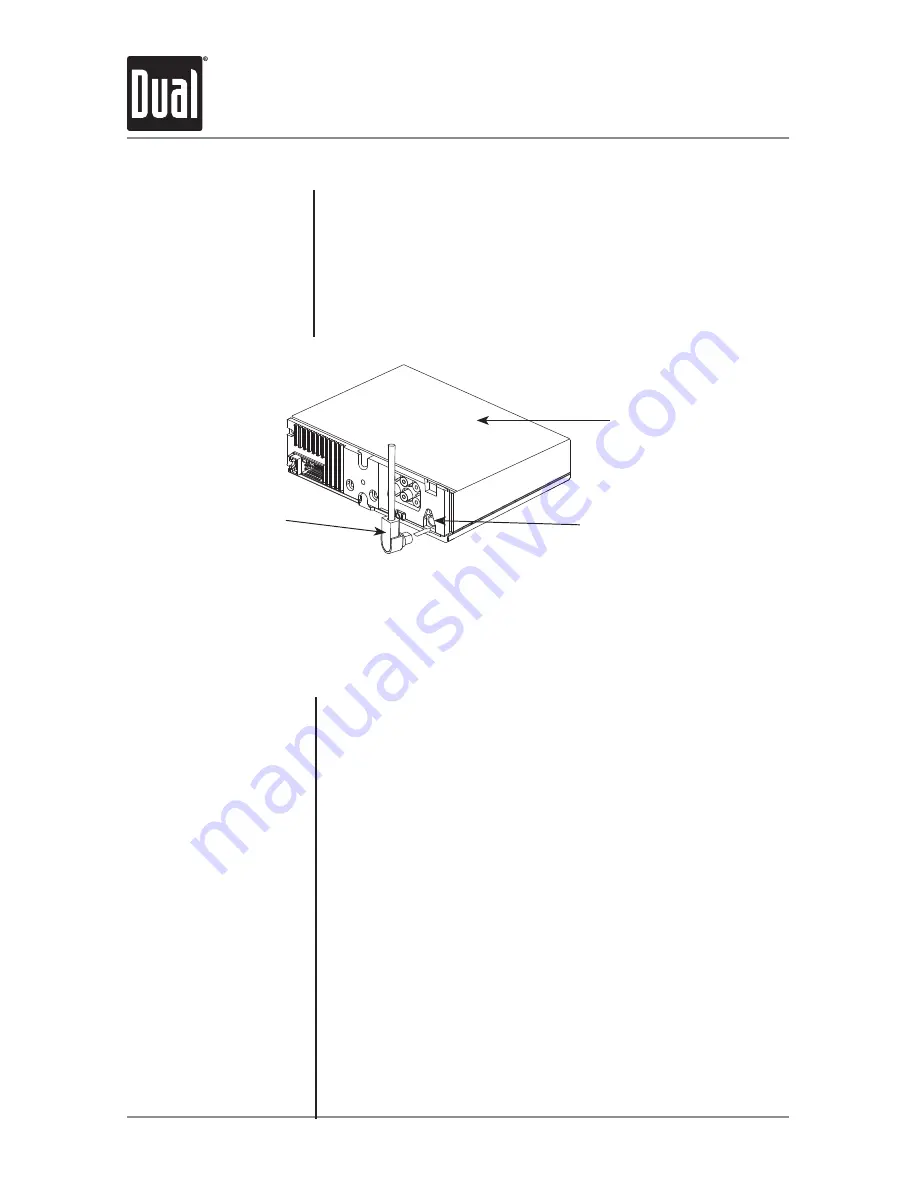
To connect the SiriusXM Vehicle Tuner, follow the instructions provided 

with the tuner. When connecting the tuner to the AMB500W, the cable 

orientation should be connected as shown below. 

Everything worth listening to is on SiriusXM, getting over 130 channels, 

including the most commercial-free music, plus the best sports, news, 

talk and entertainment. A SiriusXM Vehicle Tuner (sold separately) and 

Subscription are required. For more information, visit www.siriusxm.

com.

Sirius, XM and all related marks and logos are trademarks of Sirius 

XM Radio Inc. and its subsidiaries. All other marks and logos are the 

property of their respective owners. All rights reserved.

To listen to SiriusXM Satellite Radio, a subscription is required. 

Activate the SiriusXM Vehicle Tuner using one of the two methods 

below:

•  Online

: Go to "www.siriusxm.com/activatenow" and choose 

ACTIVATE RADIO.

•  Phone

: Call 1-800-XM-RADIO (1-800-967-2346).

Activation typically takes 10-15 minutes, but may take up to an hour. 

It is recommended to leave your vehicle on until the "Subscription 

Updated" message appears.

SiriusXM Vehicle 

Tuner Cable

Line up the connector with the pins on the cable. It can only be inserted as shown above. Push the 

cable into the head unit's connector until it clicks. Attempting to insert the cable differently from shown 

above may cause damage to the cable or head unit.

AMB500W Head 

Unit

SiriusXM-Ready

Input

SiriusXM Vehicle Tuner Operation

Summary of Contents for AMB500W

Page 1: ...INSTALLATION OWNER S MANUAL Marine Receiver with Detachable Face AMB500W ...

Page 2: ...nding tabs to secure Connect wiring harness and antenna Consult a qualified technician if you are unsure Certain vessels may require an installation kit and or wiring harness adapter sold separately Test for correct operation and slide into mounting sleeve to secure Snap trim ring into place Mounting Sleeve Mounting Tabs Vessel Dash Panel or Splashguard Mounting Sleeve WM4000 Head Unit Vessel Dash...

Page 3: ...d antenna Insulate wire if not used Ground Connect to the vessel or battery ground terminal Accessory Connect to a switched 12 volt power source Battery Connect to a constant 12 volt power source or the positive battery terminal Right Front Gray Black Gray Left Front White Black White Right Rear Violet Black Violet Left Rear Green Black Green AM FM Antenna Input Connect the vessel antenna BLACK 3 ...

Page 4: ...3 Intro Mode Source Volume turn Select Tag push USB Port Auxiliary Input 1 2 3 4 5 6 7 8 Tune Track Up Tune Track Down Power Display Preset 6 Folder Up Band Escape Preset 5 Folder Down Audio Menu Preset 4 Play Pause 9 10 11 12 13 14 AMB500W OPERATION 15 16 17 10 11 13 14 1 9 2 4 3 15 16 18 19 5 6 7 8 12 17 18 19 ...

Page 5: ...e Source Preset 2 Random 1 2 3 4 5 6 7 1 2 3 5 6 7 19 18 17 16 15 Preset 3 Intro Preset 5 Folder Down Preset 6 Folder Up Kay 8 Key 9 Key Display Key 0 Mute 8 9 10 11 12 13 14 Key 7 Key Preset 4 Play Pause Preset 1 Repeat Band Escape Volume Down Tune Track Down 15 16 17 18 19 20 4 8 9 10 11 12 13 14 20 ...

Page 6: ...vice MP3 player etc Press MODE to select AUX FRONT or AUX REAR modes Adjust volume using volume knob 00 46 Press DISP to select between clock and different types of information such as radio frequency CD track elapsed time or MP3 WMA song information Press RESET upon initial installation or if abnormal operation occurs Reset button is located behind the front panel With the unit on press and hold ...

Page 7: ... FRNT OFF Disables the front panel 3 5mm auxiliary input Rear Auxiliary Input AUX REAR ON Enables the rear RCA auxiliary input AUX REAR OFF Disables the rear RCA auxiliary input Rear Sub RCA output SUBWFR SUB Programs the rear sub RCA preamp output to subwoofer SUBWFR REAR Programs the rear sub RCA preamp output to rear Beep Confirmation BEEP OFF Disables the confirmation beep BEEP ON Enables the ...

Page 8: ...C BEAT ROCK and USER Any manual adjustments to the bass and treble settings are automatically saved as USER Press AUDIO until SUBWFR appears then rotate volume knob left right to adjust 0 minimum 12 maximum Note Subwoofer option will not appear if the REAR SUB option in the setup menu is set to REAR Refer to page 7 for details The source volume level control allows a gain adjustment for each audio...

Page 9: ...ld the desired preset button 1 6 for more than 2 seconds When stored the preset number will appear in the display The station can be recalled anytime by pressing the corresponding preset button Band Manual Tuning Storing and Recalling Presets Press BAND to select weather band WB Press TUNE nn or TUNE ll momentarily to seek the next weather band station Up to 6 weather band stations can be stored T...

Page 10: ... For more information visit www siriusxm com Sirius XM and all related marks and logos are trademarks of Sirius XM Radio Inc and its subsidiaries All other marks and logos are the property of their respective owners All rights reserved To listen to SiriusXM Satellite Radio a subscription is required Activate the SiriusXM Vehicle Tuner using one of the two methods below Online Go to www siriusxm co...

Page 11: ...nd hold a preset button 1 6 on the front panel or remote control for more than two seconds When stored a beep sound will be heard and the preset number will appear in the display The preset channel can be recalled by pressing the corresponding preset button Note Buttons 7 8 9 0 on the remote control are not associated with channel presets Press SELECT to enter the channel search menu With CHANNEL ...

Page 12: ... to reset the locked channels back to the factory default All currently subscribed channels will be unlocked To access the SiriusXM setup menu options press and hold AUDIO MENU for more than 3 seconds press AUDIO MENU to cycle through menu options until SIRIUSXM SETUP appears then press SELECT Press AUDIO MENU to cycle through the list of submenu options To enter a 4 digit code choose from the two...

Page 13: ...a if necessary Press RESET located behind the front panel If the message remains the antenna may have been damaged NO SIGNAL The vehicle must be outside and the antenna must have a clear view of the southern sky The magnetic antenna must be mounted on the outside of the vehicle for the best reception CHANNEL UNSUB This channel is not included in your SiriusXM subscription plan Call 1 800 XM RADIO ...

Page 14: ...M Tags can be saved before they must be transferred or deleted Transfer Tags to an iPod iPhone Connect an iPod iPhone device The mode will change to operation of iPod and Tags will be automatically transferred to the device removing the Tags from the AMB500W s internal memory A confirmation message will appear confirming the number of tags sent The AMB500W must remain in operation of iPod mode unt...

Page 15: ...on is displayed ALREADY TAGGED The same song has already been tagged from the same channel and is currently saved in memory The same song cannot be tagged twice unless the song is tagged on a different channel the Tags are sent to an iPod device or the tags are erased MEMORY FULL CONNECT iPod The internal memory will hold 64 SiriusXM Tags An iPod device must be connected to transfer the Tags or th...

Page 16: ... fast forward or reverse a track Press l II to temporarily stop USB SD Card playback Press l II again to resume playback Press SELECT to enter the file folder search mode A list of all the folders from the USB SD Card device will be displayed Folders that do not contain music will be ignored Note Any files located in the root directory will be located in the folder named ROOT Press SELECT to view ...

Page 17: ... than one folder Press RPT to enter the Repeat menu then turn the volume knob to select one of the following options ALL Plays all tracks on the device SONG Continuously repeats selected track FOLDER Continuously repeats all files in selected Folder Press RDM to enter the Random menu then turn the volume knob to select one of the following options OFF Cancels the RDM function ALL Plays all tracks ...

Page 18: ...aracters Artist Name 32 characters Album Name 32 characters File Name 32 characters Folder Name 32 characters ID3 Tag Support MP3 Tags Version 1 0 2 4 WMA Tags File Folder Limit Maximum number of files 50 000 Maximum number of folders 255 plus the root folder Maximum number of files in each folder 50 000 Note For devices with more than the maximum number of files folders some files will be ingnore...

Page 19: ...inning of the previous song Press and hold ll or nn to fast forward or reverse a song Press l II to temporarily stop playback Press l II again to resume playback Press RPT to enter the Repeat menu then turn the volume knob to select one of the following options ALL Repeats all tracks SONG Repeats selected track Press RDM to enter the Random menu then turn the volume knob to select one of the follo...

Page 20: ...to the desired song podcast audiobook and press SELECT to begin playback Note If a specific category is selected the iPod iPhone device playback will be limited to that category until another category is selected in the search menu Controlling a Device Full Control Music Search Menu The AMB500W features a powerful music search that simplifies the searching process Follow the steps below to find th...

Page 21: ...ent song Pressing nn again skips to the beginning of the previous song Press l II to temporarily stop playback Press l II again to resume playback When playing an iPod device the volume is adjustable using the volume knob iPod touch 4th generation iPod nano 6th generation iPod touch 3rd generation iPod nano 5th generation iPod touch 2nd generation iPod nano 4th generation iPod classic iPod touch 1...

Page 22: ...e to connect Note If the Auto Connect setup menu setting is set to OFF you must press to connect you device after pairing and each time the AMB500W is powered on Press and hold for 3 seconds to disconnect a connected device The device will remain paired and appear in the PAIRED DEVICES menu but will not be connected Before you can use a Bluetooth device it must be paired and connected Make sure th...

Page 23: ...mode Dialing will begin automatically Manual Dialing using IR remote control Placing a call from the phone Recent Calls List Redialing last number Receiving and Ending Phone Calls Incoming phone calls will automatically appear on the display and a ring tone will be heard Note The volume of the ring tone depends on the volume level of the AMB500W The incoming ring tone may not be heard if the volum...

Page 24: ... hold and switch to the second phone call Press again to switch back to the first call Note Audio transfer and call waiting must be supported by the mobile phone and service provider to function properly Volume Microphone Mute Audio Transfer Call Waiting Bluetooth Setup Menu Options Function Options Action Bluetooth BL TOOTH ON OFF Enables disables Bluetooth functionality Auto Connect AUTO CON ON ...

Page 25: ...laying music using the music player on your mobile device Once the music is playing the following functions can be used to control the music The llbutton will skip to the next available audio track The nnbutton will skip to the previous audio track The l II button will toggle between play and pause during playback Note Some Bluetooth devices may not fully support these commands Resetting the Bluet...

Page 26: ...urn shipment of the product Specific license conditions and copyright notices for the software can be found via www dualav com What to do 1 Before you call for service check the troubleshooting guide in your owner s manual A slight adjustment of any custom controls may save you a service call 2 If you require service during the warranty period you must carefully pack the product preferably in the ...

Page 27: ... from each other and chassis ground Unit blows fuses Yellow or red wire touching chassis ground Check for pinched wire Speaker wires touching chassis ground Check for pinched wire Incorrect fuse rating Use fuse with correct rating NO SUPPORT appears on display An invalid ID3 tag version is present Version 1 0 to 2 4 ID3 tags are supported An ID3 tag character is not supported Only ASCII characters...

Page 28: ...nsions 7 x 7 x 2 178 x 178 x 51 mm File system FAT FAT32 File extensions support mp3 wma SD Card maximum device capacity 16GB HFP hands free profile A2DP advanced audio distribution profile AVRCP audio video remote control profile Design and specifications subject to change without notice FM Tuner AM Tuner General USB SD Card Bluetooth Profiles CEA 2006 Power Standard Specifications reference 14 4...

Page 29: ...29 AMB500W OPERATION Notes ...

Page 30: ...30 AMB500W OPERATION Notes ...

Page 31: ...31 AMB500W OPERATION Notes ...

Page 32: ...ds Apple is not responsible for the operation of this device or its compliance with safety and regulatory standards Please note that the use of this accessory with iPod or iPhone may affect wireless performance SD is a trademark of SD 3C LLC The Bluetooth word mark and logos are owned by the Bluetooth SIG Inc and any use of such marks by Namsung is under license Sirius XM and all related marks and...

Reviews: