background image


40” WIDESCREEN LED TV 


MODEL NO.: DL-TQL40F4-001 


USER MANUAL 


Please read this manual carefully before using, 

and keep it for future reference. 

Summary of Contents for DL-TQL40F4-001

Page 1: ...40 WIDESCREEN LED TV MODEL NO DL TQL40F4 001 USER MANUAL Please read this manual carefully before using and keep it for future reference ...

Page 2: ... ventilation of the product shall not be impended for intended use Always leave a minimum distance of 10 cm around the unit to ensure sufficient ventilation Naked flame sources such as candles should not be placed on top of the device The device is intended for use only in a temperate climate Situate this product away from heat sources such as radiators heat registers stoves or other appliances in...

Page 3: ...her purpose Do not subject the product to violent shocks extreme temperatures or lengthy periods of direct sunlight Keep the product away from magnetic objects motors and transformers Do not use outdoors in inclement weather Do not use the TV while driving this is dangerous and is illegal in some areas BATTERY HANDLING AND USAGE CAUTION Danger of explosion if battery is incorrectly replaced or not...

Page 4: ...nd the environment The crossed out wheeled bin symbol on the product reminds you of your obligation that when you dispose of the appliance it must be separately collected Consumers should contact their local authority or retailer for information concerning the correct disposal of their old appliance DUAL ELECTRONICS 79 81 ANCIENNE RN7 69570 DARDILLY User Manual 1 Remote Control 1 All the pictures ...

Page 5: ...REMOTE CONTROL 8 9 REMOTE CONTROL PREPARATION 10 BASIC CONNECTION 11 15 OPERATIONS BASIC OPERATIONS 16 24 MAIN MENU 25 42 FIRST TIME INSTALLATION 25 26 DTV MODE 27 41 ATV AND OTHER MODES 41 PC MODE 41 42 FOR REFERENCE MAINTENANCE 43 WALL MOUNTING 43 STAND INSTALLATION 44 SPECIFICATIONS 45 TROUBLESHOOTING 46 ...

Page 6: ...ort TV Guide Function Support TELETEXT Europe Function Support USB Multimedia Playback Support Multi languages On Screen Display Support Full Function Remote Control Support HDMI SCART YPBPR AV VGA PC AUDIO and CI Input Support EARPHONE and COAXIAL Output Support PVR Function Support TIME SHIFT Function With Detachable Stand Holder With External Antenna Jack With Built in Speakers FEATURES ...

Page 7: ... on the unit the indicator light will display blue color 3 Stand holder 4 VOL button To increase decrease the volume level or move left right 5 CH button To select next previous channel or move up down 6 MENU button To enter menu setting page 7 SOURCE button To select the input source 8 POWER button To turn ON OFF the TV GENERAL PARTS Front View ...

Page 8: ...input terminal 5 SCART input terminal 6 EARPHONE output terminal 7 CI input terminal 8 Mini AV input terminal 9 Mini YPbPr input terminal 10 COAXIAL output terminal 11 USB input terminal 12 RF input terminal To connect the external antenna 13 Built in speakers GENERAL PARTS Back View ...

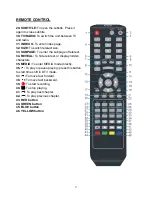
Page 9: ...revious channel 11 DISPLAY To display information of current program 12 Up navigation button 13 Left navigation button 14 OK To confirm selection 15 Right navigation button 16 Down navigation button 17 MENU To display the main menu Press it again to return to previous menu page 18 EXIT To exit menu page 19 SOURCE To switch the input source 20 P MODE To switch the picture mode 21 SLEEP To set the s...

Page 10: ... To enter the subpage of teletext 34 REVEAL To hide teletext or display hidden characters 35 MEDIA To enter MEDIA mode directly 36 To play or pause playing press this button to start time shift in DTV mode 37 To move fast forward 38 To move fast backward 39 To start recording 40 To stop playing 41 To play next chapter 42 To play previous chapter 43 RED button 44 GREEN button 45 BLUE button 46 YELL...

Page 11: ... impact the remote control This may damage the parts or lead to malfunction If the remote control is not going to be used for a long time remove the batteries REMOTE CONTROL OPERATION Point the remote control from no more than about 6m from the remote control sensor and within about 60 of the front of the player Fig2 NOTES The operating distance may vary according to the brightness of the room Do ...

Page 12: ...ructions before connecting other equipments CONNECTING TO AC POWER SOURCE CONNECT EXTERNAL ANTENNA TO UNIT Install external antenna into antenna jack for best picture BASIC CONNECTION Main unit Antenna Outdoor antenna amplifier Indoor antenna amplifier Power plug of antenna amplifier 75 OHM antenna plug To power outlet ...

Page 13: ...HDMI cable to connect the unit with other devices to receive high definition multimedia signal Back of DVD VCR Back of PC Use VGA cable and Audio cable to connect the unit with TV or PC and use this product as a monitor VGA cable Not included Audio cable Not included ...

Page 14: ...NECTION COAXIAL CONNECTION Back of DVD VCR SCART cable Not included Use coaxial cable to connect the unit with amplifier or other audio decoding devices for coaxial audio signal output Coaxial cable is not included ...

Page 15: ...PR CONNECTION YPbPr cable Not included Back of DVD VCR Back of DVD VCR For basic connection use the composite Audio L R white red and CVBS yellow cable to connect the unit with other devices AUDIO cable Not included AV cable Not included ...

Page 16: ...ON TV Insert a USB memory device into USB slot for multimedia files playback and recording digital programs INSERT A CI CARD EARPHONE CONNECTION CI slot CI card is not included Not included EARPHONE cable Not included ...

Page 17: ...on repeatedly to switch the digit VOLUME CONTROL Press VOL or VOL to adjust the level of current volume Available range 0 100 MUTE CONTROL Press MUTE button to mute the sound press it again to turn on the sound SOURCE SETTING Press SOURCE button on the unit or remote control to display the sources list Press UP or DOWN navigation button to select desired input source and then press OK button to co...

Page 18: ...k And the available video size may be different for different input source MULTI AUDIO SETTING Press AUDIO button on remote control to enter Multi Audio menu page Press LEFT RIGHT navigation button to select the available soundtrack Press UP DOWN navigation button to select the available audio language NOTE To enable this function make sure that the channel you are viewing supports multi audio lan...

Page 19: ...ton on remote control to display the keyboard Then you can rename a desired favorite type using navigation buttons QUICK SELECT When viewing an available channel press OK button on remote control to enter Channel List menu page Press UP or DOWN navigation button to select preferred channel Press OK button to confirm selection TELETEXT Press TEXT button on remote control to display the available te...

Page 20: ...trol to call out the Record List menu Press UP DOWN navigation button to select recorded files and press OK button to start playback TIME SHIFT FOR DTV MODE ONLY Insert your USB memory device into USB slot first When watching a digital program If you don t want to miss any programs when left press button on remote control to call out a dialog box and select OK to enter TIME SHIFT mode select Cance...

Page 21: ...ntrol to enter MEDIA mode directly 1 Photo Press LEFT RIGHT navigation button to select Photo in the main menu and press OK button to enter it NOTE When selecting Photo files press EXIT button to move the cursor to TITLE and then press RIGHT navigation button to view files in thumbnail mode Use navigation buttons to select preferred file Press RED button to enter a dialog box and select Yes to del...

Page 22: ...ause playing Press button on remote control to stop playing Press button on remote control to play previous file Press button on remote control to play next file 2 Music Press LEFT RIGHT navigation button to select Music in the main menu and press OK button to enter it Use navigation buttons to select preferred file Press RED button to enter a dialog box and select Yes to delete highlighted file s...

Page 23: ...remote control to display it again Press button on remote control to play or pause playing Press button on remote control to stop playing Press button on remote control to move fast backward Press button on remote control to move fast forward Press button on remote control to play previous file Press button on remote control to play next file 3 Movie Press LEFT RIGHT navigation button to select Mo...

Page 24: ... the tool bar press EXIT button to hide it Press LEFT RIGHT navigation button to select preferred option in the tool bar and press OK button to confirm selection enter submenu Press button on remote control to play or pause playing Press button on remote control to stop playing Press button on remote control to move fast backward Press button on remote control to move fast forward Press button on ...

Page 25: ...ove current page from Bookmark List Press GREEN button on remote control to enter GOTO mode Input valid number and press OK button to enter desired page directly Press YELLOW button on remote control to display the Bookmark list Press BLUE button on remote control to display the play list Press button on remote control to play previous page Press button on remote control to play next page NOTE To ...

Page 26: ...s UP or DOWN navigation button to select preferred option Press LEFT or RIGHT navigation button to adjust the value Press OK button to confirm selection Press MENU button to return to previous menu page Press EXIT button to exit menu page First Time Installation Connect to power source and turn on this TV the first time below installation menu page will display on the screen Setup 1 Press UP DOWN ...

Page 27: ...age Setup 5 Press UP DOWN navigation button to select desired searching type Press OK button to confirm selection and then this unit will search programs automatically NOTE To skip ATV or DTV tuning press MENU button on remote control to call out a dialog box and select OK to skip it select Cancel to dismiss the dialog box To exit tuning press EXIT button on remote control to call out a dialog box...

Page 28: ...adjusted from 0 100 1 4 Sharpness The sharpness value of picture can be adjusted from 0 10 1 5 Colour The colour saturation value of picture can be adjusted from 0 100 NOTE The value of Brightness Contrast Sharpness and Colour is adjustable only in User picture mode 1 6 Tint This item is used to adjust the tone of color in NTSC system from 0 100 1 7 Colour Temperature This item is used to adjust t...

Page 29: ...to eliminate the image noise to gain better image effect Available options Off Low Middle High 2 SOUND 2 1 Sound Mode Available options Standard Movie Music Speech User 2 2 Bass This item is used to adjust the level of lower pitched sounds from 0 100 2 3 Treble This item is used to adjust the level of higher pitched sounds from 0 100 NOTE The value of Bass and Treble is adjustable only in User sou...

Page 30: ...DOWN navigation button to select this item and press OK or RIGHT navigation button to enter submenu Press UP DOWN navigation to select preferred program a Press RED button on remote control and use number buttons to input the password Then press RED button to add remove a delete mark on highlighted program After that press OK button to enter a dialogue box Select OK to delete it select Cancel to c...

Page 31: ...Press UP DOWN navigation to select preferred program Then press OK button to enter Rename menu page NOTE RENAME function is available only for analog programs Rename operations Press UP DOWN LEFT RIGHT navigation button to select preferred option and press OK button to input it Press RED button on remote control to add a space Press GREEN button on remote control to switch between capital letters ...

Page 32: ...mote control to add highlighted channel to Favorite 4 list 3 3 Country This item is used to select the country that you are living in 3 4 Auto Search Press UP DOWN navigation button to select this item and press OK or RIGHT navigation button to enter submenu Then press UP DOWN navigation button to select All DTV or ATV and press OK or RIGHT navigation button to enter a dialog box Select OK to star...

Page 33: ... and press UP DOWN navigation button to select preferred bandwidth Once the settings of part 3 51 to part 3 53 are finished select Start in the menu and press OK button to start searching 3 6 ATV Manual Search for ATV input source only 3 61 Current Channel Press OK or RIGHT navigation button to enter submenu and press UP DOWN navigation button to select preferred program 3 62 Frequency This item i...

Page 34: ...ect preferred sound system Available options BG DK I L L NOTE The Sound System options may vary due to different Color System settings 3 7 LCN On Off This item is used to turn on off LCN Logic Channel Number 4 Feature 4 1 Lock Press OK or RIGHT navigation button to enter submenu Input the factory default password 0000 using number buttons on remote control NOTE You can use the universal password 8...

Page 35: ...ion button to enter submenu and press UP DOWN navigation button to select preferred option Available options Off 4 to 18 4 13 Change Pin Code Press OK or RIGHT navigation button to enter submenu Input the Old Password New Password and Confirm New Password in turn After that this unit will save the new password automatically ...

Page 36: ...on off Picture menu lock Sound Lock Turn on off Sound menu lock Feature Lock Turn on off Feature menu lock Setup Lock Turn on off Setup menu lock Key Lock Turn on off Key Lock Source Lock Turn on off the lock of all available sources Set Source Select desired source Channel Number Select desired channel Max Volume Set the maximum volume Default Volume Set the default volume Clear Lock Clear above ...

Page 37: ...nd save it automatically 4 33 Time Zone Press OK or RIGHT navigation button to enter submenu and press UP DOWN navigation button to select preferred option 4 34 DST Daylight Saving Time This item is used to turn on off DST function 4 4 Sleep Timer This item is used to set the automatic sleep time in standby mode Available options Off 10 Mins 20 Mins 30 Mins 60 Mins 90 Mins 120 Mins 180 Mins 240 Mi...

Page 38: ... scene or action through the caption instead of hearing it NOTE Hearing Impaired function works only when you are viewing programs that contain related caption information 4 7 CI Info This item is used to display the CI information 4 8 PVR Timeshift Press OK or RIGHT navigation button to enter submenu Press UP DOWN navigation button to select preferred item ...

Page 39: ...o format your USB memory device Press GREEN button to set default partition 4 82 Auto Timeshift This item is used to turn on off Auto Timeshift function 4 83 Timeshift Buffer This item is used to select desired time shift buffer duration Available options Auto 30Mins 1hr 2hr 4 84 Timer Press OK or RIGHT navigation button to enter submenu ...

Page 40: ... DTV Radio Channel Select a channel you want to record Start Time Set the recording start time Duration Set the recording duration Date Set the date of recording Mode Set the recording mode NOTE To change the numerical display of above items press OK button to enter it and then use LEFT RIGHT navigation button to move the cursor use number buttons to input your desired value and press OK button to...

Page 41: ... options 5 10 15 20 25 30 Seconds and Never 5 2 Auto SCART This item is used to turn on off Auto SCART function If Auto SCART is on you can view the programs by SCART automatically when SCART cable is connected 5 3 PC Setup for PC input source only This item is adjustable only with PC input signal 5 4 Blue Screen This item is used to turn on off blue background function The screen background will ...

Page 42: ...puter and this unit Press SOURCE button on the unit or remote control to select PC input source Press MENU button to display the main menu Select Setup using UP DOWN navigation button Then press OK or RIGHT navigation button to enter submenu Select PC Setup and enter it Press UP DOWN navigation button to select preferred item Press OK or RIGHT navigation button to enter submenu Press LEFT RIGHT na...

Page 43: ...on available range 16 to 16 4 Phase This item is used to adjust the picture apply to the TV available range 0 to 100 5 Clock This item is used to adjust the signals transfer speed available range 50 to 50 NOTE For other menus please refer to the menu operations of DTV mode ...

Page 44: ...hen wipe again with a dry cloth Never use alcohol benzene thinner cleaning fluid or other chemicals And do not use compressed air to remove dust Contact a professional for assistance when wall mounting your TV We are not responsible for any damage to the product or injury to yourself if you mount the TV on your own Do not wall mount the TV while TV is turned on It may cause personal injury due to ...

Page 45: ... to prevent the panel from being damaged Step 2 Align the Stand with TV bottom and then force the end of stand until the TV is fully seated on the stand Step 3 Tighten the included screws with a screw driver NOTES Unplug the power plug first when installing or removing the TV Stand This product is a 40 Series TV Contact one or more partner for assistance when installing or removing the TV stand ST...

Page 46: ... Angle 178 H 178 V Visible Range 886 5 H 499 V mm Life Time 50 000 Hrs Movie AVI MPEG 1 2 WMV TS Music WMA AAC AC3 MP3 Photo JPEG BMP PNG GIF USB Multimedia Playback Format Text TXT Power Source AC 100 240V 50 60Hz Power Consumption 75W Operation Temperature 5 to 45 Measurement 934 W 246 D 615 H mm Weight Approx 9 kg Specifications are subject to change without notice SPECIFICATIONS ...

Page 47: ...he remote control unit at a distance of no more than 6m from the remote control sensor Remove the obstacles between the remote control and remote control sensor No key operation by the main unit and or the remote control unit is effective Disconnect the power plug and then reconnect it The player may not be operating properly due to lightning static electricity or some other factors Symptom TV Rem...

Reviews: