background image

5

SX SERIES

 INSTALLATION

Mounting

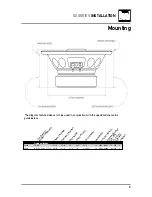
The diagram featured above is to be used in conjunction with the specifications matrix 

guide below:

Fractional Inches 


SX652 

7" x 5/8" 


2 1/4”  

2 7/16"  

3/4”  

9/16”  

5 3/4”  


90   60Hz - 23kHz   75   225 

 4

SX692 

10 7/16" x 7 9/16" x 11/16"  3 5/16”  

3 1/2"  

11/16” 

1/2”  

6" x 8.75"  

90    55Hz - 23kHz   100   300  

4

Grill

 Dimensions

(HxWxD)

 or

 (HxDiameter)

Top-Mounting

 Depth

Tweeter

 Protrusion

Bottom-Mounting

 Depth

Cut-out

 Diameter

Sensitivity

 (dB)

Frequency

 Response

Recommended

 Power

(watts

 RMS)

Peak

 Power

(watts

 IPP)

Impedance

Mounting

 Depth

Summary of Contents for SXSERIES SX652

Page 1: ...INSTALLATION OWNER S MANUAL SX SERIES Car Audio Speakers SX652 SX692 ...

Page 2: ...this system yourself have it installed by a qualified audio technician Before installation disconnect the battery negative terminal to prevent damage to the unit fire and or possible injury Do not connect Amplifier or any audio source to illumination inputs Inputs are designed for 12 volt power source only Thank you for purchasing the SX Series car speakers Although Dual has attempted to make sure...

Page 3: ...If additional wiring is required we recommend running all wires prior to mounting your speaker in place 4 Use the highest quality connectors for a reliable installation and to minimize signal or power loss 5 Use caution before you drill or cut Be careful not to cut or drill into gas tanks fuel lines brake or hydraulic lines vacuum lines or electrical wiring when working on any vehicle 6 Never run ...

Page 4: ...lastic mounting ring as a template to mark the locations for the mounting screws Drill the holes with a 3 32 bit 4 Be sure to observe proper polarity when connecting the wires The speaker s positive terminal is indicated with a symbol 5 Fit the speaker to the hole cut out Mount the speaker using the supplied screws If the speaker grill is to be used insert 4 screws into the grill holes and then mo...

Page 5: ...11 16 3 5 16 3 1 2 11 16 1 2 6 x 8 75 90 55Hz 23kHz 100 300 4 G r i l l D i m e n s i o n s H x W x D o r H x D i a m e t e r T o p M o u n t i n g D e p t h T w e e t e r P r o t r u s i o n B o t t o m M o u n t i n g D e p t h C u t o u t D i a m e t e r S e n s i t i v i t y d B F r e q u e n c y R e s p o n s e R e c o m m e n d e d P o w e r w a t t s R M S P e a k P o w e r w a t t s I P P ...

Page 6: ...e product What to do 1 Before you call for service check the troubleshooting guide in your owner s manual A slight adjustment of any custom controls or connections discussed in your instruction booklet may save you a service call 2 If you require service during the warranty period you must carefully pack the product preferably in the original package and ship it by prepaid transportation with a co...

Page 7: ...SX SERIES WARRANTY Notes 7 ...

Page 8: ...Dual Electronics Corporation Toll Free 1 866 382 5476 www dualav com 2008 Dual Electronics Corp All rights reserved NSA0608 V01 ...

Reviews: