background image

2

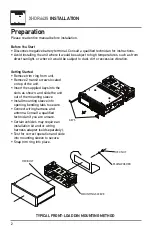
TYPICAL FRONT-LOAD DIN MOUNTING METHOD

Please read entire manual before installation.

Before You Start
•  Disconnect negative battery terminal. Consult a qualified technician for instructions.
•  Avoid installing the unit where it would be subject to high temperatures, such as from 

direct sunlight, or where it would be subject to dust, dirt or excessive vibration. 

Getting Started
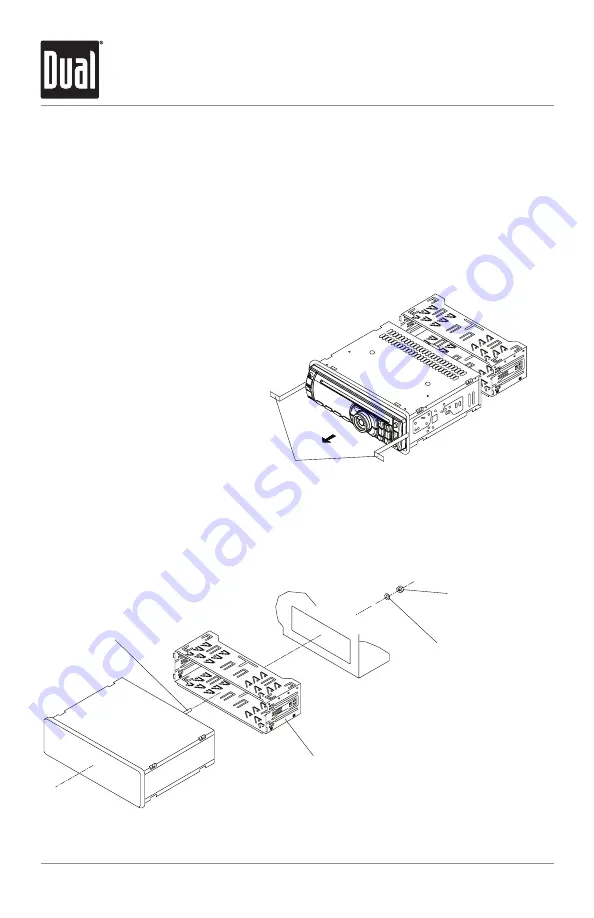
• Remove trim ring from unit,
• Remove 2 transit screws located 

on top of the unit.

 • Insert the supplied keys into the 

slots as shown, and slide the unit 
out of the mounting sleeve.

 • Install mounting sleeve into 

opening, bending tabs to secure.

 • Connect wiring harness and 

antenna. Consult a qualified 
technician if you are unsure.

 • Certain vehicles may require an 

installation kit and/or wiring 
harness adapter (sold separately).

 • Test for correct operation and slide 

into mounting sleeve to secure.

 • Snap trim ring into place.

XHDR6435

 INSTALLATION

Preparation

KEYS

HEX BOLT

MOUNTING SLEEVE

PLAIN WASHER

HEX NUT

Summary of Contents for XHDR6435

Page 1: ...INSTALLATION OWNER S MANUAL CD Receiver with Detachable Face XHDR6435 READY ...

Page 2: ...rim ring from unit Remove 2 transit screws located on top of the unit Insert the supplied keys into the slots as shown and slide the unit out of the mounting sleeve Install mounting sleeve into opening bending tabs to secure Connect wiring harness and antenna Consult a qualified technician if you are unsure Certain vehicles may require an installation kit and or wiring harness adapter sold separat...

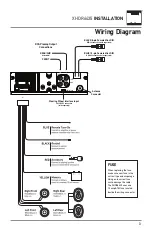
Page 3: ...located beside the wiring connector XHDR6435 INSTALLATION Wiring Diagram Antenna Connector Steering Wheel Interface Input PAC SWI PS connection sold separately FRONT R SUB L CH R CH REMOTE IN BLACK 8 pin Female Mini DIN BTM60 Connection sold separately BLUE 10 pin Female Mini DIN HDM90 Connection sold separately REAR SUB selectable RCA Preamp Output Connections FRONT ...

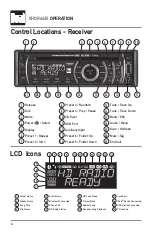
Page 4: ...e Stereo Mono Repeat Song Random Song Playback 11 12 9 10 Preset 2 Random Preset 4 Play Pause CD Eject USB Port Auxiliary Input Preset 6 Folder Up Preset 5 Folder Down 8 9 10 11 12 13 14 Loudness iPod Device Connected USB Device Connected CD Loaded 13 14 15 16 Tune Track Up Tune Track Down Band ESC Audio Menu Scan HD Seek Mute Tag End Call 15 16 17 18 19 20 21 1 2 3 4 5 10 11 12 13 14 6 8 15 7 9 1...

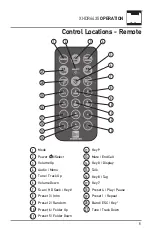
Page 5: ...epeat Band ESC Key Tune Track Down 1 2 3 4 5 6 7 8 9 10 12 13 14 15 16 17 18 19 20 Mode Power Select Volume Up Audio Menu Tune Track Up Volume Down Scan HD Seek Key Preset 3 Intro Preset 2 Random Preset 6 Folder Up Preset 5 Folder Down 2 3 6 5 8 7 10 19 12 13 17 18 9 20 15 16 21 XHDR6435 OPERATION 1 4 14 11 21 11 ...

Page 6: ... unless an iPod device is connected Bluetooth mode will not appear unless the BTM60 Bluetooth module is connected Insert 3 5 mm plug to connect your portable audio device The steering wheel interface input located on the back of the head unit allows connection to the PAC Pacific Accessory Corporation SWI PS interface module sold separately Visit www pac audio com for details To configure steering ...

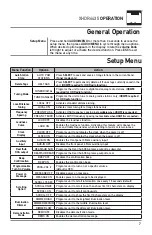
Page 7: ... ON Enables the front panel 3 5mm auxiliary input AUX IN OFF Disables the front panel 3 5mm auxiliary input Rear Sub RCA output REAR SUB SUB Programs the Rear Sub RCA preamp output to subwoofer REAR SUB REAR Programs the Rear Sub RCA preamp output to rear Beep Confirmation BEEP OFF Disables the confirmation beep BEEP ON Enables the confirmation beep Programmable Turn On Volume PROG VOL Programs un...

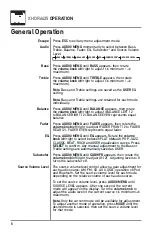
Page 8: ...lect between FLAT default POP JAZZ CLASSIC BEAT ROCK and USER equalization curves Press SELECT to confirm Any manual adjustment to the Bass or Treble settings are automatically saved as USER Press AUDIO MENU until SUBWFR appears then rotate the volume knob left right to adjust 0 12 Adjusting levels to 0 turns the subwoofer off The source volume level control allows a gain adjustment for each audio...

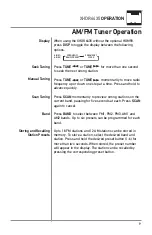
Page 9: ...ress SCAN momentarily to preview strong stations on the current band pausing for five seconds at each Press SCAN again to cancel Press BAND to select between FM1 FM2 FM3 AM1 and AM2 bands Up to six presets can be programmed for each band Up to 18 FM stations and 12 AM stations can be stored in memory To store a station select the desired band and station Press and hold the desired preset button 1 ...

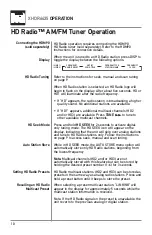
Page 10: ...or 2 seconds to activate digital only tuning mode The HD SEEK icon will appear on the display indicating that the unit will skip over analog stations and tune to HD Radio stations only Follow the instructions on page 9 to access seek manual and scan tuning While in HD SEEK mode the AUTO STORE menu option will automatically store only HD Radio stations beginning from the lowest frequency Note Multi...

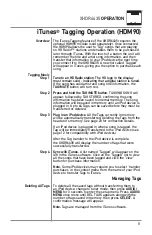
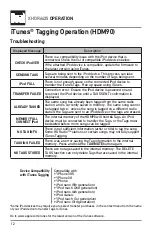
Page 11: ...evice All the Tags currently in memory will be automatically transferred deleting the Tags from the head unit s memory See page 23 for connection details If an iPod device is plugged in when a song is tagged the Tag will be immediately transferred to the iPod device see page 12 for compatibility with iPod devices After the Tag transfer to the iPod device is complete the XHDR6435 will display the n...

Page 12: ... displayed ALREADY TAGGED The same song has already been tagged from the same radio station and is currently saved in memory The same song cannot be tagged twice unless the song is tagged on a different radio station the Tags are sent to an iPod device or the tags are erased MEMORY FULL CONNECT iPod The internal memory of the HDM90 will hold 64 Tags An iPod device must be connected to transfer the...

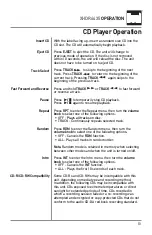
Page 13: ... the volume knob to select one of the following options OFF Plays all tracks on disc TRACK Continuously repeats selected track Press RDM to enter the Random menu then turn the volume knob to select one of the following options OFF Cancels the RDM function ALL Plays all tracks in random order Note Random mode is retained in memory when selecting between other modes and when the unit is turned on of...

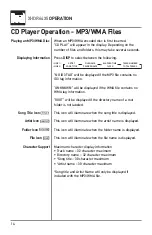
Page 14: ...ormation ROOT will be displayed if the directory name of a root folder is not labeled This icon will illuminate when the song title is displayed This icon will illuminate when the artist name is displayed This icon will illuminate when the folder name is displayed This icon will illuminate when the file name is displayed Maximum character display information Track name 32 character maximum Directo...

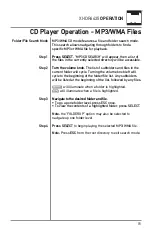
Page 15: ...nd files in the current folder will cycle Turning the volume knob left will cycle to the beginning of the folder file list Any subfolders will be listed at the beginning of the list followed by any files will illuminate when a folder is highlighted will illuminate when a file is highlighted Navigate to the desired folder and file To go up one folder level press ESC once To view the contents of a h...

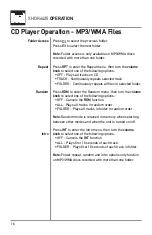
Page 16: ...d folder Press RDM to enter the Random menu then turn the volume knob to select one of the following options OFF Cancels the RDM function ALL Plays all tracks in random order FOLDER Plays all tracks in folder in random order Note Random mode is retained in memory when selecting between other modes and when the unit is turned on off Press INT to enter the Intro menu then turn the volume knob to sel...

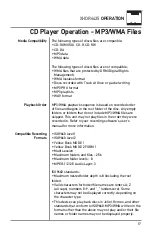
Page 17: ...they were recorded in Refer to your recording software s user s manual for more information ISO9660 level 1 ISO9660 level 2 Yellow Book MODE 1 Yellow Book MODE 2 FORM 1 Multi session Maximum folders and files 256 Maximum folder levels 8 MPEG 1 2 2 5 Audio Layer 3 ISO9660 standards Maximum nested folder depth is 8 including the root folder Valid characters for folder file names are letters A Z all ...

Page 18: ...MP3 WMA extension 8kHz 48kHz 32kHz 48kHz 32kbps 320kbps constant Variable bit rates 32kbps 192kbps constant Variable bit rates Note Some files may not play or be displayed correctly depending on sampling rates and bit rates ID3 tags Version 1 0 to 2 0 For best results use the following settings when burning an MP3 disc 128kbps or higher constant bit rate 44 1kHz or higher sampling frequency For be...

Page 19: ...Press l II again to resume playback Press SELECT to enter the USB file folder search mode USB SEARCH will be displayed A list of all the folders from the USB device will be displayed Note Any files located in the root directory will be located in the folder named ROOT Press SELECT to view the files on the root folder Turn the volume knob to cycle through all the folders on the device and press SEL...

Page 20: ...t one of the following options OFF Plays all tracks on USB device TRACK Continuously repeats selected track FOLDER Continuously repeats all files in selected folder Press RDM to enter the Random menu then turn the volume knob to select one of the following options OFF Cancels the RDM function ALL Plays all tracks in random order FOLDER Plays all tracks in folder in random order Note Random mode is...

Page 21: ...ot folder Any empty folders or folders that do not include MP3 WMA files are skipped Depending on your software the playback order may vary Maximum number of files 48896 Maximum number of folders 127 plus the root directory Maximum number of files in each folder and root 382 Maximum number of folder levels sub folders 8 7 levels plus the root Note If the number of files folders exceeds the maximum...

Page 22: ...ant Variable bit rates 32kbps 192kbps constant Variable bit rates Note Some files may not play or be displayed correctly depending on sampling rates and bit rates ID3 tags Version 1 0 to 2 0 Note If an invalid ID3 tag version is detected NO SUPPORT will scroll on the display Additional MP3 WMA Information Sampling Frequency Rates MP3 WMA Transfer Bit rates MP3 WMA MP3 Tag Display USB Operation MP3...

Page 23: ...SONG TITLE LINE 2 Search Item Menu Navigation Playlist Menu Playlists Songs Artist Menu Artists Albums Songs Album Menu Albums Songs Song Menu Songs Audiobooks Menu Audiobooks Podcast Menu Podcasts See the below table for a list of the search menu navigation options Search Menu Functions step 1 step 2 step 3 Press SELECT once to enter the search mode Turn the volume knob to select between playlist...

Page 24: ...wing options OFF Cancels the INT function ON Plays first 10 seconds of each track Only alphanumeric characters can be displayed ASCII type NO SUPPORT will be displayed if the file contains characters that can not be displayed NO FILE will be displayed if there are no songs in the selected playlist Maximum character display information Song title 32 character maximum Artist name 32 character maximu...

Page 25: ...g from the Bluetooth menu of your mobile device by searching for new devices Please refer to your mobile device instructions for further information on Bluetooth pairing and connections The Bluetooth icon will illuminate solid when connected The BTM60 device name is DUAL_BTM60 The Bluetooth passcode is 1234 Compatibility Due to the differences in Bluetooth technology some mobile devices may be inc...

Page 26: ...the display and a ring tone will be audible from the vehicle speakers See Bluetooth Settings for speaker configurations Note The ring audio level will depend on the mobile device and head unit ring volume and audio settings If the ringer on the mobile device is off you may not hear an incoming ring tone Press on the head unit to receive a call The phone icon in the display will illuminate solid Du...

Page 27: ... current call will be placed on hold and the second call will be active Press again to return to the first call Call Hold During a phone call press to place the current call on hold To resume the phone call press again Menu Function Options Action Bluetooth Mode BL TOOTH ON Enables the BTM60 Bluetooth Interface Module The Bluetooth icon will flash every 10 seconds BL TOOTH OFF Disables Bluetooth s...

Page 28: ...ling streaming audio from a compatible mobile device begin playing music using the music player on your mobile device Once the music is playing the following functions can be used to control music The llbutton will skip to the next available audio track The nnbutton will skip to the previous audio track The l II button will toggle between play and pause during playback The button will stop the aud...

Page 29: ...g sleeve and backstrap support Physical defect in media CD CD R or CD RW Check media for scratches ERROR 01 appears on display Disc read error Press EJECT or RESET ERROR 02 appears on display Focus error or disc is in upside down Press EJECT or RESET PROTECT appears on display The WMA file is copy protected by DRM Digital Rights Management Write disc using WMA files that are not copy protected NO ...

Page 30: ...ct Specific license conditions and copyright notices for the software can be found via www dualav com What to do 1 Before you call for service check the troubleshooting guide in your owner s manual A slight adjustment of any custom controls may save you a service call 2 If you require service during the warranty period you must carefully pack the product preferably in the original package and ship...

Page 31: ...and can radiate radio frequency energy and if not installed and used in accordance with the instructions may cause harmful interference to radio communications However there is no guarantee that interference will not occur in a particular installation If this equipment does cause harmful interference to radio or television reception which can be determined by turning the equipment off and on the u...

Page 32: ...s compliance with safety and regulatory standards The Bluetooth word mark and logos are owned by the Bluetooth SIG Inc and any use of such marks by Namsung is under license HD Radio and the HD and HD Radio Ready logos are proprietary trademarks of iBiquity Digital Corporation Other trademarks and trade names are those of their respective owners NSA0410 V01 Frequency response 10Hz 20kHz Channel sep...

Reviews: