background image

1st

2nd

3rd

1st

2nd

1st

2nd

1st

2nd

3rd

1st

2nd

3rd

1st

2nd

1st

2nd

1st

2nd

3rd

CLICK

LOCK

CLICK

LOCK

9

8

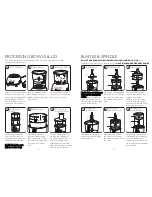
BLADES & SPINDLE

Do noT UsE blaDEs for lonGEr Than 45 sEconDs aT a TimE

.

Allow 

processer to cool if you go over the max run time.

CAUTION, BLADES ARE VERY SHARP.

PROCESSING BOWLS & LID

You will always need to use the large bowl first, no matter what other bowls and 
attachments you wish to use.

Before you assemble the food
processor, ensure that the
power cord is unplugged, and
placed facing you on a dry, 
level surface. Push down on 
the body to secure firmly.

CLICK

LOCK

Place the large bowl onto
the main body, with the 
handle pointing to the right 
(four o’clock).

Hold the handle and turn it
clockwise until you hear and
feel it lock in to place.

1

2

3

POSITION BODY

LARGE BOWL

LOCK LARGE BOWL

CLICK

LOCK

1

ADDITIONAL
BOWLS

When using the medium
bowl, insert this into the
large bowl. When using the
small bowl insert this into
the medium bowl.
Small bowl must be used
with the medium bowl.

CLICK

LOCK

2

ALIGN BOWLS

The medium bowl will 
self-locate into the large
bowl. The groove on the
small bowl must allign with
the pip on the medium
bowl.

CLICK

LOCK

3

ATTACH LID &
LOCK INTO PLACE

To attach the lid, place it on
the large bowl aligning to 
the slots on the bowl rim. To
lock, hold the large bowl
handle, and with your other
hand, hold the base of the feed
tube and rotate clockwise.

Handle blades and attachment
using only the central plastic
section. The large chopping
blade locates directly onto 
the bowl drive, once the large
bowl is locked in place.

1st

2nd

3rd

1st

2nd

1st

2nd

1st

2nd

3rd

The medium chopping blade
also locates directly onto the
bowl drive, once both large
and medium bowls are in
place.

The small chopping blade
needs to be used with the 
spindle. This must be 
attached to the bowl drive 
once the large and medium
bowls are in place, and before
locating the small bowl.

1

2

3

LARGE BLADE

MEDIUM BLADE

SMALL BLADE

1st

2nd

3rd

1st

2nd

1st

2nd

1st

2nd

3rd

1

SPINDLE IN 
LARGE BOWL

The spindle locates on to
the bowl drive on the large
processing bowl.

1st

2nd

3rd

1st

2nd

1st

2nd

1st

2nd

3rd

2

SPINDLE IN 
MEDIUM BOWL

When using the medium
bowl, place it in the large
bowl then the spindle on the
bowl drive.

1st

2nd

3rd

1st

2nd

1st

2nd

1st

2nd

3rd

3

SPINDLE IN 
SMALL BOWL

When using the small bowl
with blade, place in the large
bowl with medium bowl,
spindle in position, then place
the small bowl and small blade
on the spindle.

Summary of Contents for XL1500

Page 1: ...XL1500 Food Processor Instruction Manual Guarantee DON T FORGET TO REGISTER YOUR FOOD PROCESSOR WWW DUALIT COM REGISTER OR BY POST...

Page 2: ...t stated on the bottom of the power base Use this product with rated voltage A C outlet only Unplug the unit when not in use before fitting or removing parts and before cleaning To unplug it hold the...

Page 3: ...uld be ASTA approved to BS1362 Do not operate the appliance with a damaged cord or plug or after appliance malfunctions or is dropped or damaged in any manner Return appliance to the nearest Authorize...

Page 4: ...ps minces blends and mixes in a matter of seconds Medium bowl Use this as a secondary bowl This is also the best bowl when using slightly smaller quantities Large bowl Use this bowl for all liquids it...

Page 5: ...must allign with the pip on the medium bowl CLICK LOCK 3 ATTACH LID LOCK INTO PLACE To attach the lid place it on the large bowl aligning to the slots on the bowl rim To lock hold the large bowl hand...

Page 6: ...c hub to avoid injury OR 2 LOCK ON SPINDLE Place the reversible shredding disc on the spindle and push down firmly to locate VARIABLE SLICING JULIENNE DISC TakE caUTion as blaDEs arE sharp Do not USE...

Page 7: ...ients before adding any liquids NOTE DO NOT USE DISCS FOR LONGER THAN 45 SECONDS AT A TIME Allow processer to cool if you go over the max run time E DISC DOUGH BLADE Do not USE DiSCS with AUto pULSE T...

Page 8: ...tachments NOTE DO NOT USE BLADES FOR LONGER THAN 45 SECONDS AT A TIME Allow processer to cool if you go over the max run time Cut large items in to evenly sized 2cm chunks Add food items to be chopped...

Page 9: ...hilst in storage This can damage the safety mechanism built into the bowl NOTE Always wait for the processing blade to stop moving completely before removing the lid Warning Use extreme caution as bla...

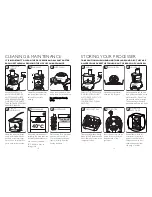
Page 10: ...helf 2 3 CLEAN DRY UNLOCK LID CLEANING MAINTENANCE IT IS ImPORTANT TO CLEAN THE PROCESSOR AND ALL PARTS AFTER EACH USE THIS WILL PROLONG THE LIFE OFYOUR APPLIANCE ALWAYS SWITCH OFF AND UNPLUG BEFORE A...

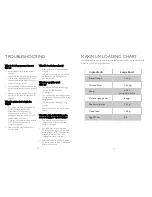
Page 11: ...itch to OFF unplug and allow the unit to cool for approximately one hour Once cool the overheat safety feature will reset and you can carry on using the processor Check the lid or large bowl has not b...

Page 12: ...tee you should Send the product postage or carriage paid to the dealer from whom it was purchased or to Dualit direct Ensure that the product is clean and packed carefully preferably in its original c...

Page 13: ......

Reviews: