background image

 7

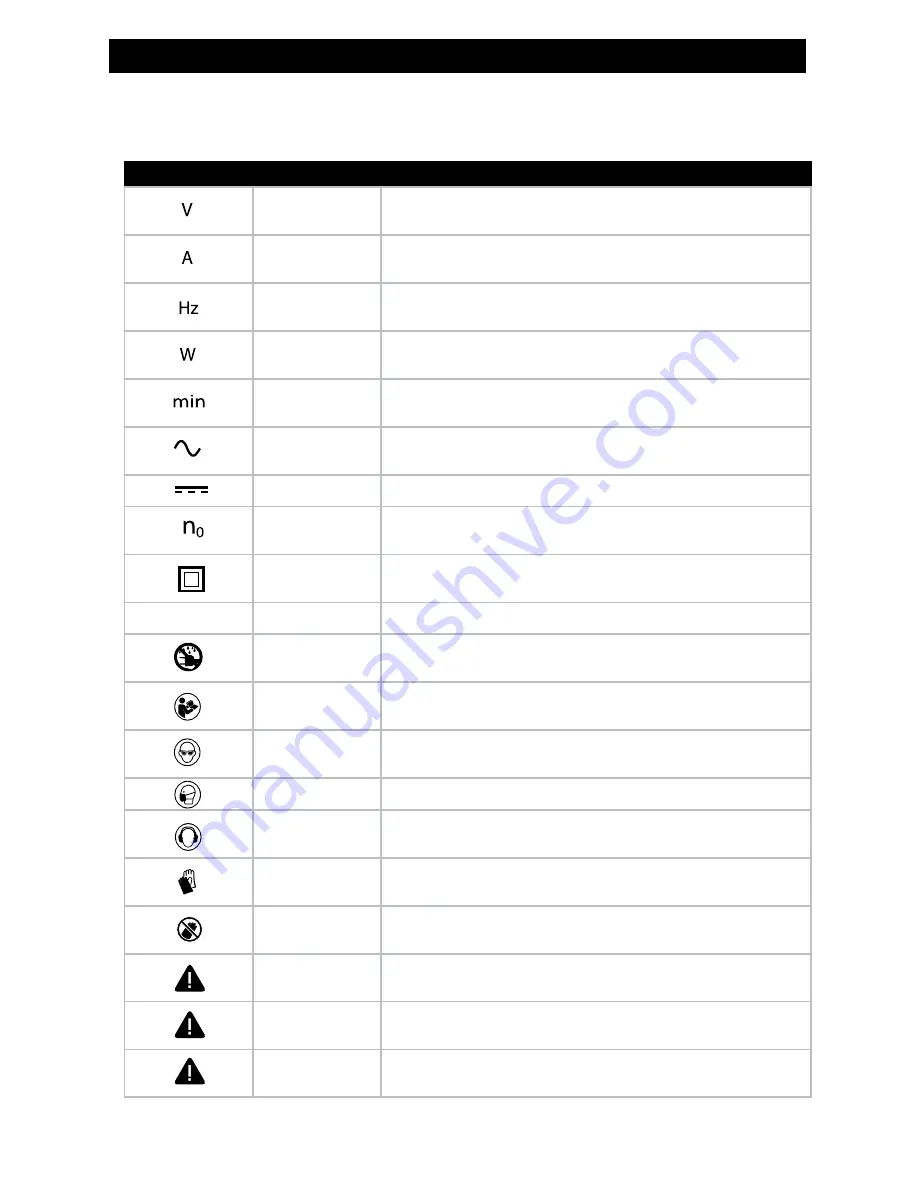
SYMBOLS

Some of the following symbols may be used on this tool. Proper interpretation of 

these symbols will allow you to operate the tool better and safer.

SYMBOL

NAME

DESIGNATION/EXPLANATION

Volts 

Voltage

Amperes 

Current

Hertz 

Frequency

Watt 

Power

Minutes 

Time

Alternating 
Current

Type of Current

Direct Current

Type of Current

No Load  
Speed

Rotational speed at no load

Class II 
Construction

Double‑insulated construction

RPM

Per Minute

Revolutions per minute 

Wet Conditions 
Alert

Do not expose to rain or use in damp areas.

Read User 
Manual

To reduce the risk of injury, user must read and understand 
user’s manual before using the product.

Eye Protection

Always wear safety goggles or safety glasses with side 
shields.

Face Mask

Wear full‑face mask when operating this product.

Ear Protection

To protect your ears from noise, always wear ear 
protectors or ear plugs.

Gloves 

Always wear gloves when operating this product.

No Hands 
Symbol

Failure to keep your hands away from the rotating pads 
may result in serious injury.

Danger

Indicates an immediate hazardous situation. Must avoid to 
prevent death or serious injury.

Warning

Indicates a potentially hazardous situation, which, if not 
avoided  may result in serious injury.

Caution

Indicates a potentially hazardous situation, which, if not 
avoided  may result in minor injury.

Summary of Contents for PS7000

Page 1: ...SAVE THIS MANUAL FOR FUTURE REFERENCE PS 7000 OWNERS MANUAL WARNING Read understand and follow all safety rules and operating instructions in this manual before using this product ...

Page 2: ...o our Authorized Service Center You can obtain the location of the Center by calling 1 888 760 4405 When you request warranty service you also must present proof of purchase documentation which includes the date of purchase sales receipt We will repair any faulty workmanship and either repair or replace any defective part at our option We will do so without any charge to you We will complete the w...

Page 3: ...his product Failure to follow all rules and instructions listed below may result in electric shock fire and or serious personal injury Save all warnings and instructions for future reference SAVE THESE INSTRUCTIONS W O R K A R E A Always keep your work area clean and well lit Cluttered benches and dark areas invite accidents Do not operate power tools in explosive atmospheres such as in the presen...

Page 4: ...ectric shock If operating the power tool in damp locations is unavoidable a Ground Fault Circuit Interrupter must be used to supply the power to your tool Use electrician s rubber gloves and footwear to further enhance your personal safety in damp conditions Do not abuse the cord Never use the cord to carry the tool or to pull the plug Keep cord away from heat oil sharp edges or moving parts Conta...

Page 5: ...at or hearing protection must be used for appropriate conditions TOOL USE AND CARE Always use clamps or other practical ways to secure and support the workpiece to a stable platform Holding the material in your hand or against your body is dangerous and may lead to loss of control Hold the tool firmly to prevent loss of control Do not force tool Use the correct tool for your application The correc...

Page 6: ...sonnel Service or maintenance performed by unqualified personnel could result in a risk of injury Contact Customer Service for information for repairs When servicing a tool always use only identical replacement parts Follow instructions in the maintenance section of this manual Use of unauthorized parts or failure to follow maintenance instructions may create a risk of electric shock or injury Cer...

Page 7: ... Service KICKBACK AND RELATED WARNINGS Kickback is a sudden reaction to a pinched or snagged rotating wheel backing pad brush or any other accessory Pinching or snagging causes rapid stalling of the rotating accessory which in turn causes the uncontrolled power tool to be forced in the direction opposite of the accessory s rotation at the point of the binding Kickback is the result of power tool m...

Page 8: ...risk of injury user must read and understand user s manual before using the product Eye Protection Always wear safety goggles or safety glasses with side shields Face Mask Wear full face mask when operating this product Ear Protection To protect your ears from noise always wear ear protectors or ear plugs Gloves Always wear gloves when operating this product No Hands Symbol Failure to keep your ha...

Page 9: ...rol dial trigger switch lock on button KNOW YOUR PS7000 POLISHER SANDER Before attempting to use this tool familiarize yourself with all operating features and safety rules Your PS7000 comes with one 60 grit sanding disc set The dual rotating pads provide control to ensure precision polishing or sanding Adjust the variable speed control knob for low speed 1 2 polishing or sanding Increase the spee...

Page 10: ...d control knob 1000 3700 rpm provides slow speeds for waxing polishing and high speeds for sanding applications Tr i g g e r S w i t c h The pressure switch in the handle turns the saw ON and OFF To turn your PS7000 ON depress switch trigger Release switch trigger to turn the tool OFF L o c k O n B u t t o n The PS7000 is equipped with a lock on feature which is convenient when continuous polishin...

Page 11: ...anual ASSEMBLY WARNING The operation of any power tool can result in foreign objects flying into your eyes Always wear safety goggles safety glasses with side shields or a full face mask as appropriate WARNING If any parts are missing or damaged do not operate the PS7000 until missing parts are replaced Failure to do so could result in serious personal injury Do not attempt to modify the PS7000 or...

Page 12: ...OOLS electric motor It should be connected to a power supply that is 120 volts 60 Hz AC only normal household current A voltage drop of more than 10 percent will cause a loss of power and the motor will overheat If your PS7000 Polisher Sander does not operate when plugged into the outlet check the power supply Do not operate the PS7000 on direct current DC TURNING THE POLISHER SANDER ON OFF To tur...

Page 13: ...to remove scratches left by the coarser grit and finer grit used for finishing of the surface Always use the proper grit sanding disc and not extra pressure when sanding Continue sanding with each grit until surface is uniform To i n s t a l l a s a n d i n g d i s c The sanding disc consists of two pieces a 5 inner disc and a 7 outer disc The reverse side of each sanding disc has a standard hook ...

Page 14: ... any surface The soft lamb s wool polishing bonnet provides smooth controlled polishing and buffing The dual counter rotating pads virtually eliminates marring and swirl marks from traditional orbital waxers 1 Unplug the PS7000 2 Place the PS7000 so the mounting surface is facing up 3 Center and place the 5 wax applicator or bonnet on the inner pad 4 Place the 7 wax applicator or bonnet on the out...

Page 15: ...ht SANDING Always secure the piece you will be sanding to prevent it from moving Secure small workpieces in a vise or use clamps to secure them to a workbench WARNING Unsecured work could be thrown towards the operator causing injury To s a n d 1 Hold the PS7000 in front and away from you keeping it clear of the workpiece 2 Press the switch trigger to start the sander Adjust the sanding speed to t...

Page 16: ...lishes should be buffed while damp where others must be allowed to dry To a p p l y w a x p o l i s h 1 Hold the PS7000 in front and away from you keeping it clear of the workpiece 2 Put wax polish either directly on the surface or on the applicator pad according to the wax manufacturer s directions 3 Start the tool at low speed and apply the wax polish evenly with a long sweeping motion back and ...

Page 17: ...ually lower the PS7000 against the work surface 4 Polish with a long sweeping motion back and forth Do not hold the polisher in one spot or use a circular or spiral pattern Always start polishing at the top or highest point and work down This will prevent light dust or polish film from being thrown upon a completed section Also it eliminates pulling the tool s power cord over sections already poli...

Page 18: ...on repairs When servicing a tool always use only identical replacement parts Use of unauthorized parts or failure to follow maintenance instructions may create a risk of electric shock or injury Use a clean cloth to remove dirt dust etc Avoid using solvents when cleaning plastic parts Most plastics are susceptible to damage from various types of commercial solvents and may be damaged by their use ...

Page 19: ...18 PARTS LIST ...

Page 20: ...king gland 1 20 ball bearing 6005 2Z 1 21 gear A 1 22 ball bearing 6001 2Z 1 23 spindle 1 24 washer 2 25 gear B 1 26 cross recessed countersunk head screw M4x6 3 27 bearing clamp 1 28 ball bearing 608 2RS 1 29 gear case 1 30 tapping screw ST4 2x32 4 No Description Qty 31 cap 1 32 pinion 1 33 ball bearing 6000 2Z 1 34 O ring 25 2 1 35 Intermediate cover 1 36 armature 1 37 ball bearing 607 2Z 1 38 b...

Page 21: ...stomerservice infusionbrands com The model and serial number of this saw will be found on the bottom of the PS7000 housing on the product information decal Please record the model number and serial number in the space provided below When calling customer service always give the following information Model Number PS7000 Serial Number ______________ Infusion Brands Inc P O Box 17840 Clearwater Flori...

Page 22: ...facts For more information and to see the Dualsaw in action go to The DUALSAW range of revolutionary tools boast unique and patented dual blade technology setting new standards in power cutting tools worldwide The DUALSAW range of tools also includes counter rotating circular saw blade technology allowing you to cut virtually any material without changing blades MOTOR POWER 4 5A 550W VOLTAGE 120V ...

Reviews: