background image

24

ENGLISH

L2000012  Installation guide for DucoBox Eco (Revision E.1  |  13.05.2020)

10.B 

Settings for the occupant

The following settings can be adjusted by the occupant:

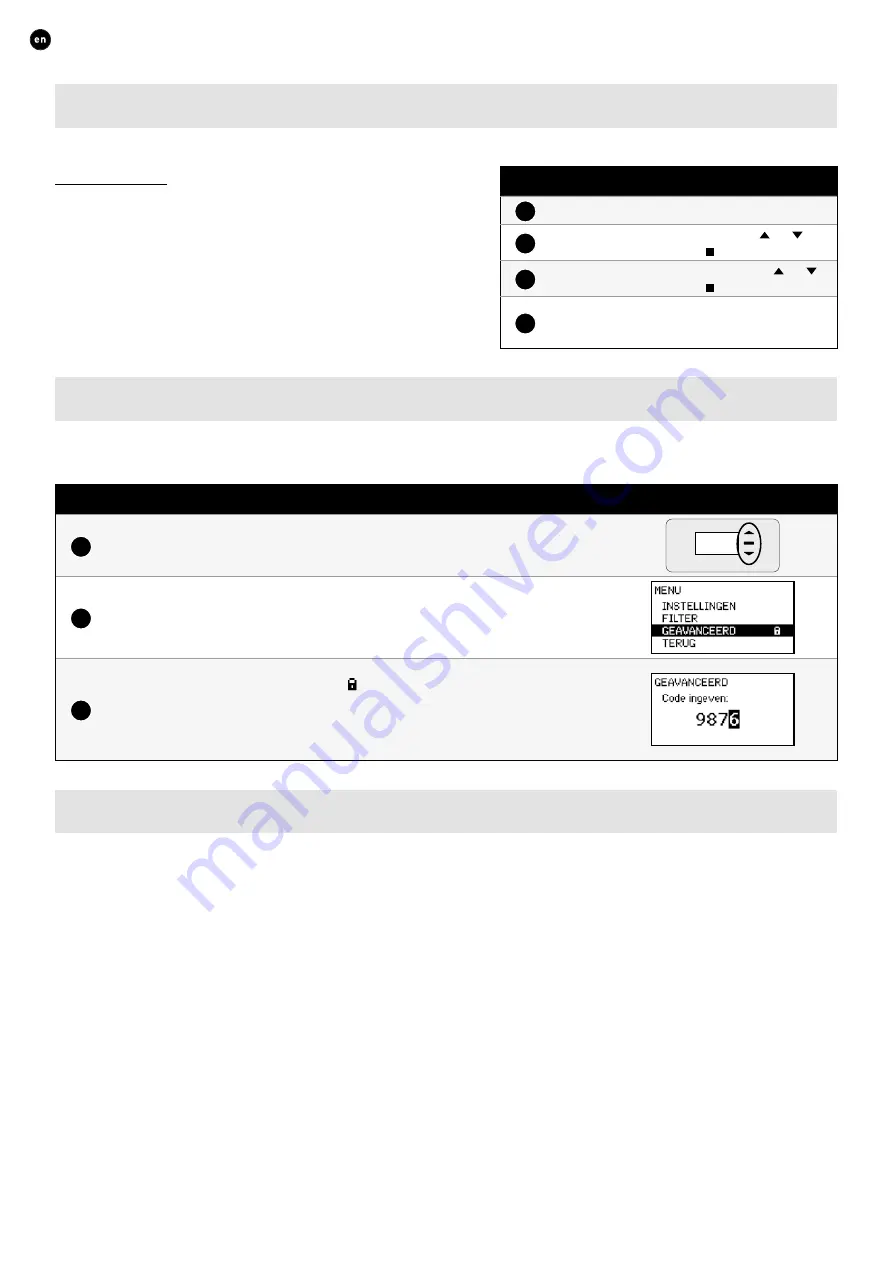
Date & time

The date & time will be set correctly during the initial installation 

which will have been carried out by the installer� Every DucoBox Eco 

will remember the date and time for a number of hours after a power 

cut� If the date and time have nevertheless been set incorrectly, they 

can be corrected manually via the menu�

The date and time will synchronise automatically if the DucoBox Eco 

is connected to a computer network with internet access� If this is not 

the case, the date and time can be set by the following method�

Setting date & time

1

Go to 

SETTINGS

 → 

DATE & TIME

2

Change the hours by pressing the   or   

button and press 

enter

 ( ) to confirm�

3

Change the minutes by pressing the   or   

button and press 

enter

 ( ) to confirm�

4

Change the day, month, year and time zone 

in the same way� Date and time are now set 

correctly�

10.C 

Advanced settings

Gaining access to menus intended for installers only requires advanced mode to be activated� When advanced mode is active, addi-

tional items will appear on the menu, which enable the unit to be put into operation�

Activate advanced mode

1

Press any button at random on the DucoBox Eco display�

2

Scroll down to 

ADVANCED

� The padlock next to the menu indicates that advanced 

mode is locked� Press enter

3

Enter the installer’s code 

9876

 and press enter, additional components will now 

be available on the menu� The padlock ( ) on the display menu indicates that 

advanced mode is active�

The menu will exit advanced mode after 30 minutes of inactivity or after restarting 

the DucoBox Eco� Advanced mode can also be closed down manually using the 

CLOSE ADVANCED

 menu command�

10.D 

Info

The info menu contains all manner of parameters that can be read off on demand by the Duco service team�

Summary of Contents for DucoBox Eco

Page 1: ...1 ENGLISH L2000012 Installation guide for DucoBox Eco Revision E 1 13 05 2020 Installation guide ENGLISH DucoBox Eco Step by step instructions duco tv L2000012 Revision E 1 13 05 2020 ...

Page 2: ...librating flow rates 21 08 C Checking flow rates and power 21 09 Water side calibration 22 09 A Venting the circuit 22 09 B Setting flow rate 22 10 Display menu 23 10 A Display overview and operation 23 10 B Settings for the occupant 24 10 C Advanced settings 24 10 D Info 24 11 Settings for CH and DHW 25 11 A Operating modes for CH and DHW 25 11 B Settings for CH operating modes 26 11 C Settings f...

Page 3: ...System make up The DucoBox Eco is a component the ventilation heat pump in a total ventilation heating and domestic hot water concept Apart from the DucoBox Eco the system consists of the following components Air side Water side Ducting systems to draw in outdoor air Ducting systems to exhaust mixed air outdoors Ducting systems to extract stale indoor air to the unit Inlet grilles Sensors Exhaust ...

Page 4: ...18 Status Date Status A1021576 mm dm m kg m mm Handelsstraat 19 8630 VEURNE tel 0032 58 330033 fax 0032 58 330044 email info duco eu www duco eu This drawing is property of Vero Duco NV and can not be copied neither shown to third party externally without written permission 108331320 2 0 000 Drawing Number Volume Coat Surf Weight Outline A1021576 Format A2 Production Number Mat Draftsman ASE Tol S...

Page 5: ...egative pressure in the home can be reduced by making sure that win dow ventilators are always adequately open It is recommended that you take out a maintenance contract to ensure the unit is regularly inspected and cleaned The device must be fitted in a touch safe man ner This means among other things that under normal circumstances no one can reach moving or electrically live parts of the fan th...

Page 6: ... Description Status mm dm m kg m mm Handelsstraat 19 8630 VEURNE tel 0032 58 330033 fax 0032 58 330044 email info duco eu www duco eu This drawing is property of Vero Duco NV and can not be copied neither shown to third party externally without written permission 0 000 0 000 Volume Coat Surf Weight Outline A10215 Format A3 Productio Mat Draftsman Tol Scale 0 1 DucoBox Eco Date 28 1 Afvoerkanaal na...

Page 7: ... of al lowing the Duco ventilation systems to communicate via ModBus and or ethernet ModBus integration enables them to be linked to a building management system Linking the Duco Ventilation App A Wi Fi router can be connected to the ethernet port on the Communication Print in order to link the Duco Ventilation App to the DucoBox Eco The app can then be paired with the Wi Fi network ModBus Etherne...

Page 8: ...attery powered component hop point Please refer to information sheet RF communication L8000018 at www duco eu for further information Duco RF Power supply 230 VAC Wiring 1 5 mm Frequency 868 3 MHz Maximum distance 350 m free field less through obstacles Maximum number of components Up to 25 wireless components in a single system 04 D Wired cabled communication Wired components can be daisy chained...

Page 9: ...Please refer to information sheet L8000003 ModBus at www duco eu for more information 04 F Removing printed circuit board housing The housing on top of the DucoBox needs to be released in order to connect cables to the printed circuit board Follow the steps set out below to do so Use a screwdriver to press the lips in at the position shown and slide the cover forwards by around 1 cm 1 Lift the cov...

Page 10: ...ake side of the supply EHA ETA1 ETA2 ODA installation tips DucoBox Energy en 64 mm 0000 4376 Use at least 1 m of flexible or rigid silencer Rigid low emission from housing Flex low noise from duct 12 Choose a double walled insulated roof vent with low resistance 9 Provide a drip moulding if the outlet EHA is through the wall 3 Secure linked ducts airtight using tape hose clamps tie wraps or use a ...

Page 11: ...rizontally to the wall ensure it is hanging level when doing so Ensure at the same time that the screws and plugs are suitable for the substrate and the weight of the unit 95 kg screws and plugs not included in the supply 4 Slide the cardboard packaging off the unit The cardboard be can removed from under the unit once it has been hung 1 Screw the automatic vent and the levelling feet onto the uni...

Page 12: ...me Description Format A Mat Tol Hook the unit onto the hanger bracket with two people Use the garb handles in the cardboard at the bottom of the unit 5 Remove the cardboard from the bottom of the unit 6 284 658 Adjust the rubber feet under the unit so it hangs level against the wall This will ensure that conden sate drains off properly 7 Slide the cardboard packaging off the unit The cardboard be ...

Page 13: ...ly When using a standard trap connection a water seal of at least 80 mm must be provided It also requires to be filled with water before start up This is to prevent an air leak from occurring preventing drain smells in the ventilation and to obtain a water seal Iteration Rev Date Name Description mm Handelsstraat 19 8630 VEURNE tel 0032 58 330033 fax 0032 58 330044 email info duco eu www duco eu T...

Page 14: ...nt cover and the green printed circuit board housing back onto the DucoBox Eco 6 23 May 18 Status Date Status 1 Zone Fit the valve for zone 1 on the left hand side of the unit Connect it to the IN connector with the cable provided 4 2 Zone Remove the front cover by unscre wing the 4 Allen bolts Use an Allen key not included for this 2 Iteration Rev Date 2 Zone With a 2 zone system fit the valve fo...

Page 15: ...xpansion vessel on the cold side of the water section in order to accommodate rising pressure in the system Its size will depend on the water capacity of the system 05 H Connecting air ducts Choosing air ducts Flow rate and maximum air velocity are defining factors in choosing the right ducting in order to avoid generating any extra intrusive noise and pressure drop ETA duct diameter Follow the gu...

Page 16: ...it ZONE 1 160 mm ETA 2 Extract Air Supply air from the house to the unit ZONE 2 160 mm OUTDOORS HOUSE ODA EHA ETA1 ETA2 05 I Vents You should preferably use Duco vents DucoVent Basic or DucoVent Design See the technical data sheet or fitting instructions for the DucoVent Basic or Design for details It is best to bear a few rules in mind when fitting vents It is preferable not to fit a vent right n...

Page 17: ...teps you can proceed with the following steps in order to complete the installation Set system type in accordance with the chosen concept via SETTINGS SYSTEM TYPE Pairing control components to the DucoBox Eco DucoBox Eco air side calibration DucoBox Eco water side calibration Recommended Settings for CH and DHW The DucoBox Eco will be ready for use after that IMPORTANT In order to avoid contaminat...

Page 18: ...em I e DucoBox Eco with 1 zone All components DucoBox Eco with 2 zones Any components that are applicable to the complete system such as a DucoBox Eco Boiler Control a User controller for both zones master control and a Duco Weather Station Short tap on a random key on all components to be paired The LED on the com ponent will start flashing green once it has been paired correctly The number of pa...

Page 19: ... latter will take on all settings connections in the network 1x NEW 3 Deactivate Installer mode by pressing the 4 buttons on a paired control simultaneously or using the palm of your hand on a control featuring touch buttons The LED will turn white 07 C Tips The network can be wiped or a full reset of the DucoBox Eco can be carried out in the event of any problems To do this refer to the following...

Page 20: ...be set depending on the situation in accordance with the table below SITUATION 1 One vent per zone SITUATION 2 Multiple vents per zone with equal flow rates SITUATION 3 Multiple vents per valve with different flow rates Set all vents to the fully open position regardless of the desired flow rate When using DucoVent Design exhaust vents leave the ou ter ring in place for acoustic effect Set all ven...

Page 21: ...is can also be done by pressing the lower and higher buttons on a paired user controller Adjust the flow rate so as to obtain the desired flow rate at this vent The flow rate can be fine adjusted at the vent NOTE The system needs around ten seconds to run stably when adjusting the flow rate using the buttons on the DucoBox Eco User controller or making large changes at the vent The flow rate canno...

Page 22: ...BRATION WATER CIRCUIT CIRCUIT VENTING and press enter 4 Take care to ensure that pipe pressure remains con stant while venting 5 Open the tap for the incoming cold circulating water connection RET again after 1 minute 6 Wait until the venting procedure has finished 7 Repeat the procedure if necessary Iteration Rev Date Name Description kg m mm Handelsstraat 19 8630 VEURNE tel 0032 58 330033 fax 00...

Page 23: ... has not been used in the normal operating mode it will be deac tivated after 1 minute Press any button at random on the display in order to reactivate it Press any button at random again to retrieve the menu up enter down Main screen The display will light up continuously when the DucoBox Eco starts up until calibration has been completed The following main screen will be visible after that Time ...

Page 24: ...ssing the or button and press enter to confirm 4 Change the day month year and time zone in the same way Date and time are now set correctly 10 C Advanced settings Gaining access to menus intended for installers only requires advanced mode to be activated When advanced mode is active addi tional items will appear on the menu which enable the unit to be put into operation Activate advanced mode 1 P...

Page 25: ...ting temperature can be limited by a mixing valve before the CH circuit Please contact your installer for more information This is useful for DHW 80 C max whenever a high draw demand is expected many hot showers in succession for example The DucoBox Eco will activate AUTO automatically after 8 hours unless the user him herself activates a diffe rent mode OFF The setpoint temperature will be set pe...

Page 26: ... times For more energy effi cient measurement however Duco recommends setting a lower setpoint temperature for an outdoor temperature of 20 C These values are set to 40 C and 25 C in the example opposite The best values however are dependent on the type of system the home the delivery system and the occupant s wishes The heating curve can be altered via the Display Menu SETTINGS CENTRAL HEA TING H...

Page 27: ... Mon Fri compared with Sat Sun WORKWEEK WEEKEND Adjusting the timer program 1 Go to SETTINGS DOMESTIC HOT WATER PRO GRAMME MODE 2 Select the mode WORKWEEK WEEKEND or EVERY DAY 3 Go to the period for which you want to set time points PROGRAMME if Everyday has been chosen WORKWEEK or WEEKEND 4 Select ADD to insert a new time point up to 8 into the program 5 Set the desired time and ventilation level...

Page 28: ...o service team BOX SENSORS Menu not in use ERROR LOG for information Overview of fault codes that can be reported to the Duco service team SOFTWARE VERSION for information In any communication with Duco you may be asked to state the software version of your unit Please keep this number to hand for any communication SOFTWARE UPLOAD Update function for the Duco service team SERVICE CODE for informat...

Page 29: ...avoid damage and or wear Please refer to the maintenance instructions at www duco eu for more information Visit duco tv too for step by step instruction videos By the user Item What Period Action Vents grilles Check for contamination 6 months Clean the vents Unit Check for abnormal noises 1 year Inform the installer By the installer Item What Period Action Unit Check for abnormal noises 1 year Che...

Page 30: ...essed air or use a vacuum cleaner to remove dust or dirt Take care not to dama ge the fins Fit everything back into the unit in reverse order Condensate drain Switch the unit off and isolate it from the power supply Remove the control unit with integral user controls Unscrew the front plate are take it off the unit Check whether there is any water left in the condensate drain If you have used a st...

Page 31: ...ucts seller Keep the serial number of your product to hand The serial number is on the sticker at the top of the DucoBox Eco 14 Warranty All warranty conditions concerning the DucoBox and Duco s ventilation systems can be found on the Duco website All complaints are to be reported to Duco by the Duco distributor with a clear description and the order invoice number under which the products were de...

Page 32: ...32 ENGLISH L2000012 Installation guide for DucoBox Eco Revision E 1 13 05 2020 Installed by L2000012 Document last modified on 13 05 2020 revision E 1 ...

Reviews: