background image

AEROCASCO

Normal warranty does not cover repairs of damages 
caused by the user or a third party. As costs of such 
repairs can be considerable, Dudek Paragliders offer an 
AeroCasco insurance. It covers a one-off repair of any 
mechanical damage, no matter how big and whoever 
inflicted them.The only expenses the purchaser has to 
pay are shipping costs and so-called share-of-cost 
amount.

AeroCasco can be purchased only for a brand new 
paraglider (at the paraglider purchase). Its cost is 50 euro.

NOTE: AeroCasco is not available for all paragliders (check this before 
purchase). It can be obtained for privately used wings only.

AeroCasco applies only to damages that took place during take-off, flight or 
landing. Obviously, all faults in the material and manufacturing flaws are 
covered by normal warranty.

When handing the paraglider for the repair you have to present a card 
confirming its AeroCasco status. After the repair you will have to cover only 
the share-of-cost value of 50 euro.

AeroCasco is valid for one repair only.There is a possibility to extend 
AeroCasco for one more year. To do this you have to send your paraglider 
for inspection not later than a year after the date of purchase. Extension fee 
is 75 euro (incl. inspection).

Remember to attach the AeroCasco confirmation on expedition.

AeroCasco does not apply to any of the following: theft, colour fading, 
damage caused by incorrect storage or transport, damage caused by 
chemicals, salt water and force majeure.

22

Summary of Contents for Orca XX

Page 1: ......

Page 2: ...Trailing edge Cell Leading edge Riser Main lines Stabiliser NOTE Please read this manual before your first flight ...

Page 3: ...G WINCHING AND MOTOPARAGLIDING AEROBATICS 6 Rapid descents 13 BIG EARS SPIRAL B STALL 7 Extreme flying manoeuvres 14 SIDE COLLAPSE SPIN AND FULL STALL WING OVER FRONTAL COLLAPSE LINE OVER CRAVATTE DEEP STALL EMERGENCY STEERING 8 Canopy care 17 FOLDING AND STORAGE CLEANING REPAIRS DETERIORATION A FEW TIPS 9 Technical data 19 10 Warranty AeroCasco 20 11 What have you bought 22 12 Rigging scheme 23 1...

Page 4: ...quirements of the EN 926 1 and 926 2 regulations Any alterations to the paraglider will render its certification invalid CONGRATULATIONS We are pleased to welcome you among the constantly growing number of Dudek Paragliders pilots You ve become a proud owner of state of the art paraglider designed according to recent world trends Extensive development application of the most modern methods and tho...

Page 5: ... of passive safety performance and steering for this class The aerofoil used in Orca XX has Shark nose intakes they help to internal pressure of the canopy stays stable within wide speed range Inner reinforcements structural cores and mini ribs perfectly shape and stabilize the aerofoil Mini ribs on the trailing edge keep it slim and decrease ballooning radically improving the airflow Rigging has ...

Page 6: ...laced on the lower surface close to the leading edge placed so that max pressure point remains in the area at possibly many states of flight They are designed and executed in Shark nose technology meaning specific concave shape of the reinforced profile area at its leading edge the name comes form the very shape reminding shark s nose Due to such shape the intakes can be smaller and moved a bit ba...

Page 7: ...n Poland under strict supervision of the designer himself thus ensuring highest European quality CLOTH Orca XX is built with the best available cloth guaranteeing good durability with as low as possible weight For that reason we have chosen textiles of Porcher company for years developing most modern paragliding materials The leading edge on the upper surface is made of Porcher Skytex Universal 2 ...

Page 8: ...n from the outer suspension points to the maillons through consecutive cascades as well The same story goes for the steering lines They run from the trailing edge through several layers to the main steering lines which are lead through the pulleys connected to the rear risers and then fixed to the brake handles Steering lines do not carry any load Some of the steering lines of the upper level are ...

Page 9: ...ith adjustable loop size 3 Trimmers Trimmer system consists of a trim shackles sewn into C and D risers and red regulation strap going through the shackles and fixed to risers with rectangular connector link We have 3 main positions of the trimmers full closed slowest speed minimum sink neutral 0 best take off position fully released increased speed and sink During normal flight at neutral positio...

Page 10: ...ith your thumb and thus allow the trim to move up By releasing the trimmers you increase the airspeed Such configuration is especially needed when flying against strong headwind or seeking next thermal Orca XX stays calm even at completely released trimmers and full speed Whenever you do adjust trim settings always remember to do it symmetrically 4 Harnesses and spreader bars When flying an Orca X...

Page 11: ...ith care especially the leading edge should stay taut and even all lines and risers should be separated Make sure they are not tangled and pay special attention to the A lines which should run free from the A golden band and A risers blue band to the canopy it is equally important to untangle the brake lines so that they will not catch anything on the ground during launch They must be firmly attac...

Page 12: ...nd keep the canopy straight above you Possible side drift is corrected best by moving yourself under the canopy as long as the launch space permits In order to keep the wing in the air the suspension lines must stay taut all the time so in light winds you will have to run forward With stronger winds you can control the wing while standing still When leaving the ground apply some brakes then releas...

Page 13: ...ft increases efficiency and the outboard wing s resistance to collapse in turbulence the edge of a thermal etc In case of necessary turn in confined area at slow speed e g slope soaring it is recommended to steer the decelerated canopy by loosening the brake at the outside of the turn while applying a little more brake on the inside NOTE when entering a turbulent area you should brake a little jus...

Page 14: ...lue to deflate the canopy after landing Using the brakes will probably result in pilot and passenger being lifted and dragged backwards The final glide of the landing approach should be straight and smooth Steep or alternating turns can result in a dangerous pendulum effect near the ground WINCHING AND MOTOPARAGLIDING During tests numerous flights were made with winch start and backpack power unit...

Page 15: ...lock with substantial altitude margin If you have to reduce your altitude shortly before landing keep the ears by hand without using the blocking ball SPIRAL It is characterized by reaching the highest sink rates Significant G forces however make it difficult to sustain a spiral dive for long as it can place high loads on the pilot and glider Never do this manoeuvre in turbulence or at too high ba...

Page 16: ...ILL NEVER HAVE TO DESCEND RAPIDLY 7 Extreme flying manoeuvres CAUTION EXTREME FLYING MANOEUVRES SHOULD ONLY BE CARRIED OUT DURING SAFETY TRAINING COURSE INSTABILITY TRAINING UNDER PROPER GUIDANCE WHILE PROVOKING OR EXITING REAL SITUATIONS THERE IS A DANGER THAT YOUR ACTIONS WILL PROVE TOO QUICK OR TOO STRONG SO YOU SHOULD ALWAYS EMPLOY GOOD JUDGMENT STAY CALM AND TAKE ONLY MEASURED ACTIONS Since a...

Page 17: ...inflates instantly and spontaneously Applying some brakes in the right moment will greatly speed up the recovery LINE OVER CRAVATTE Not very likely when flying Orca XX Use standard action in case of any doubts pilot should seriously consider throwing the rescue chute DEEP STALL Under normal conditions does not occur If you want to prevent it stick to a couple of rules after B stall release the ris...

Page 18: ...sing falling down and dragging around A good precaution to avoid catching wet and or UV is to use quickpack after rigging up when you have to wait in start line Never pack up or store the glider when wet This shortens the life of the cloth Remember that wing gets wet even when laying on a green grass in full sun as the grass evaporate Leaving wet paraglider in a car heated by sun is absolutely una...

Page 19: ...ay from entering the cell openings their weight can slow down or even stall the glider and sharp edges can damage the cloth Prevent lines from catching anything as they can get overstretched or torn Do not step on the lines Uncontrolled strong wind takeoffs or landings can result in the leading edge of the canopy hitting the ground with lots of energy which may heavily damage the ribs and surface ...

Page 20: ...a flat m2 Surface area projected m 2 Span flat m Span projected m Aspect Ratio flat Aspect Ratio projected Sink rate m s Speed km h trym 38 max 48 2km h Max cord cm Min cord cm Distance pilot to wing m Total line lenght m Weight range kg Weight kg Lines Technora 1 2 1 3 1 5 1 8 2 3 A 8000U 050 Fabric Porcher 38 g m2 Porcher 32 g m2 Porcher Hard 38 g m2 Porcher Hard 32 g m2 SR Scrim SR Laminate 180...

Page 21: ...ng wings as well as school and profit users warranty covers 18 months 1 5 year 150 flight hours depending on what comes first WARRANTY DOES NOT COVER canopy colour fading damage caused by chemicals or salt water damage caused by incorrect use damage caused by emergency situations damage resulting from accidents airborne or not WARRANTY IS ONLY VALID IF flight hours are correctly registered in the ...

Page 22: ...plies only to damages that took place during take off flight or landing Obviously all faults in the material and manufacturing flaws are covered by normal warranty When handing the paraglider for the repair you have to present a card confirming its AeroCasco status After the repair you will have to cover only the share of cost value of 50 euro AeroCasco is valid for one repair only There is a poss...

Page 23: ...raglider itself canopy lines risers Compression strap for tightening up th wing before putting it into a bag Windsock Pocket with paper work and repair wallet including A piece of self adhesive fabric for small repairs 10 cm x 37 5 cm Note this excludes even small rips placed in the vicinity of the stitches they have to be repaired by an authorised workshop A one side looped 1 9 mm suspension line...

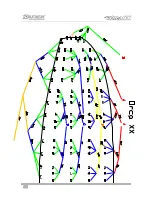
Page 24: ...ON Distances given below are to be understood as distances between connection points When cutting a line for repairs 200 mm more must be counted as on each end a 100 mm stitch is required to fix the loop The only exception is main steering line brmain which is looped at the upper end only while down there is 200 mm margin left for fastening the brake handle that means 300 mm more is needed to be c...

Page 25: ...25 ...

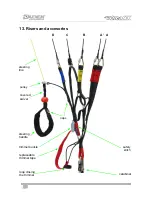
Page 26: ...13 Risers and accesories pulley safety stitch steering line covered swivel steering handle trimmer buckle replaceable trimmer tape loop closing the trimmer carabiner D A B C A naps 26 ...

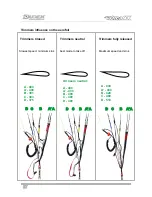
Page 27: ...d Trimmers neutral C D C D B D A C A B A A B A A A 400 A 400 B 391 C 383 D 375 All risers neutral A 400 A 400 B 400 C 400 D 400 Trimmers fully released Slowest speed minimum sink best mode to take off Maximum speed and sink A 400 A 400 B 428 C 469 D 510 ...

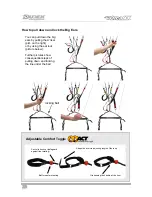
Page 28: ...ures show consequential steps of pulling down and locking the line under the ball How to pull down and lock the Big Ears 28 locking ball Adjustable Comfort Toggle Swivel in its cover safeguard against line twisting Clip keeping the handle at the riser Strap with a velcro adjusting length of the loop Ball for easier steering ...

Page 29: ...V 14 01 2015 MADE IN EUROPE ...

Reviews: