5
Induction
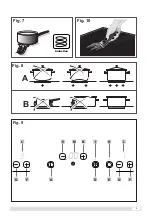
Fig. 8
Fig. 10
Fig. 7
A
B
A- Phím tắt/bật> để tắt bật bếp
B- Phím tăng thời gian hẹn giờ> để tăng thời gian đặt giờ.
C- Phím giảm thời gian hẹn giờ>để giảm thời gian đặt giờ
D- Phím khóa bàn phím điều khiển> dùng để khóa bàn phím điều khiển, khóa trẻ em.
E- Phím điều khiển mâm nhiệt trong> dùng để điều khiển mâm nhiệt nấu trong.
F- Phím tăng nhiệt> dùng để tăng nhiệt lượng mâm nấu.
G- Phím giảm nhiệt> dùng để giảm nhiệt lượng mâm nấu
H- Đèn hiển thị mâm nhiệt trong> đèn sẽ sáng khi kích hoạt chế độ nấu trong.
I- Đèn hiển thị khóa bàn phím> đèn sáng khi chế độ khóa bàn phím được kích hoạt
L- Màn hình hiển thị công suất mâm nhiệt
M- Màn hình hiển thị thời gian hẹn giờ
Fig. 9
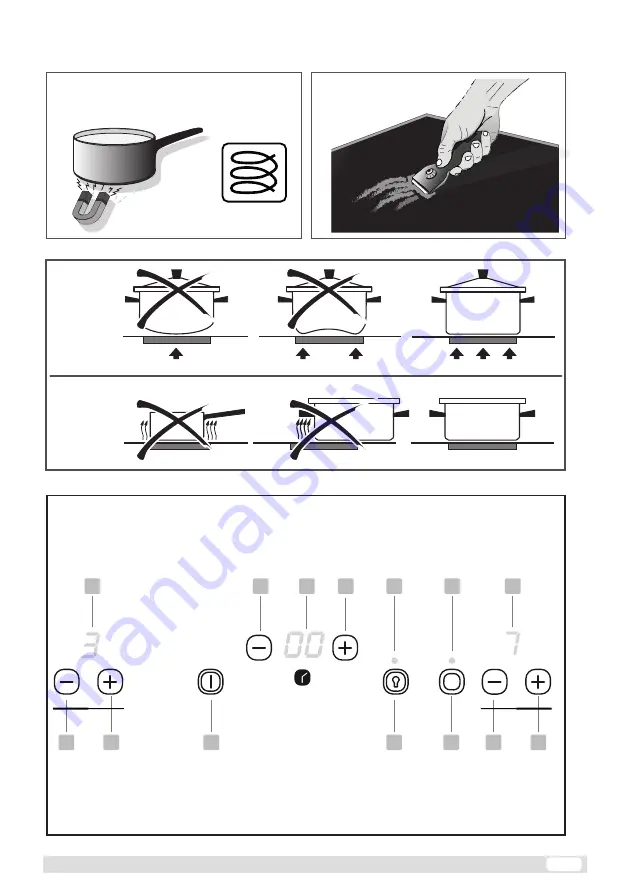
A - ON/OFF key
>
switch the appliance on and off
B - Timer Plus key
>
increase timer value
(OPTIONAL)
C - Timer Minus key
>
decrease timer value
(OPTIONAL)
D - Lock key
>
activate control panel lock /child lock
E - Second Zone
>
activate second cooking zone
(OPTIONAL)
F - Plus key
>
increase power level of cooking zone
G - Minus key
>
reduce power level of cooking zone
H - Second Zone LED
>
the light is on when second zone
is active
I - Lock LED
>
the light is on when control lock is active
L - Cooking Zone Display
>
display power level
M - Timer Display
>
display timer countdown
(OPTIONAL)
A- Phím tắt/bật> để tắt bật bếp
B- Phím tăng thời gian hẹn giờ> để tăng thời gian đặt giờ.
C- Phím giảm thời gian hẹn giờ>để giảm thời gian đặt giờ
D- Phím khóa bàn phím điều khiển> dùng để khóa bàn phím điều khiển, khóa trẻ em.
E- Phím điều khiển mâm nhiệt trong> dùng để điều khiển mâm nhiệt nấu trong.
F- Phím tăng nhiệt> dùng để tăng nhiệt lượng mâm nấu.
G- Phím giảm nhiệt> dùng để giảm nhiệt lượng mâm nấu
H- Đèn hiển thị mâm nhiệt trong> đèn sẽ sáng khi kích hoạt chế độ nấu trong.
I- Đèn hiển thị khóa bàn phím> đèn sáng khi chế độ khóa bàn phím được kích hoạt
L- Màn hình hiển thị công suất mâm nhiệt
M- Màn hình hiển thị thời gian hẹn giờ
I
H
L
L
M
B
C
F
G
E
D
A
F
G
I
H
L
L
M
B
C
F
G
E
D
A
F
G
Fig. 9

