Short Seam Automat 2211-5 Working Instructions
- B 28 -
Beisler Automated Sewing Equipment
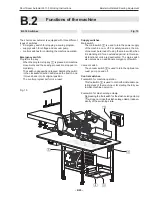
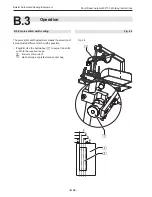
Fig. 21
Fig. 21
NOTE - Vacuum supply!
If the machine is equipped with the optional vacuum pump,
the vacuum supply is now ready for operation.
If the machine is prepared for the on-site vacuum supp-
ly system, the on-site vacuum hose
5
must be connected
to the sleeve
7
of the vacuum valve
6
.
The machine is ready for operation.
B.3
Operation
B.3.2 Preparing the machine
Prior to the production start, check the supply connections,
connect the machine to the compressed air and power
supply systems and prepare the sewing head.
1. Insert needle, pass top thread through needle and insert
bobbin for bottom thread into sewing head (see wor-
king instructions of sewing head manufacturer or sup-
plier).
2.
Fig 21:
Connect machine to compressed air supply by
inserting the plug-in connector
4
of the compressed
air supply hose into the compressed air receptacle in
the operating room. The pressure of the compressed
air is reduced to the required operating pressure of 6
bar by a pressure reducer
3
. Check manometer
2
to see if the correct operating pressure is set. The
pressure reducer is installed at the side mounting wall
of the worktable.
3. Connect machine to power supply system.
WARNING - Electric shock:
Contact with current-carrying components may cause
a lethal electric shock. Check plug and cable before
connecting machine to power supply system.
•
Do not use damaged plugs, sockets or cables to
connect the machine to the power supply system!
•
The machine is connected to a power source of 230
V ±10 % at 50/60 Hz.
•
Before connecting the machine to the power supply
system, check to see if the ratings of the power
supply system in the operating room correspond
with the ratings on the nameplate at the rear of the
machine.
•
If the ratings for voltage (V) and maximum current
(A) do not match, the machine must not be con-
nected.
•
Insert the grounding plug into a properly grounded
and fused power socket.
•
Make sure that the power supply cable is not sub-
ject to tensile or pressure forces.
4. Turn machine on by moving the main switch
1
into
the position
I
.
5. Turn the vacuum pump of the machine on. Press vacu-
um switch
8
or open on-site vacuum supply.


