background image

- 40 - 

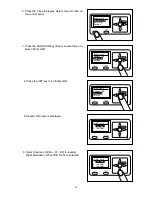
Retrieve JOB 

Retrieve JOB no. 

Retrieve JOB log 
Return 

Retrieve JOB35 
34:

No Data


35:

 DUPLO35


36:

No Data


Retrieve JOB35 
34:

No Data


35:

 DUPLO35


36:

No Data


35

DUPLO35 

StopPos:XXX.X


fin.Sht                  0


*


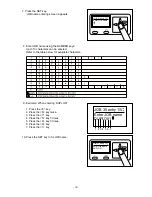
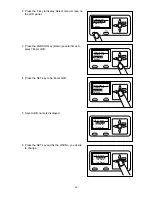
4. Press the SET key to fix ‘Retrieve JOB no.’. 


5. Saved JOB name is displayed. 


6. Enter JOB number you desire to process using the 

  CURSOR keys (Up/Down) or the NUMBER keys. 

Right illustration: JOB No.35 is being retrieved. 


7. Press the SET key to fix the JOB No. 


8. ‘Retrieving JOB’ is displayed on the LCD panel and 

  selected JOB No. is retrieved.    And then satnd-by 
 screen appears. 


Retrieve JOB01 
1: 

DUPLO01


2:

No Data


3:

No Data


Summary of Contents for DC-F 1

Page 1: ...INSTRUCTION MANUAL Be sure to read this manual prior to use Please leave this manual at the site of use for easy reference DC F 1 DC Folder 1 ...

Page 2: ...r your purchase of the Duplo DC F1 To ensure safe and efficient prolonged use of this unit read and thoroughly understand this manual before using this unit After using this manual be sure to keep it in a handy place to reference ...

Page 3: ... 2 ...

Page 4: ...t Papers 19 4 2 Confirming right side other side and edge rear edge of paper 19 4 3 Paper size limit after folding 20 5 Turning Power ON OFF 22 5 1 Turning power ON 22 5 2 Turning power OFF 22 6 Connecting with Other Units 23 6 1 When connecting with other units 23 7 Switching Input Unit 24 7 1 Selecting input unit 24 7 2 Notes for input unit 25 Chapter 2 Basic Operations 1 Supported Fold Type 28 ...

Page 5: ...w 54 1 2 Adjusting vertical fold skew 55 2 Error Messages 58 2 1 Messages for paper jam 58 2 2 Messages for error in operation 58 2 3 Error display 59 3 When a Paper Jam Has Occuurred 67 3 1 When a paper jam has occurred in conveyer area F 67 3 2 When a paper jam has occurred in conveyer area R 69 3 3 When a paper jam has occurred in the Fold 1 area 70 3 4 When a paper jam has occurred in the Fold...

Page 6: ...n white on the disc In the example shown here the instruction is remove the plug from the outlet Precautions for use WARNING If the machine is used after foreign matter metal fragments water or liquid has entered the machine this may result in fire or electric shock Turn the main unit s power switch OFF and then remove the power plug from the outlet Contact the sales distributor If the machine is ...

Page 7: ...ng injury to hands or fingers WARNING Do not touch the rotating part or do not put things in the machine while it is running Your hands or fingers may get caught in the machinery and injured Use tweezers or a similar tool to remove jammed paper Be sure to unplug the power supply cord in order to prevent an electric shock Unplug the power supply cord before removing jammed paper Caution for Groundi...

Page 8: ...etc resulting in fire or electric shock If the following situation happens immediately stop use and turn off the power switch and disconnect the power plug from the outlet And then contact our distributor When the machine emits smoke or outside of the machine gets abnormally hot When the machine sounds or smells abnormally When water gets inside the machine Using the machine as is may cause a fire...

Page 9: ...d i e during vacation Insulation may deteriorate and cause an electrical fire Liability for damaged paper CAUTION We shall not be liable for any damage to or dirt on envelopes or enclosures resulting from the use of the machine as well as any secondary damage Be sure to handle your important documents with great care ...

Page 10: ...warning labels Keep the WARNING and CAUTION labels clean at all times If labels become damaged or come off replace them with new ones DC Folder 1 DC F1 NO Part No Name Q ty 1 M7 T3030 WARNING 3 2 P9 T3100 CAUTION 2 1 2 ...

Page 11: ... 10 1 DC Straight Conveyer 1 DC SC1 Note The DC SC1 is connected to the DC F1 and is not included in the DC F1 NO Part No Name Q ty 1 M7 T3030 WARNING 1 ...

Page 12: ... 11 Chapter 1 Before Use ...

Page 13: ...er without folds is exited on this board 5 Power switch Press the I side on the power switch to turn the power ON and press the side to turn it OFF 6 D sub connector 9p Use this to connect communication cable 7 Inlet Insert the female side plug on the provided power cord plug here 8 Top cover Open this to remove the paper jam 9 D sub connector 9p Connects the DC F1 and DC machine DC 645 DC 615 DC ...

Page 14: ...1 2 Fold roller 1 Folds paper and feeds it 3 Fold roller 2 Folds paper and feeds it No Name Function 1 Fold knife 2 Folds paper fold position 2 2 Fold roller 3 Folds paper and feeds it 3 Fold roller 4 Folds paper and feeds it Roller position is under fold roller 3 4 Decurl roller Suppresses paper curl 1 2 3 4 ...

Page 15: ...ce DC SC1 Note The DC SC1 is connected to the DC F1 and is not included in the DC F1 No Name Function 1 Manual slot option Insert paper here when folding paper individually 2 Top cover Open this to remove the paper jam 1 2 ...

Page 16: ...right Press to move the cursor to horizontal direction 5 CURSOR up down Press to move the cursor to vertical direction 6 SET key Press to fix switching function JOB entry 7 START key Press to start processing document 8 TEST key Press when you want to process one sheet document to test the current JOB details 9 STOP key Press to stop processing 10 JOG key Press to eject the document from the unit ...

Page 17: ...y Press to enter JOB 2 SET key Press to fix switching function or JOB entry 3 CLEAR key Press to cancel JOB entry or clear the number of current processed sheet to 0 1 2 ABC 4 5 JKL MNO GHI TUV WXYZ PQRS 3 6 7 8 9 C 0 SET DEF 3 2 1 1 ...

Page 18: ...ide position finished paper size only when stacker is connected to the system 4 Icon DC mode is selected when icon is not displayed on the LCD panel Manual mode is selected when icon is displayed on the LCD panel 5 Icon display When no fold mode or precision mode only when DC SC1 is connected or reject mode only when DC mode is selected is on icon is displayed The above display shows when reject m...

Page 19: ...ection fold cancel while JOB processing on DC only in DC mode 4 Manual mode Switches manual mode status ON OFF 5 System Select connection status to the DC 645 and system configuration of DC SC DC CC1 and DC stacker 6 Cleaning mode Cleans feed roller 7 Return Returns to stand by screen Select menu Retrieve JOB Enter JOB Settings Manual mode System Cleaning Mode Return ...

Page 20: ...e such as double feed When the paper is set to the manual slot of the DC SC1 please confirm the right side other side and leading edge rear edge of the paper When confirming the finish after test fold check fold skew and the right side other side and leading edge rear edge of the paper Example When the paper right side colored other side white is folded by the fold mode as below V fold has 2 direc...

Page 21: ...size and fold dimension No fold Fold zero When using DC SC Fold type 1V 2V Fold once 1V fold 42 5mm can be entered for Fold 1 4 3 Paper size limit after folding Paper Length 85mm 650mm When using DC CC 85mm 370mm Paper Width 48mm 370mm When using DC CC 85mm 370mm Paper Width 48mm 370mm Paper Length 127 5mm 650mm 85mm 85mm Fold 1 ...

Page 22: ...old type Double Parallel Fold 3 times Deformed Z fold 42 5mm can be entered for Fold 1 and 85 0mm can be entered for Fold 2 and then 170 0mm can be entered for Fold 3 Fold Fold Paper Width 48mm 370mm 85mm 85mm 85mm Paper Length 170mm 650mm Paper Length 212 5mm 650mm 85mm 85mm 85mm 85mm Paper Width 48mm 370mm ...

Page 23: ...nsert the male side of the power supply cord into the outlet three slot 3 Press the I side of the power switch to turn the power ON The unit is ready when the stand by screen appears on the LCD panel 1 Press the side of the power switch to turn the power OFF The unit is turned OFF and the panel display goes out 5 1 Turning power ON 5 2 Turning power OFF Inlet Female plug of the power supply cord O...

Page 24: ...any inquiries about connected units In the interest of upgrading our products product system configuration is subject to change without notice New models to be released in the future may be added to the paper feed units DC 645 DC 615 DC 445 DC F1 system configuration 1 2 3 4 5 6 7 DC F1 DC ST1 DC ST2 DC F1 DC ST1 DC ST2 DC F1 DC ST1 DC ST2 6 1 When connecting with other units DC645 DC615 DC645 DC6...

Page 25: ... from mm mode to inch mode Default setting of input unit is mm mode 1 Confirm that the LCD panel displays stand by screen Right illustration JOB No which JOB is not registered is displayed as No Data 2 Press the F key to display the Select menu screen on the LCD panel 3 Press the CURSOR key Down several times to select Settings 4 Press the SET key to fix Settings Select menu Retrieve JOB Enter JOB...

Page 26: ...the stand by screen appears Before registering a JOB select input unit either mm or inch Input unit is registered for each JOB No If input unit set by Function differs from that selected for each JOB the JOB cannot be edited with input unit selected when registering JOB In this case change the input unit to that previously set for the JOB No or set it to the changed one and overwrite it 1 Previous...

Page 27: ... 26 ...

Page 28: ... 27 Chapter 2 Basic Operations ...

Page 29: ...Double Parallel fold This section describes fold types that the unit can perform Fold type Fold 2 position Fold 1 position Before folded V fold 2V fold Z fold C fold Gate fold Double parallel 1 1 Fold type Paper feed direction Paper leading edge A Paper leading edge B B A B B A A A A B B B A A B A B B A B A ...

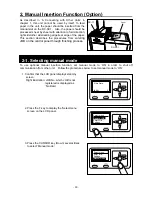
Page 30: ...rection right side other side leading edge rear edge of the paper This section describes the procedures from entering JOB on the control panel through finishing process To use optional manual insertion function set manual mode to ON in order to shut off communication from other unit Follow the procedures below to set manual mode to ON 1 Confirm that the LCD panel displays stand by screen Right ill...

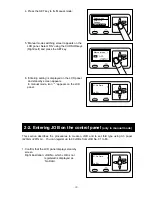
Page 31: ...y 6 Entering setting is displayed on the LCD panel and stand by screen appears In manual mode icon appears on the LCD panel This section describes the procedures to create a JOB and to set fold type using A3 paper 420mm 297mm You can register up to 80 JOBs from JOB No 01 to 80 1 Confirm that the LCD panel displays stand by screen Right illustration JOB No which JOB is not registered is displayed a...

Page 32: ...to display Select menu screen on the control panel 3 Press the CURSOUR key Down several times to select Enter JOB 4 Press the SET key to fix Enter JOB 5 Saved JOB name is displayed 6 Select desired JOB No 01 80 to register Right illustration When JOB No 01 is selected Select menu Retrieve JOB Enter JOB Settings JOB 01 entry 1 No Data 2 No Data 3 No Data ...

Page 33: ...vailable characters 9 Example When entering DUPLO01 1 Press the 3 key 2 Press the 8 key twice 3 Press the 7 key 4 Press the 5 key 3 times 5 Press the 6 key 3 times 6 Press the 0 key 7 Press the 1 key 10 Press the SET key to fix JOB name JOB 35 entry 1 5 Enter JOB name DUPLO01 1 2 3 4 5 6 7 JOB 01 entry 1 7 Enter JOB name JOB 01 entry 1 7 Enter JOB name DUPLO01 ...

Page 34: ...key Example When 420 mm is entered Selecting fold type V fold 1V Select V fold 1v using the CURSOR keys Right Left and then press the SET key Right illustration When V fold 1v is selected Enter the dimension of Fold 1 using the NUMBER keys and then press the SET key Right illustration When 210 0mm is entered V fold 2V Select V fold 2V using the CURSOR keys Right Left and then press the SET key Rig...

Page 35: ...Left and then press the SET key Right illustration When C fold is selected Enter the dimension of Fold 1 using the NUMBER keys and then press the SET key Right illustration When 136 0mm is entered Enter the dimension of Fold 2 using the NUMBER keys and then press the SET key Right illustration When 278 0mm is entered Z fold Select Z fold using the CURSOR keys Right Left and then press the SET key ...

Page 36: ...nsion of Fold 2 using the NUMBER keys and then press the SET key Right illustration When 280 0mm is entered Gate fold Select Gate fold using the CURSOR keys Right Left and then press SET key Right illustration When Gate fold is selected Enter the dimension of Fold 1 using the NUMBER keys and then press the SET key Right illustration When 104 0mm is entered Enter the dimension of Fold 2 using the N...

Page 37: ...stration When Double Parallel is selected Enter the dimension of Fold 1 using the NUMBER keys and then press the SET key Right illustration When 107 0mm is entered Enter the dimension of Fold 2 using the NUMBER keys and then press the SET key Right illustration When 214 0mm is entered Enter the dimension of Fold 3 using the NUMBER keys and then press the SET key Right illustration When 317 0mm is ...

Page 38: ... the SET key Right illustration When Overwrite is selected 13 Saving JOB is displayed on the LCD panel and the created JOB is saved in the memory And then the display returns to stand by screen Saving will be completed in 1 or 2 seconds The following describes the procedures to confirm the entered JOB 1 Confirm that the LCD panel displays stand by screen Right illustration When JOB No 01 is select...

Page 39: ...the SET key 5 Saved JOB name is displayed 6 Press the right CURSOR key to display the screen for confirming paper length Right illustration The length of the paper can be confirmed 7 Press the right CURSOR to display fold type selection screen Right illustration C fold Fold type can be confirmed 8 Press the right CURSOR key to display the screen for confirming fold dimensions Right illustration C ...

Page 40: ...The following describes the procedures to process the paper by selecting JOB 1 Confirm that the LCD panel displays stand by screen Right illustration When JOB No 01 is selected 2 Press the F key to display Select menu screen on the LCD panel 3 Press the SET key to fix Retrieve JOB 2 4 Processing paper by selecting JOB only in manual mode 01 DUPLO01 StopPos XXX X fin Sht 0 ...

Page 41: ...the SET key to fix Retrieve JOB no 5 Saved JOB name is displayed 6 Enter JOB number you desire to process using the CURSOR keys Up Down or the NUMBER keys Right illustration JOB No 35 is being retrieved 7 Press the SET key to fix the JOB No 8 Retrieving JOB is displayed on the LCD panel and selected JOB No is retrieved And then satnd by screen appears Retrieve JOB01 1 DUPLO01 2 No Data 3 No Data ...

Page 42: ...TEST key in operating is displayed and operation starts 11 The paper is ejected to the DC ST2 Right illustration When the DC ST2 is connected The following describes the procedures to overwrite and save the setting by changing JOB setting 1 Confirm that the LCD panel displays stand by screen Right illustration when JOB No 01 is selected 2 5 Changing JOB setting only in manual mode ...

Page 43: ...Press the F key to display Select menu screen on the LCD panel 3 Press the CURSOR key Down several times to select Enter JOB 4 Press the SET key to fix Enter JOB 5 Saved JOB name is displayed 6 Press the SET key and fix the JOB No you desire to change Select menu Retrieve JOB Enter JOB Settings JOB 01 entry 1 DUPLO01 2 No Data 3 No Data ...

Page 44: ...r length mm you desire to save using the NUMBER keys and then press the SET key Example When 420mm is entered 9 Select Z fold using the CURSOR keys Right Left and then press the SET key Right illustration When Z fold is selected 10 Enter the dimension of Fold 1 using the NUMBER keys and then press the SET key Right illustration when 140 0mm is entered 11 Enter the dimension of Fold 2 using the NUM...

Page 45: ...sing the CURSOR keys Up Down and press the SET key Right illustration When Overwrite is selected 13 Saving JOB is displayed on the LCD panel and and the created JOB is saved in the memory And then the display returns to stand by screen Saving will be completed in 1 or 2 seconds The unit logs the processed JOBs 10 last processed JOBs can be saved and the saved JOB is deleted in chronologic order Th...

Page 46: ... the down CURSOR key to fix Retrieve JOB log and then press the SET key 5 Please wait is displayed on the LCD panel and the previously used JOB log is displayed 6 Select the setting you desire to process using the CURSOR keys Up Down and press the SET key Right illustration When JOB No 35 is selected 7 Selected JOB No is retrieved and stand by screen appears Retrieve JOB Retrieve JOB no Retrieve J...

Page 47: ...ess the RETURN key in the middle of JOB entry 1 To stop the JOB entry in the middle of it press the STOP key Stand by screen appears on the LCD panel 1 To clear the entered value in the middle of JOB entry press the CLEAR key The entered value is cleared and returned to 0 2 7 Returning to previous operation only in manual mode 2 8 Stopping JOB entry only in manual mode ...

Page 48: ... 47 Chapter 3 Application operations ...

Page 49: ...r JOB with no fold The paper does not go through the decurl area and is ejected to the reject area 1 Confirm that the LCD panel displays stand by screen Right illustration When JOB No 01 is selected 2 Press the F key to display Select menu screen appears on the LCD panel 3 Press the down CURSOR key several times to select Settings 4 Press the SET key to fix Settings 1 1 Using Reject mode only in D...

Page 50: ...ustration When Rejet mode is changed to ON 7 Entering setting is displayed on the LCD panel and stand by screen appears This mode can be used only when the unit interlocks with the DC machine DC 645 DC 615 DC445 and disables fold setting of JOB entered on the DC machine Use this mode when ejecting paper without fold or confirmation of crease 1 Confirm that the LCD panel displays stand by screen Ri...

Page 51: ...y to display Select menu screen on the LCD panel 3 Press the down CURSOR key several times to select Settings 4 Press the SET key to fix Settings 5 Press the down CURSOR key several times to select No fold mode 6 Select ON using the CURSOR keys Right Left and press the SET key Right illustration When No fold mode is changed to ON Select menu Retrieve JOB Enter JOB Settings ...

Page 52: ...interlocks with the DC machine DC 645 DC 615 DC445 Use this mode when adjusting paper feed speed of DC machine and DC F1 to enhance fold accuracy of light paper You cannot use thick paper in this mode 1 Confirm that the LCD panel displays stand by screen Right illustration When JOB No 01 is selected 2 Press the F key to display Select menu screen on the LCD panel 3 Press the down CURSOR key severa...

Page 53: ...y to fix Settings 5 Press the down CURSOR key several times to select Precision mode 6 Select ON using the CURSOR keys Right Left and press the SET key Right illustration When Precision mode is changed to ON 7 Entering setting is displayed on the LCD panel and stand by screen appears Select menu Retrieve JOB Enter JOB Settings ...

Page 54: ... 53 Chapter 4 Trouble Guide ...

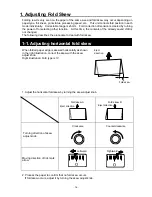
Page 55: ...g describes the procedure to deal with fold skew When folded paper edge is skewed horizontally as shown in the right illustration correct the skew with the skew adjust knob Right illustration Fold type is 1V 1 Adjust the horizontal fold skew by turning the skew adjust knob Fold skew A Fold skew B Turning direction of skew adjust knob Moving direction of tick mark arrow 2 Process the paper to confi...

Page 56: ...tion of the fold knife 1 and fold knife 2 Right illustration Fold type is 1V 1 Confirm that the LCD panel displays stand by screen Right illustration When JOB No 01 is selected 2 Press the F key to display Select menu screen on the LCD panel 3 Press the CURSOR key Down several times to select Settings 4 Press the SET key to fix Settings 1 2 Adjusting vertical fold skew Select menu Retrieve JOB Ent...

Page 57: ...MBER keys Right illustration When 1 0mm of fold correction dimension is entered for Fold 2 Fold 1 correction Fold 2 correction Fold type Fold state How to correct Fold type Fold state How to correct long Enter value 1V fold short Enter value long Enter value 2V fold short Enter value long Enter value long Enter value Z fold short Enter value Z fold short Enter value long Enter value long Enter val...

Page 58: ...Enter value Gate fold short Enter value Fold 2 correction Fold 3 correction Fold type Fold state How to correct Fold type Fold state How to correct long Enter value long Enter value D PARALLEL short Enter value D PARALLEL short Enter value 7 Press the SET key to fix fold correction 8 Entering setting is displayed on the LCD panel and stand by screen appears Eject direction A B A B Eject direction ...

Page 59: ...ppear on the LCD panel 1 There is a paper remained and jammed in the unit Paper in machine 2 A paper jam has occurred while processing J JAM Countermeasure Refer to 3 When a Paper Jam Has Occurred to remove the jammed paper When operation is not correct with the cover opened the following messages appear on the LCD panel 1 When the cover is opened Cover open Countermeasure Close the cover 2 1 Mess...

Page 60: ... area Countermeasure Remove the jammed paper in the posterior part of paper feed area The error is automatically cleared Status Paper remains in the Knife 1 area Countermeasure Remove the jammed paper in the Knife 1 area The error is automatically cleared Status Paper remains in the Knife 2 area Countermeasure Remove the jammed paper in the Knife 2 area The error is automatically cleared 2 3 Error...

Page 61: ...y cleared Status A paper jam has occurred in the conveyer area F while processing Countermeasure Remove the jammed paper in the conveyer area F and press the STOP key to clear the error Status A paper jam has occurred in the conveyer area R while processing Countermeasure Remove the jammed paper in the conveyer area R and press the STOP key to clear the error Paper in machine Remove document from ...

Page 62: ...rmeasure Remove the jammed paper in the paper exit area and press the STOP key to clear the error Status A paper jam has occurred in the reject area while processing Countermeasure Remove the jammed paper in the reject area and press the STOP key to clear the error Status A paper jam has occurred in the manual slot while processing Countermeasure Remove the jammed paper in the manual slot and pres...

Page 63: ...ior part of conveyer area and press the STOP key to clear the error Status Knife lock has occurred in the Knife 1 area while processing Countermeasure Remove the jammed paper in the Knife 1 area and press the STOP key to clear the error Status Knife lock has occurred in the Knife 2 area while processing Countermeasure Remove the jammed paper in the Knife 2 area and press the STOP key to clear the ...

Page 64: ...he stacker to clear the error Status Stacker is full with document Countermeasure Remove the documents in the stacker and press the STOP on the stacker key to clear the error Status A paper jam has occurred in the stacker and caused motor lock Countermeasure Remove the jammed paper in the stacker and press the STOP key on the stacker to clear the error Paper in machine Remove document from stacker...

Page 65: ... is ejected to the DC CC1 Countermeasure Set the length of paper to be ejected to the DC CC1 to 370mm or less Press the STOP key on the stacker to clear the error Status A paper jam has occurred in the DC CC1 and caused motor lock Countermeasure Remove the jammed paper in the DC CC1 and press the STOP key on the stacker to clear the error Paper in machine Remove document from cross area Paper in c...

Page 66: ...as occurred Countermeasure The error cannot be cleared Contact serviceperson Status A memory error has occurred Countermeasure The error cannot be cleared Contact serviceperson Status A memory error has occurred Countermeasure The error cannot be cleared Contact serviceperson Contact service person STR Memory error Contact service person E00 Main panel Contact service person E01Memory error Contac...

Page 67: ... 66 Area names DC ST1 DC F1 Conveyer area F Conveyer area R Reject area FOLD1 area Knife1 area DC ST2 FOLD2 area Knife2 area Decurl area Exit area ...

Page 68: ... J1 Conveyer F Remove document from conveyer error is displayed and paper jam area flashes on the LCD panel Remove the document with the following procedures 1 J1 Conveyer F error is displayed on the LCD panel 2 Press the JOG key to eject the document in the conveyer area F to the reject area 3 Press the STOP key to clear the error The unit is reset and the error message is cleared WARNING When re...

Page 69: ...d follow the procedures below to remove it 1 Open the top cover on the DC SC1 2 Remove the jammed document in the conveyer area F If it is not removed easily use a tool such as pliers to remove it 3 Close the top cover on the DC SC1 4 Press the STOP key to clear the error The unit is reset and the error message is cleared Top cover DC SC1 DC F1 ...

Page 70: ...h the following procedures 1 J2 Conveyer R error is displayed on the LCD panel 2 Press the JOG key to eject the document in the conveyer area R to the reject area 3 Press the STOP key to clear the error The unit is reset and the error message is cleared If the document cannot be removed with the procedure mentioned above follow the procedures below to remove it 1 Open the top cover on the DC SC1 3...

Page 71: ...nit is reset and the error message is cleared When a paper jam has occurred in the FOLD1 area of DC F1 J3 Fold1 area Remove document from fold 1 area error is displayed and paper jam area flashes on the LCD panel Remove the document with the following procedures 1 J3 Fold1 area error is displayed on the LCD panel 3 3 When a paper jam has occurred in the Fold 1 area Top cover DC SC1 DC F1 Paper in ...

Page 72: ...Lift the lock lever to open the FOLD2 area 3 Remove the jammed document in the Fold 1 area in the direction of the arrow 4 Close the FOLD2 area 5 Press the STOP key to clear the error The unit is reset and the error message is cleared Lock lever Paper FOLD2 area ...

Page 73: ...nt with the following procedures 1 J4 Fold 2 area error is displayed on the LCD panel 2 Open the top cover by holding the handle 3 Remove the jammed document in the Fold 2 area in the direction of the arrow 4 Close the top cover by holding the handle 3 4 When a paper jam has occurred in the Fold 2 area Handle Top cover Handle Top cover Paper in m Remove document from fold 2 area J4 Fold 2 area ...

Page 74: ... has occurred in the Decurl area of DC F1 J5 Decurl area Remove document from decurl area error is displayed and paper jam area flashes on the LCD panel Remove the document with the following procedures 1 J5 Decurl area error is displayed on the LCD panel 2 Open the top cover by holding the handle 3 Loosen the knob to take out the decurl roller 3 5 When a paper jam has occurred in the decurl area ...

Page 75: ...4 Remove the jammed document in the decurl area in the direction of the arrow 5 Install the press roller and fasten the knob 6 Close the top cover by holding the handle 7 Press the STOP key to clear the error The unit is reset and the error message is cleared Paper ...

Page 76: ...cument from exit area error is displayed and paper jam area flashes on the LCD panel Remove the document with the following procedures 1 J6 Exit area error is displayed on the LCD panel 2 Lift the lock lever to open the FOLD2 area 3 Remove the jammed document in the exit area 4 Close the FOLD2 area 3 6 When a paper jam has occurred in the exit area FOLD2 area Paper ...

Page 77: ... area error is displayed and paper jam area flashes on the LCD panel Remove the document with the following procedures 1 J7 Reject area error is displayed on the LCD panel 2 Remove the jammed document in the reject area 3 Press the STOP key to clear the error The unit is reset and the error message is cleared 2 ABC 5 JKL MNO TUV WXYZ 3 6 8 9 0 SET DEF 3 7 When a paper jam has occurred in the rejec...

Page 78: ...th the following procedures 1 J8 Man PF error is displayed on the LCD panel 2 Open the top cover on the DC SC1 3 Remove the jammed document in the manual slot If it is not removed easily use a tool such as pliers to remove it 4 Close the top cover on the DC SC1 3 8 When a paper jam has occurred in the manual slot Top cover DC SC1 DC F1 Manual slot Paper Paper in machine Remove document from manual...

Page 79: ... 78 5 Press the STOP key to clear the error The unit is reset and the error message is cleared 2 ABC 5 JKL MNO TUV WXYZ 3 6 8 9 0 SET DEF ...

Page 80: ... that the fold dimension is entered correctly Make the process speed slower Fan the papers well The paper cannot be folded in the correct position Does the paper have static electricity Use commercially available static free spray Have the papers been fanned well Fan the papers well Is the paper curled Decurl the paper before using The paper slip occurred in the paper feed area The paper cannot be...

Page 81: ...fold dimension entered correctly Confirm that the fold dimension is entered correctly Vertical fold skew occurred Was the paper type paper quality paper thickness changed while processing Use the paper before change ...

Page 82: ... 81 Chapter 5 Maintenance ...

Page 83: ...ct our serviceperson Clean the exterior in the following procedures 1 Use soft cloth tightly wrung out of water or mild detergent 2 Wipe the exterior 3 Wipe off the liquid with dry soft cloth Gently wipe off the dust on the LCD panel with dry soft cloth Never use wet cloth It may cause damage WARNING Never use alcohol or solvent cleaner It may tarnish or damage the exterior finish Do not put dilut...

Page 84: ...ulates the paper may get dirty with the toner or it may cause fold skew At times like this clean the conveyer rollers according to the following procedures 1 Confirm that the control panel displays stand by screen Right illustration When JOB No 01 is used 2 Press the F key to display menu selection screen 3 Press the CURSOR key Down several times to select Cleaning mode 4 Press the SET key to fix ...

Page 85: ... the exterior finish WARNING During cleaning extreme care should be taken to prevent our hands or fingers from being caught 7 Close the top cover by holding the handle The conveyer rollers turn 60 degrees The entire roll is cleaned around its circumference by opening closing the top cover 8 After cleaning the rollers press the SET key Menu selection screen reappears Caution Warning Conveyer roller...

Page 86: ... 85 Chapter 6 Specifications ...

Page 87: ...gth170mm 650mm Paper size depends on that of ejected paper from upstream unit Finished paper size No fold Width 48mm 370mm Length85mm 650mm 1 fold Width 48mm 370mm Length85mm 650mm 42 5mm 2 fold Width 48mm 370mm Length85mm 650mm 42 5mmx2 Paper size depends on that of ejected paper from upstream unit Paper weight Bond paper MIN 110gsm MAX 350gsm Coated paper MIN 110gsm MAX 350gsm Laminated paper wi...

Page 88: ...t LCD Panel language Japanese English German French Italian Spanish Polish Russian Standard features 80 job memories Fold position adjustment for each fold knife Communication between units DC SC1 control required when connected with DC 645 615 Power supply Single application 100 240V AC 6 10 50 60Hz 1 9 0 9A Dimension 550mm W x 610mm D x 1070mm H The height varies depending on connected DC machin...

Page 89: ...350gsm Laminated Within the above range of weight including lamination Paper type Coated bond laminated Minimum finished size Width 48mm x Length 85mm when using DC CC1 Width 48mm x Length 85mm Requirements When cutting multiple up documents on DC 645 615 connected Slit gutter between each sheet on 1 document must be 5mm or more Cut gutter between each sheet on 1 document must be 4mm or more Speed...

Page 90: ... 89 4 1 6 Oyama Sagamihara shi Kanagawa 229 1180 Japan TEL 81 42 775 3602 FAX 81 42 775 3606 E mail info duplo com www duplo com U3 Y1010 2009 2 ...

Reviews: