Option 1 (soft ground)
Slide one 16” steel L-channel ground anchor
into bottom of each post. Slide ground anchor
up to bottom cross rail. Using two 1” self-
tapping white-head screws per post, screw
post to ground anchor (figure 1). When
fastening, use one screw per side where
ground anchor meets post. For added support
fasten screws with at least two inches vertically
between them.
Option 2 (hard ground)
Measure distance between posts and mark
ground accordingly. Pound 16” steel L-
channel ground anchors into ground according
to measurements and basic layout (figure 2),
leaving about 4 inches of ground anchor
exposed. When pounding into ground, use
block of wood to prevent ground anchor from
bending.
Slide trellis over ground anchors. Using two 1”
self-tapping white-head screws per post screw
post to ground anchor (figure 1). When
fastening, use one screw per side where
ground anchor meets post. For added support
fasten screws with at least two inches vertically
between them.
Option 3 (permanent installation)
Measure distance between posts and mark
ground accordingly. Dig holes 12” deep
according to measurements and basic layout
(figure 2). Fill with cement and place 16” steel
L-channel ground anchors in wet cement. Be
sure that ground anchors are straight and in
accordance with measurements of trellis posts.
Allow cement to dry. NOTE: There is very little
room for error with this installation method.
Slide trellis over ground anchors. Using two 1”
self-tapping white-head screws per post screw
post to ground anchor (figure 1). When
fastening, use one screw per side where
ground anchor meets post. For added support
fasten screws with at least two inches vertically
between them.
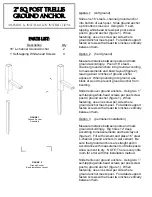
FIGURE 1
Ground Anchor
Assembly
FIGURE 2
Ground Anchor
Basic Installation Layout
2” sq. post trellis
ground anchor
Assembly & installation Instructions
Description
Qty
16” L-channel Ground Anchor
2
1” Self-tapping White-head Screws
4
Parts List:


