#11201
h
illcrest
P
otting
b
ench
ASSEMBLY INSTRUCTIONS
Dura-Trel, Inc. ~
PO Box 122, Sheboygan Falls, WI 53085 ~ Toll Free 877-258-6020
TOOLS NEEDED:
Drill with #2 Phillips Bit (recommended)
or Phillips Screwdriver
File
POTTING BENCH BACK ASSEMBLY
POTTING BENCH BACK ASSEMBLY
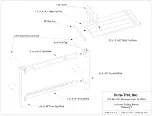
(Refer to Drawing 1)
(Refer to Drawing 1)
On a flat surface lay back left post with screw pilot holes facing down and routed holes facing right
and up. Insert one 1½ x 4 x 51½” shelf rail into bottom routed hole with holes facing up and
positioned towards the top. Next insert one 1½ x 4 x 51½” table rail with holes facing up and
positioned towards the bottom. Insert opposite ends of rails into back right post. (pilot holes for
screws facing down) Make sure all rails are fully inserted into both back posts, flip assembly over
so screw pilot holes are facing up and fasten together using ¾” kappet screws. Snap screw caps
over screw heads.
POTTING BENCH FRONT ASSEMBLY
POTTING BENCH FRONT ASSEMBLY
(Refer to Lower Left Portion of Drawing 2)
(Refer to Lower Left Portion of Drawing 2)
On a flat surface lay front right post with screw pilot holes facing down and routed holes facing
right and up. Insert remaining 1½ x 4 x 51½” shelf rail into bottom routed hole with holes facing
up and positioned towards the top. Next insert remaining 1½ x 4 x 51½” table rail with holes
facing up and positioned towards the bottom. Insert opposite ends of rails into front left post.
(pilot holes for screws facing down) Make sure all rails are fully inserted into both front posts, flip
assembly over so screw pilot holes are facing up and fasten together using ¾” kappet screws. Snap
screw caps over screw heads.


