Making Connections
© 2019 Twinhead International Corp and/or its affiliates. All rights reserved.
Connecting to a Wireless Local Area Network
Your notebook comes with a WLAN module. A wireless network can be added
either when the network is detected or by manually entering the settings
information.
To connect, follow the steps below:
1.
Press both
Fn
and
F3
keys to turn on the wireless network function.
2.
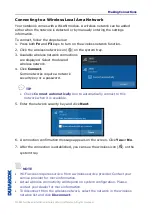
Click the wireless network icon ( ) on the system tray.
3.
Available wireless network connections
are displayed. Select the desired
wireless network.
4.
Click
Connect
.
Some networks require a network
security key or a password.
TIP
Check
Connect automatically
box to automatically connect to this
network when it is available.
5.
Enter the network security key and click
Next
.
6.
A connection confirmation message appears on the screen. Click
Yes
or
No
.
7.
After the connection is established, you can see the wireless icon (
) on the
system tray.
NOTE
Wi-Fi access requires service from a wireless service provider. Contact your
service provider for more information.
Actual wireless connectivity will depend on system configuration. Please
contact your dealer for more information.
To disconnect from the wireless network, select the network in the wireless
network list and click
Disconnect
.


