36
Using the BIOS Setup Utility
Using the BIOS Setup
Utility
Your notebook has a BIOS setup utility which allows you to configure important
system settings, including settings for various optional functions of the notebook.
This chapter explains how to use the BIOS setup utility.
BIOS Setup Menu
The BIOS setup Utility allows you to configure your notebook basic settings.
When you turn your notebook on, the system reads this information to initialize
the hardware so that it can operate correctly. Use the BIOS setup utility to
change your notebook start-up configuration. For example, you can change the
security and power management routines of your system.
Starting the BIOS Setup Utility
You can only enter the BIOS setup utility as the notebook is booting, that is
between the time you turn on the notebook and before the Windows interface
appears. If your notebook is already on, shut down your notebook completely
(power off) and restart it and then press the
Delete
key to enter the setup utility.
Navigating and Entering
Information in BIOS
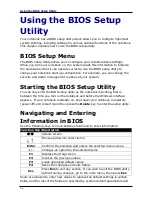
Use the following keys to move between fields and to enter information:
Function Key
Description
Selects screen.
Moves up/down to select items.
Enter
Confirms the selection and enters the selected menu screen.
+
/
-
Changes an option for the selected items.
F1
Displays the Help screen.
F2
Invokes the previous values.
F3
Loads optimized default values.
F4
Saves the changes and exits Setup.
Esc
Press
Esc
to exit any section. If you wish to exit the BIOS utility
without saving changes, go to the main menu, then press
Esc
.
Users are allowed to enter new values to replace the default settings in certain
fields, and the rest of the fields are specified by system default parameters and
Summary of Contents for U12C
Page 1: ......

