background image

Before You Start 


© 2019 Twinhead International Corp and/or its affiliates. All rights reserved. 


Before You Start 

Congratulations on your purchase of this notebook.  

This fully-rugged notebook is portable and provides users with maximum mobile 
computing experience in a wide range of working environments. Before you 
begin using your notebook, read this chapter to familiarize yourself with the main 
components installed in the system. 
 

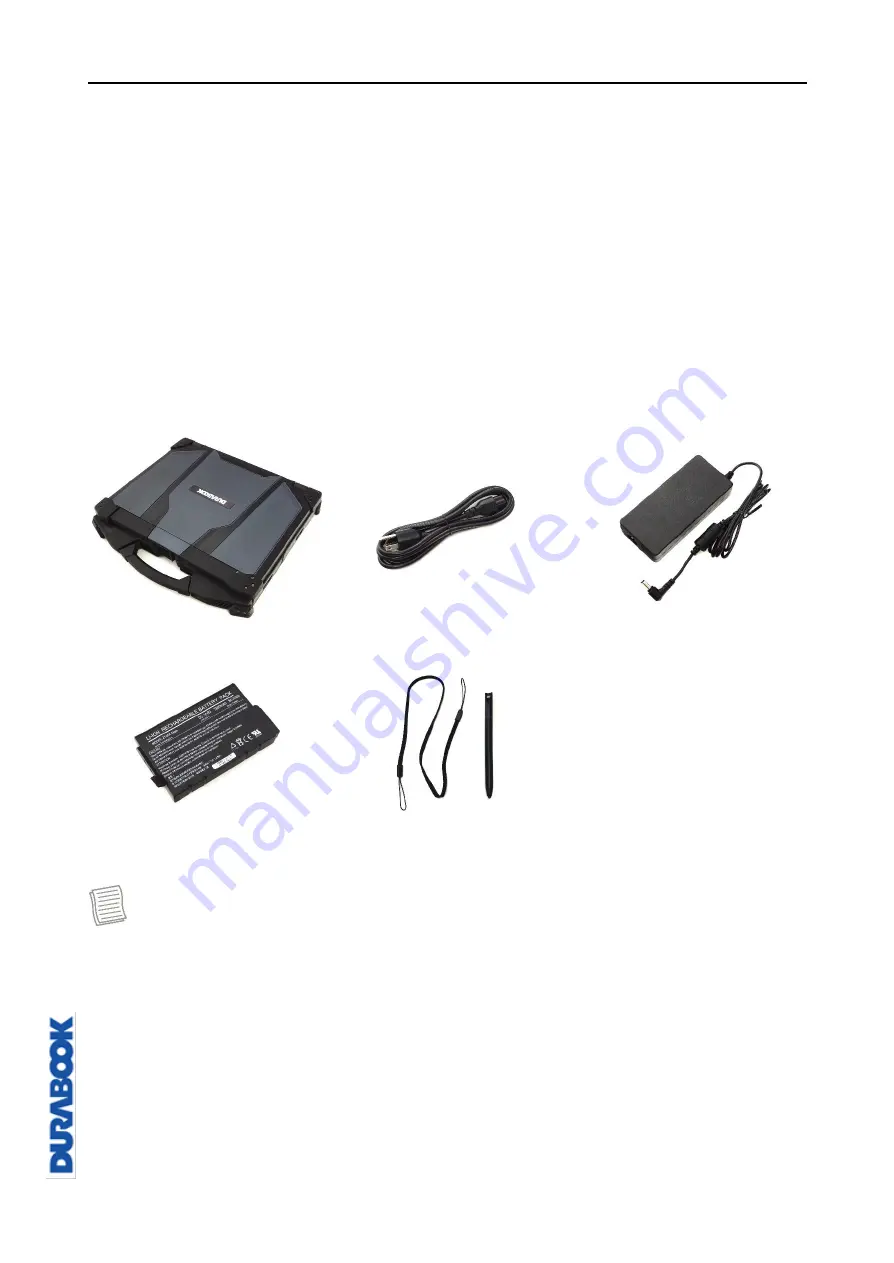
Package Contents 

If any of the following items is damaged, please contact your retailer. 


Notebook 

Power cord 

DC 19V 90W power adapter 


Standard 9-cell Li-ion 

Battery 

Stylus and strap 


NOTE 


These pictures are for reference only. Actual items may slightly differ. 


Declaration of product weight: 3.6kg. The actual weight may vary by 
configuration. 

Summary of Contents for Z14I

Page 1: ... 2019 Twinhead International Corp and or its affiliates All rights reserved ...

Page 2: ...ry Battery 18 USING THE SECONDARY STORAGE 19 Installing the Secondary Storage 19 Removing the Secondary Storage 21 USING THE OPTICAL DISC DRIVE ODD 22 Installing the Optical Disc Drive ODD 22 Removing the Optical Disc Drive ODD 24 USING THE STORAGE DRIVE 25 Installing the Storage Drive 25 Removing the Storage Drive 27 CONNECTING THE POWER 28 Connecting the AC Adapter 28 Using Battery Power 28 Conf...

Page 3: ... Adjusting Brightness 45 Setting Photo Timer 46 Configuring Camera Settings 46 Viewing Photos Videos 47 MAKING CONNECTIONS 48 INSTALLING THE MEMORY CARD 48 INSTALLING A SIM CARD 49 INSTALLING A SMART CARD 50 INSTALLING THE PC CARDS 51 CONNECTINGTHEMICROPHONE HEADSET 52 CONNECTING USB DEVICES 53 CONNECTING TO EXTERNAL DISPLAYS 54 CONNECTING TO A LOCAL AREA NETWORK LAN 56 CONNECTING TO WIRELESS CONN...

Page 4: ...OBLEMS 83 HARD DISK PROBLEMS 84 OTHER PROBLEMS 88 APPENDIX 89 COPYRIGHT 89 SPECIFICATIONS 89 REGULATORY STATEMENT 92 Federal Communications Commission Statement 92 Declaration of Conformity 92 Battery Disposal 93 WARNING EXPLOSION HAZARD 93 CLASS 1 LASER PRODUCT 93 SAFETY INSTRUCTIONS 96 ...

Page 5: ...king environments Before you begin using your notebook read this chapter to familiarize yourself with the main components installed in the system Package Contents If any of the following items is damaged please contact your retailer Notebook Power cord DC 19V 90W power adapter Standard 9 cell Li ion Battery Stylus and strap NOTE These pictures are for reference only Actual items may slightly diffe...

Page 6: ...ference 2 Camera cover Protects the camera 3 Microphones Records the surrounding sound 4 Display screen Optional capacitive touch panel 5 Programmable buttons P1 P2 Press to enter the chosen program user definition 6 7 Status indicators Indicates the corresponding function status 8 Power button Press to turn your notebook on or off ...

Page 7: ...or biometric identification 11 Touch pad Use to point select drag or scroll objects on the screen 12 Touch pad button Press to select objects or display a shortcut menu 13 RFID reader optional Reads tags for data collections from other device Back View No Item Description 1 Docking connector Connects the notebook to a docking station 2 RF Pass thru connectors x3 optional Use for the external anten...

Page 8: ...Type II card or Express Card 54 2 Battery compartment cover latch Slide to the unlock position to release the battery compartment cover 3 Battery compartment Contains the battery 4 Audio Combo jack Connects to headphones external speakers or microphone 5 USB 2 0 port Connects to USB 2 0 peripheral devices 6 USB 3 1 Gen 1 port Connects to USB 3 0 peripheral devices 7 USB 3 1 Gen 1 port Supports USB...

Page 9: ...ble devices The card reader supports SD Secure Digital SDXC Mini SD with adapter 3 RF Signal Slide Switch Slide the switch to enable disable the RF functions 4 Smart card reader Use to insert smart cards 5 Media bay Varies depending on SKU Optical disk drive Secondary battery pack Secondary storage 6 Storage Drive compartment cover latch Slide to the unlock position to release the Storage Drive co...

Page 10: ...an external display 3 VGA port Connects to peripheral devices such as an external monitor projector 4 RS 232 ports Connects to serial peripheral devices 5 RJ 45 ports Connects to a local area network LAN using an Ethernet cable 6 Kensington lock slot Connects to a Kensington compatible notebook security lock ...

Page 11: ... The LED light stays on blue when the system is running When the system is in sleep mode the LED blinks Battery Indicates the battery status Green when the battery is fully charged 95 or above Orange when the battery is charging Flashing orange charging error Red when the battery capacity is lower than 7 Off when discharged RF LED Indicates the wireless connection status Blue Any of the RF feature...

Page 12: ...ystem is turned off and cooled down for 5 minutes Failing to turn off the system before opening it can cause permanent damage to the system and serious or fatal injury to the user Installing the Battery To install the battery follow the steps below 1 Slide the battery compartment cover latch to the unlock position to release the battery compartment cover 2 Open the battery compartment cover ...

Page 13: ...rved 3 Insert the battery into the battery compartment as shown in the image below 4 Push completely until the battery locks into place 5 Close the battery compartment cover 6 Slide the battery compartment cover latch to the lock position to secure the battery compartment cover in place ...

Page 14: ...ely 3 0 hours at 25º C to fully charge the battery NOTE The charging time may be longer if you are using your notebook while charging the battery CAUTION DO NOT charge the battery if the temperature is below 0º C or higher than 45º C Use only the supplied AC adapter Using other AC adapters may damage the battery or your notebook Checking the Battery Level It is important that you monitor the batte...

Page 15: ... battery follow the steps below 1 Slide the battery compartment cover latch to the unlock position to release the battery compartment cover Then open the battery compartment cover 2 Press and hold the battery latch release button Then pull the battery out to disengage it from its compartment 3 Pull the battery out of the battery compartment 4 Close the battery compartment cover Then slide the batt...

Page 16: ... the Secondary Battery Installing the Secondary Battery To install the secondary battery follow the steps below 1 Slide the I O device cover latch to the unlock position to release the I O device cover 2 Open the I O device cover ...

Page 17: ...All rights reserved 3 Insert the secondary battery into the media bay compartment Then push completely until the secondary battery locks into place 4 Close the I O device cover 5 Slide the I O device cover latch to the lock position to secure the I O device cover in place ...

Page 18: ...lease the I O device cover Then open the I O device cover 2 Press and hold the media bay latch release button Then pull the secondary battery out to disengage it from its compartment 3 Pull the secondary battery out of the media bay compartment 4 Close the I O device cover Then slide the I O device cover latch to the lock position to secure the I O device cover in place ...

Page 19: ...filiates All rights reserved Using the Secondary Storage Installing the Secondary Storage To install the secondary storage follow the steps below 1 Slide the I O device cover latch to the unlock position to release the I O device cover 2 Open the I O device cover ...

Page 20: ...econdary storage into the media bay compartment Then push completely until the secondary storage locks into place 4 Close the I O device cover 5 Slide the I O device cover latch to the lock position to secure the I O device cover in place ...

Page 21: ... latch to the unlock position to release the I O device cover Then open the I O device cover 2 Press and hold the media bay latch release button Then pull the secondary storage out to disengage it from its compartment 3 Pull the secondary storage out of the media bay compartment 4 Close the I O device cover Then slide the I O device cover latch to the lock position to secure the I O device cover i...

Page 22: ...ng the Optical Disc Drive ODD Installing the Optical Disc Drive ODD To install the ODD follow the steps below 1 Slide the I O device cover latch to the unlock position to release the I O device cover 2 Open the I O device cover ...

Page 23: ...ts affiliates All rights reserved 3 Insert the ODD into the media bay compartment Then push completely until the ODD locks into place 4 Close the I O device cover 5 Slide the I O device cover latch to the lock position to secure the I O device cover in place ...

Page 24: ...tion to release the I O device cover Then open the I O device cover 2 Press and hold the media bay latch release button Then pull the ODD out to disengage it from its compartment 3 Pull the ODD out of the media bay compartment 4 Close the I O device cover Then slide the I O device cover latch to the lock position to secure the I O device cover in place ...

Page 25: ...hts reserved Using the Storage Drive Installing the Storage Drive To install the storage drive follow the steps below 1 Slide the Storage Drive compartment cover latch to the unlock position to release the Storage Drive compartment cover 2 Open the Storage Drive compartment cover ...

Page 26: ...into its compartment Then push completely until the storage drive is fully seated 4 Close the Storage Drive compartment cover 5 Slide the Storage Drive compartment cover latch to the lock position to secure the Storage Drive compartment cover in place ...

Page 27: ...the Storage Drive compartment cover latch to the unlock position to release the Storage Drive compartment cover Then open the Storage Drive compartment cover 2 Pull the storage drive out of its compartment 3 Close the Storage Drive compartment cover Then slide the Storage Drive compartment cover latch to the lock position to secure the Storage Drive compartment cover in place ...

Page 28: ...er to the DC in jack on your notebook 2 Connect the AC adapter to the power cord 3 Plug the power cord to an electrical outlet Using Battery Power 1 Install the charged battery in the battery compartment 2 Remove the AC adapter if plugged in Your notebook will automatically use the battery power NOTE If your notebook is connected to an electrical outlet and the battery is installed your notebook u...

Page 29: ...filiates All rights reserved Configuring the Power Settings 1 Right click the battery icon on the system tray Then select Power Options 2 Select Change plan settings to customize a power plan 3 Change the desired sleep and display settings Then select Save changes ...

Page 30: ...ights up TIP Besides using the keyboard or touch pad for operations on your notebook you can also use a mouse To use a wired mouse simply plug it into an available USB port Turning Off Your Device It is important to properly shut down your notebook to avoid the loss of unsaved data To shut down your notebook do the following Tap Shut down Wait for your notebook to power off completely before remov...

Page 31: ...Getting Started 2019 Twinhead International Corp and or its affiliates All rights reserved NOTE When closing the cover lid make sure to press the chassis latch firmly until it locks into place ...

Page 32: ...to execute a command Fn F1 Toggles the display on off Fn F2 Toggles between LCD External display or both Fn F3 Switches to suspend mode Fn F4 Decreases the keyboard illumination Fn F5 Increases the keyboard illumination Fn F6 Decreases the display brightness Fn F7 Increases the display brightness Fn F8 Decreases the audio volume Fn F9 Increases the audio volume Fn F10 Toggles the audio mute on off...

Page 33: ... enter numbers or operands as you would on a calculator Using the Touch Pad The touch pad is a cursor pointing device that provides all the features of a two button mouse Its primary function is to move the cursor around the screen You can also point select or drag items or objects on the screen Point Slide your finger on the touch pad to point the cursor to an item or object on the screen Click T...

Page 34: ... left button twice Drag To drag an item or object press and hold the left button then slide your finger on the touch pad to move the item or object Scroll To scroll a page press and hold the left button then slide your finger on the touch pad to scroll ...

Page 35: ...our Notebook This chapter will guide you through how to use your notebook Using the Quick Menu To enter the Quick menu tap the Quick Menu icon on the task bar You can also access the Quick menu in the All apps list Quick Menu Overview NOTE If the tab is green i e this indicates the current function is activated ...

Page 36: ...Programmable Button P1 In the P1 Button Setting section you can assign the function for the P1 button There are three available options Stealth Mode Turns off the LCD backlight LEDs speakers and camera flash Night Vision Mode Adjusts the brightness of the LCD under 1 7 nits and turns off the LEDs and camera flash Launch Application Shortcut key for launching specific applications To assign the app...

Page 37: ...ur available options Touch Screen Mode Toggles the touch screen mode Launch Application Shortcut key for launching the specific application To assign the application refer to the Assigning an Application to the P1 P2 Button section Disable No function Assigning an Application to the P1 P2 Button Tap the P1 Key or P2 Key tab to assign an application to the P1 or P2 button respectively Select the de...

Page 38: ...otebook EN 38 Accessing the Mobility Center Tap the Mobility Center tab to adjust or configure the brightness volume level mute function battery status screen orientation external display sync and presentation settings ...

Page 39: ... You should change the film when it gets worn out You can select the desired touch screen mode in the Quick menu Select one of the available options Select Finger Water if you are using your fingertips Select Glove if you are wearing gloves Select Stylus if you are using a stylus Select Disable to disable the touch function NOTE If the touchscreen mode is set to Glove or Stylus and the touchscreen...

Page 40: ... external WLAN antenna when it is affixed on a docking station Tap the LTE Antenna tab to enable disable the device to automatically switch to the external WWAN antenna when it is affixed on a docking station Tap the GPS Antenna tab to enable disable the device to automatically switch to the external GPS antenna when it is affixed on a docking station NOTE If the tab is green this indicates the cu...

Page 41: ...es All rights reserved Using the Camera Using the Camera application you can use this notebook to take photos videos or panorama shots Opening Camera App To access the Camera application do one the following a Tap Camera b In the Cortana search box enter camera Then tap Camera ...

Page 42: ...Operating Your Notebook EN 42 Taking Photos Tap to capture a photo Recording Videos 1 Tap to switch to Video mode ...

Page 43: ...rights reserved NOTE You can also toggle to switch to Video mode 2 Tap to start recording a video The recording time appears on the bottom of the screen 3 During the video recording you can do the following Tap to pause the recording Then tap to resume Tap to stop recording the video ...

Page 44: ...N 44 Shooting Panorama Photos 1 Tap to switch to Panorama mode NOTE You can also toggle to switch to Panorama mode 2 Tap to start shooting the panoramic photo 3 Slowly move the device toward the direction as shown on the screen ...

Page 45: ...hooting point as shown on the screen To manually stop the shooting tap Adjusting Brightness 1 Tap to display the brightness control slider NOTE If the icon is not appear on the left panel tap and set the Pro mode to On 2 Do the following Tap and drag the slider upwards to brighten your photo or video Tap and drag the slider downwards to darken your photo or video ...

Page 46: ...ond self timer 5 second self timer 10 second self timer Configuring Camera Settings 1 Tap to enter the Settings menu 2 Select the desired menu option and setting Menu Option Description Pro mode Enable this option for show advanced controls for photos and videos Framing grid Show or hide the framing grid lines ...

Page 47: ...ality Set the video quality Flicker reduction Select 50 Hz or 60 Hz to reduce the flickering that may occur when recording video under fluorescent light Related settings Select the related settings that can only be configured in Settings app Viewing Photos Videos After taking a photo recording a video or shooting a panorama photo tap the thumbnail in the bottom right corner to view the most recent...

Page 48: ...s of memory cards to provide faster data transfer Supported types Micro SDHC Micro SDXC 1 Slide the I O device cover latch to the unlock position to release the I O device cover Then open the I O device cover 2 Push the memory card into the memory card slot until it clicks into place 3 Close the I O device cover Then slide the I O device cover latch to the lock position to secure the I O device co...

Page 49: ...es with your network service provider Make sure to turn off the notebook before inserting the SIM card 1 Slide the I O device cover latch to the unlock position to release the I O device cover Then open the I O device cover 2 Push a valid SIM card into the SIM card slot until it clicks into place 3 Close the I O device cover Then slide the I O device cover latch to the lock position to secure the ...

Page 50: ...nformation and provide identification and information using a smart card 1 Slide the I O device cover latch to the unlock position to release the I O device cover Then open the I O device cover 2 Insert a smart card into the smart card slot 3 Close the I O device cover Then slide the I O device cover latch to the lock position to secure the I O device cover in place ...

Page 51: ... II card or Express Card 54 which can perform a variety of functions NOTE Refer to the PC Card manual for specific instructions on the card installation 1 Slide the I O port cover latch to the unlock position to release the I O port cover Then open the I O port cover 2 Insert a PC card firmly into the PC card slot until it clicks into the connector or ...

Page 52: ...t Your notebook is equipped with an audio combo jack that enables you to use the headset or microphone 1 Slide the I O port cover latch to the unlock position to release the I O port cover Then open the I O port cover 2 Plug the stereo headphone cable into the audio combo jack of your device NOTE The headset and microphone are not included in the package They are sold separately ...

Page 53: ...to other USB devices such as a mouse keyboard digital camera printer or an external storage drive 1 Slide the I O port cover latch to the unlock position to release the I O port cover Then open the I O port cover or 2 Connect one end of the USB cable to the USB port of your device 3 Connect the other end of the cable to the USB device if necessary ...

Page 54: ...cting to External Displays You can connect an additional display to your notebook by using the HDMI DisplayPort or VGA cable 1 Slide the I O port cover latch to the unlock position to release the I O port cover Then open the I O port cover or 2 Connect one end of the HDMI DisplayPort or VGA cable to its corresponding port of your device ...

Page 55: ...winhead International Corp and or its affiliates All rights reserved 3 Connect the other end of the cable to the external display NOTE The HDMI cable DisplayPort or VGA cable is not included in the package It is sold separately ...

Page 56: ...rnet cable 1 Slide the I O port cover latch to the unlock position to release the I O port cover Then open the I O port cover 2 Connect one end of the Ethernet cable to the RJ 45 port of your notebook 3 Connect the other end of the Ethernet cable to the router NOTE The Ethernet cable is not included in the package It is sold separately ...

Page 57: ... not disassemble the bumper Otherwise the antenna may be damaged resulting in poor reception Make sure to slide the RF Signal switch to enable the RF functions Connecting to a Bluetooth Device Your notebook can connect and communicate with other Bluetooth enabled devices By default the Bluetooth function is disabled To add a device follow the steps below 1 Tap on the system tray Then tap Bluetooth...

Page 58: ...Making Connections EN 58 2 Tap the Bluetooth icon and select Add a Bluetooth Device 3 Tap and select the kind of device you want to add ...

Page 59: ...evice you want to connect Verify the pairing code on the screen of your device and pairing device match then tap Connect to start pairing NOTE If the device that you want to add does not appear on the screen please check if the device is turned on and discoverable 5 Tap Done to complete the pairing connection ...

Page 60: ...you enter on the notebook must be the same PIN to be entered on the other Bluetooth device Once a partnership has been created connecting to that device again will no longer require entering the PIN To disconnect from the Bluetooth enabled device select the device in the Bluetooth menu and tap Remove device ...

Page 61: ...etwork can be added either when the network is detected or by manually entering the settings information To connect follow the steps below 1 Tap the wireless network icon on the system tray TIP If you do not see the wireless network icon tap on the system tray and tap Wi Fi to enable the Wi Fi function 2 Available wireless network connections are displayed Tap the desired wireless network ...

Page 62: ...t After the connection is established you can see the wireless network icon in the Notification area NOTE Wi Fi access requires service from a wireless service provider Contact your service provider for more information Actual wireless connectivity will depend on the system configuration Please contact your dealer for more information To disconnect from the wireless network select the network in t...

Page 63: ...w the steps below 1 Insert a valid SIM card into the SIM card slot refer to page 49 2 Tap the cellular network icon on the system tray Then tap Cellular to enable the Internet connection via mobile data network NOTE The above screenshot is for illustration purposes only The Cellular option will only appear on a device that is equipped with a LTE module TIP If you do not see the cellular network ic...

Page 64: ...Making Connections EN 64 3 After the connection is established you can see the cellular network icon in the Notification area ...

Page 65: ... to initialize the hardware so that it can operate correctly Use the BIOS setup utility to change your notebook start up configuration For example you can change the system s security and power management routines Starting the BIOS Setup Utility You can only enter the BIOS setup utility as the notebook is booting i e between the time you turn on the notebook and before the Windows interface appear...

Page 66: ...3 Optimized Defaults F4 Save Exit Esc Exit Users are allowed to enter new values to replace the default settings in certain fields and the rest of the fields are specified by system default parameters and cannot be modified by users Reverse the attribute of the main options and press the Enter button to enter into the submenu Press the Esc button to return to the previous configuration page To dis...

Page 67: ...tem date and time Item Description BIOS Information Displays the BIOS version detected during boot up System Information Displays the CPU type and speed total memory mainboard version UEFI Firmware version processor type ME FW version ME Firmware SKU serial number and UUID SATA Information Displays the SATA hard drive information System Date Sets the system date System Time Sets the system time ...

Page 68: ...nly in some specific SKUs Device Configurations Configures the device settings including USB 3 0 ports 1 2 USB 2 0 ports 3 4 LAN SD card reader TPM device HD audio finger printer scanner touch screen front camera smart card wireless LAN Bluetooth GPS and Intel AMT For details refer to Device Configurations on page 70 Antenna Switching Configurations Configures the external WLAN GPS or WWAN antenna...

Page 69: ...age 73 UART port1 Mode selection Sets the UART port1 mode This function is supported only in some specific models or SKUs CPU Configurations Select this option to configure the CPU parameters Item State Description Intel VMX Virtualization Technology Enabled Turns on the function The default value is Enabled Disabled Turns off the function VT d Enabled Turns on the function The default value is En...

Page 70: ...AN Enabled Turns on the function Disabled Turns off the function LAN No 2 Enabled Turns on the function Disabled Turns off the function SD Card reader Enabled Turns on the function Disabled Turns off the function TPM Device Enabled Turns on the function Disabled Turns off the function HD Audio Enabled Turns on the function Disabled Turns off the function Fingerprint Scanner Enabled Turns on the fu...

Page 71: ... function Wireless LAN Enabled Turns on the function Disabled Turns off the function Bluetooth Enabled Turns on the function Disabled Turns off the function GPS Enabled Turns on the function Disabled Turns off the function WWAN Enabled Turns on the function Disabled Turns off the function PCMCIA Card Slot 1 Enabled Turns on the function Disabled Turns off the function PCMCIA Express Card Slot 2 En...

Page 72: ...WAN antenna when it is affixed on a docking station Disabled Turns off the function NOTE By default all settings are set to Disabled Power Configurations Select this option to configure the power management settings Item State Description Keyboard Backlight Timer Settings Keyboard Backlight Off 1 3 5 10 15 30 60 120 Minutes Configures the length of time the keyboard backlight will remain on Resume...

Page 73: ...ect this option to configure the touchscreen mode Item Description Finger Water mode Select this for fingertip operation When raindrops are falling on the screen should be rejected as input This mode is set as the default operation mode Glove mode Select this if you are wearing gloves Stylus mode Select this if you are using the stylus ...

Page 74: ... and boot sequence Item Description Bootup NumLock State Selects the keyboard NumLock state Launch CSM Enables Disables CSM support Launch Network PXE OpRom Selects the LAN PXE boot mode Option ROM Messages Sets the display mode for Option ROM messages Boot Option Priorities Sets the system boot order ...

Page 75: ...its affiliates All rights reserved Security Menu The Security menu allows you to set the Administrator password and configure the Secure Boot settings Item Description Administrator Password Sets the administrator password Secure Boot Configures the Secure Boot settings ...

Page 76: ...up options before leaving the BIOS Setup Menu Item Description Save Changes and Reset Resets the system after saving any changes Discard Changes and Reset Resets the system setup without saving any changes Restore Defaults Restores the default values for all the Setup options Boot Override Displays all available boot options from the Boot Option List ...

Page 77: ...lock loop the lock cable around a stationary object such as a table Then insert the lock into the Kensington lock hole and turn the key to secure the lock Store the key in a safe place Storing and Handling Your Notebook General Storage and Handling Guidelines Use your notebook at the recommended temperature between 0 C 32 F and 55 C 131 F to ensure optimal performance Actual operating temperature ...

Page 78: ...cial protective coating that prevents dirt from sticking to it Not using a soft cloth may cause damage to the special protective coating on the touchscreen surface Turn off the notebook power when cleaning the display Cleaning the display with the power on may cause improper operation Do not use excessive force on the display Avoid placing objects on top of the display as this may cause the glass ...

Page 79: ...or damage the battery If your battery is charged in a cold less than 5 C 41 F or very warm greater than 50 C 122 F environment it is possible that the battery LED will indicate that the charge has stopped however this does not necessarily mean that your battery is fully charged Read and follow all battery precautions in the Safety section Use only batteries of the same kind as replacements Turn th...

Page 80: ...elow Back up the data on your hard drive to a flash drive or other storage device As an added precaution bring an extra copy of your important data Make sure that the battery pack is fully charged Ensure that your notebook is turned off Confirm that all the connector covers are closed completely to ensure the device s waterproof integrity Disconnect the AC adapter from your notebook and take it wi...

Page 81: ...Are there any messages on the screen Do any indicators light up Do you hear any beeps Detailed descriptions are useful to the service personnel when you need to consult someone for assistance 7 If any problem persists after you follow the instructions in this chapter contact an authorized dealer for help Solving Common Problems Battery Problems The battery does not charge To prevent possible damag...

Page 82: ...ery if you are not getting the usage you need from it To meet ENERGY STAR requirements Wake on LAN is enabled by default If running on battery power this may decrease battery run time To change Wake on LAN settings open the Device Manager Network Adapters and select the LAN device Open the device Properties and select Power Management Disable the Wake on LAN setting by unchecking Allow this device...

Page 83: ...play Problems The display performance is slow The temperature may be too cold Move the device to a warmer operating environment The underlined inverse and hypertext characters are difficult to read on the screen Right click on the Windows Desktop select Personalize then Colors to change the color and style of your Windows I changed my display resolution but I see no difference on the screen Select...

Page 84: ...re The device does not startup properly Make sure you remove any USB drives from the unit before you start it Connect the AC adapter to charge the battery if it is not charged If the battery does not begin charging perform the following 1 Remove the battery 2 Connect the AC adapter 3 Turn on the device by pressing the button 4 Reinstall the battery The battery LED is a steady orange while the batt...

Page 85: ...ternational Corp and or its affiliates All rights reserved 3 Under Reset this PC tap Get started 4 Select one of the two options depending on your needs Keep my files requires around 3 to 4hr Remove everything requires around 5 to 6hr ...

Page 86: ...leshooting EN 86 5 You are informed of the programs that will be removed Tap Next to proceed 6 Tap Reset to start resetting NOTE If you see a message as shown below that means WinRE Windows Reset is disabled ...

Page 87: ...resetting Windows follow the steps below a Hover mouse over Start menu b Right click and select Command Prompt Admin from the pop up menu c Enter the following command Reagentc enable d Press Enter Wait until you see the Operation Successful status on the screen e Follow steps 1 to 7 to reset your device ...

Page 88: ...own the button for at least ten seconds release it and then press the button again The device won t turn off 1 Select Start Power Restart 2 If that does not work press Ctrl Alt Del and then select Task Manager 3 If any programs are open use your arrow keys to highlight each one and select End task Repeat this until all programs are closed 4 If that still does not work press and hold the button for...

Page 89: ...iation Salt Fog Fungus Resistance MIL STD 461G certified Conduction Radiation Conducted Susceptibility Radiated Susceptibility ANSI ISA 12 12 01 2000 Class I Division 2 6 drop 26 faces IP 65 certified Aluminum magnesium alloy chassis Port covers Removable quick release battery and storage drive Sunlight readable display Optional swappable battery technology OPERATING SYSTEM Windows 10 Pro 64 bit P...

Page 90: ...yboard volume and mute controls CAMERA Integrated 2 0 MP web cam with shutter design KEYBOARD INPUT 2 user definable keys P1 P2 RF signal slide switch Standard membrane keyboard with optional LED backlight membrane keyboard COMMUNICATONS Integrated 10 100 1000 Ethernet Intel Dual Band Wireless AC 9260 802 11a b g n ac Bluetooth V5 0 Optional dedicated GPS module UBLOX NEO M8N Optional 4G LTE multi...

Page 91: ...IA Type II x 1 ExpressCard 54 x 1 or PCMCIA Type II x 1 Optional RF antenna pass through for GPS WWAN and WLAN MEDIA BAY One Option Only Optional DVD super Multi Optional 2nd battery Optional 2nd storage SSD POWER AC adapter 100 240V 50Hz 60Hz 90W Main battery Li Ion 10 8V 7800mAh 15 hours Optional 2nd battery Li Ion 10 8V 4700mAh Optional bridge battery 5 minutes swap time ENVIRONMENT Temperature...

Page 92: ...ween the equipment and the receiver Connect the equipment into an outlet on a circuit different from that to which the receiver is connected Consult the dealer or an experienced radio TV technician for help FCC Caution Any changes or modifications not expressly approved by the party responsible for compliance could void the authority to operate equipment This device and its antenna must not be co ...

Page 93: ...R ENDRE CE MATERIEL INACCEPTABLE POUR LES EMPLACEMENTS DE CLASSE I DIVISION 2 WARNING TO PREVENT IGNITION OF A HAZARDOUS ATMOSPHERE BATTERIES MUST ONLY BE CHARGED IN AN AREA KNOWN TO BE NON HAZARDOUS And AVERTISSEMENT RISQUED EXPLOSION AFIN D EVITER TOUT RISQUE D EXPLOSION S ASSURER QUE L EMPLACEMENT EST DESIGNE NON DANGEREUX AVANT DE CHANGER LA BATTER IE WARNING EXPLOSION HAZARD DO NOT CONNECT OR...

Page 94: ...EZ LE MANUEL D INSTRUCTIONS ATTENTIVEMENT ET CONSERVEZ LE POUR RÉFÉRENCE FUTURE EN CAS DE PROBLÈMES AVEC CE MODÈLE VEUILLEZ CONTACTER VOTRE STATION DE SERVICE AUTORISÉE LA PLUS PROCHE POUR ÉVITER UNE EXPOSITION DIRECTE AUX FAISCEAUX LASER N ESSAYEZ PAS D OUVRIR CE BOÎTIER ANNEX IV Symbol for the marking of electrical and electronic equipment The symbol indicating separate collection for electrical...

Page 95: ...THE MANUFACTURER S INSTRUCTIONS replacement of a battery with an incorrect type that can defeat a safeguard for example in the case of some lithium battery types disposal of a battery into fire or a hot oven or mechanically crushing or cutting of a battery that can result in an explosion leaving a battery in an extremely high temperature surrounding environment that can result in an explosion or t...

Page 96: ...p objects to tap on the display screen Do not expose the device to direct sunlight and dusty environments Keep the device away from excessive heat and humidity Keep liquids away from the device Keep the device away from any magnetic emitting devices as this may affect the quality of the wireless signal reception When using an AC adapter Place this device in a location that is close enough to an el...

Page 97: ...et de l humidité Gardez les liquides à l écart de l appareil Gardez l appareil à l écart des appareils émettant des ondes électromagnétiques car celles ci peuvent affecter la réception du signal sans fil Lors de l utilisation d un adaptateur secteur Placez l appareil à un emplacement suffisamment proche d une prise électrique pour prendre en charge la longueur du cordon d alimentation Utilisez uni...

Page 98: ...Appendix EN 98 Twinhead International Corp 11F No 550 Ruiguang Rd Neihu Taipei 11492 Taiwan R O C ...

Reviews: