background image

IB-CD1493(AD-63E)-WM-E-030404

6

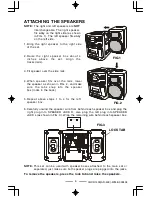
ATTACHING  THE  SPEAKERS

6.Carefully  unwind  the  speaker  wire  from  behind  each  speaker  box  and  plug  the

right  plug  into  SPEAKER  JACK  R,  also  plug  the  left  plug  into  SPEAKER
JACK L (as shown in FIG. 3). Wrap the remaining wire behind each speaker box.

NOTE:

  The  right  and  left  speakers  are 

NOT

interchangeable.  The  right  speaker
fits 

only

 on the right side (as shown

in FIG.  1). The  left speaker  fits 

only

on  the  left  side.

1.Bring  the  right  speaker  to  the  right  side

of  the  set.

2.Raise  the  right  speaker  box  about  4

inches  above  the  set.  Align  the
tracks (rails).

3.Fit speaker over  the side rails.

4.When  speaker  fits  over  the  rails,  lower

the  speaker  as  shown  in  FIG.  2,  and  make
sure  the  tabs  snap  into  the  speaker
box (locks in the back).

5.Repeat  above  steps  1  to  4  for  the  left

speaker  box.

NOTE:

This  set  can  be  used  with  speaker  boxes  attached  to  the  main  set  or
separated,  just  make  sure  both  speaker  plugs  are  plugged  into  the  jacks.

To  remove  the  speakers,  press  the  lock  tab  and  raise  the  speakers.

FIG.1

FIG.2

FIG.3

LOCK TAB

IB-CD1493(63E)-WM-E-030404.p65

10/03/2004, 06:00 PM

7

Summary of Contents for CD-1493

Page 1: ... SPEAKERS MODEL CD 1493 OPERATING INSTRUCTIONS PLEASE READ CAREFULLY BEFORE USE PLAYS MUSIC COMPACT DISCS FULLY PROGRAMMABLE CD PLAYER WITH REPEAT RECEIVES AM FM STEREO BROADCASTS RECORDS FROM CD RADIO OR BUILT IN MICROPHONE DETACHABLE SPEAKER SYSTEM 2 WAY POWER AC DC REQUIRES 8 SIZE C BATTERIES ...

Page 2: ...from the apparatus 11 Only use attachments accessories specified by the manufacturer 12 Unplug this apparatus during lightning storms or when unused for long periods of time 13 Refer all servicing to qualified service personnel Servicing is required when the apparatus has been damaged in any way such as power supply cord or plug is damaged liquid has been spilled or objects have fallen into the ap...

Page 3: ...vice the appliance beyond that described in the operating instructions All other servicing should be referred to qualified service personnel CAUTION Use of controls or adjustments or performance of procedures other than those specified herein may result in hazardous radiation exposure This compact disc player is classified as CLASS 1 LASER PRODUCT as stated on the bottom of the set Do not apply oi...

Page 4: ... a long period of time several months or more since during the period the batteries could leak damaging the product 10 Discard weak or dead batteries as soon as possible since they are more likely to leak in the product Batteries should be replaced depending on the product when the display gets dim or if the Low Battery Indicator shows or if the sound gets distorted 11 Do not store this product in...

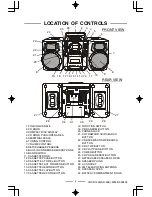
Page 5: ...WARD BUTTON 15 CASSETTE REWIND BUTTON 16 CASSETTE PLAY BUTTON 17 CASSETTE RECORD BUTTON 18 FUNCTION SWITCH 19 CD RANDOM BUTTON 20 PHONES JACK 21 CD FORWARD SKIP SEARCH BUTTON 22 CD BACKWARD SKIP SEARCH BUTTON 23 CD STOP BUTTON 24 CD PLAY PAUSE BUTTON 25 POWER BUTTON 26 CD PROG REPEAT BUTTON 27 DETACHABLE SPEAKER LOCKS 28 SPEAKER PLUGS 29 AC SOCKET 30 FM TELESCOPING ANTENNA 31 SPEAKER JACKS 32 BATT...

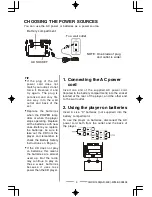
Page 6: ...E One blade of plug and outlet is wider TIP If the plug of the AC power cord does not match your outlet do not force it Reverse it and try again The plug is polarized and only fits one way into the wall outlet and back of the set Replace the batteries when the POWER lamp dims or when the player stops operating Replace all the batteries with new ones Before you replace the batteries be sure to take...

Page 7: ...nly on the left side 1 Bring the right speaker to the right side of the set 2 Raise the right speaker box about 4 inches above the set Align the tracks rails 3 Fit speaker over the side rails 4 When speaker fits over the rails lower the speaker as shown in FIG 2 and make sure the tabs snap into the speaker box locks in the back 5 Repeat above steps 1 to 4 for the left speaker box NOTE This set can...

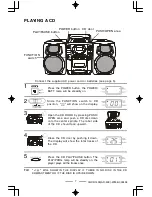
Page 8: ...r cord or batteries see page 5 3 Slide the FUNCTION switch to CD position will show on the display Press the CD PLAY PAUSE button The PLAY PROG lamp will be steadily on the player plays all the tracks once 7 TIP WILL SHOW IN THE DISPLAY IF THERE IS NO DISC IN THE CD COMPARTMENT OR IF THE DISC IS UPSIDE DOWN POWER button CD door PUSH OPEN area PLAY PAUSE button FUNCTION switch Close the CD door by ...

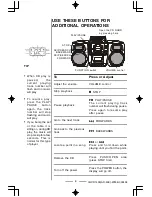
Page 9: ...s paused the current playing track number will flash and no music will play Remove the CD Press PUSH OPEN area press STOP first To resume play press the PLAY PAUSE button again the track number will stop flashing and music will play 8 FORWARDS BACKWARDS STOP PLAY PAUSE Turn off the power Press the POWER button the display will go off If you bump the set or the table it is sitting on during CD play...

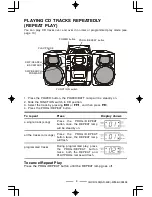
Page 10: ...EAT lamp will flash programmed tracks During programmed play press the PROG REPEAT button twice both the REPEAT and PLAY PROG lamps will flash Display shows To cancel Repeat Play Press the PROG REPEAT button until the REPEAT lamp goes off 9 2 Slide the FUNCTION switch to CD position 3 Select the track by pressing or and then press 4 Press the PROG REPEAT button 1 Press the POWER button the POWER B...

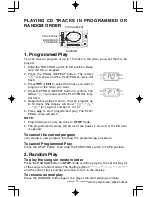
Page 11: ...ow for program number 11 to 16 6 Press to start programmed play The PLAY PROG lamp will flash NOTE 1 Programming can only be done in STOP mode 2 The programmed memory will be lost if the power is shut off or the CD door is opened To cancel the current program Just create a new program following the programming procedure To cancel Programmed Play Press the STOP button then slide the FUNCTION switch...

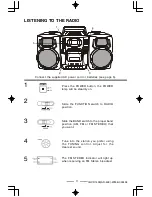
Page 12: ...position AM FM or FM STEREO that you want Tune into the station you prefer using the TUNING control Adjust for the clearest sound 4 The FM STEREO indicator will light up when receiving an FM Stereo broadcast 11 Press the POWER button the POWER lamp will be steadily on 5 Connect the supplied AC power cord or batteries see page 5 1 2 3 4 5 POWER ...

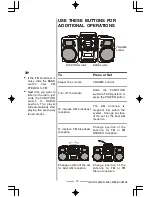
Page 13: ... to the radio just slide the FUNCTION switch to RADIO position The player will automatically start playing the previously tuned station To improve AM broadcast reception The AM antenna is magnetic bar within the system Change position of the set for the best AM reception To improve FM broadcast reception Change position of the antenna for FM or FM STEREO reception Change position of the set for be...

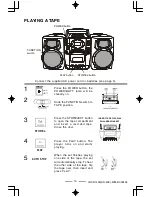
Page 14: ...itch to TAPE position 1 4 When the set finishes playing one side of the tape the set will automatically stop To hear the other side of the tape flip the tape over then insert and press PLAY AUTO STOP STOP EJ 13 5 Connect the supplied AC power cord or batteries see page 5 Press the POWER button the POWER BATT lamp will be steadily on INSERT TAPE THIS WAY FULL REEL ON LEFT POWER button FUNCTION swit...

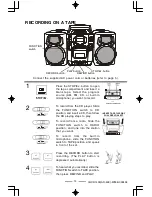
Page 15: ... CD position and insert a CD then follow the CD playing steps to play To record from a radio Slide the FUNCTION switch to RADIO position and tune into the station that you want To record from the built in microphone slide the FUNCTION switch to TAPE position and speak in front of the set Press the RECORD button to start recording The PLAY button is depressed automatically 4 3 Connect the supplied ...

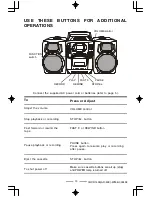
Page 16: ...ewind the tape FAST F or REWIND button Pause playback or recording PAUSE button Press again to resume play or recording after pause STOP EJ button 15 To shut power off Make sure cassette buttons are all up stop and POWER lamp is turned off STOP EJ button Connect the supplied AC power cord or batteries refer to page 5 FUNCTION switch VOLUME control RECORD PLAY REWIND FAST F STOP EJ PAUSE ...

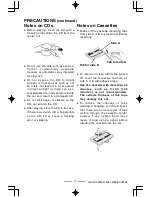
Page 17: ...bump the set during CD play the music will stop or skip for a few seconds This is normal for this type of player On Placement Do not leave the player in a location near a heat source or in a place subject to direct sunlight excessive dust or mechanical shock Do not place the player on an inclined or unstable place Do not place anything within 1 inch of the back of the cabinet The ventilation holes...

Page 18: ...re the CD in its case If there is a scratch dirt or fingerprints on the CD it may cause a tracking error or skipping Side A Tab for side A Tab for side B Notes on Cassettes Break off the cassette recording tabs from side A or B to prevent accidental recording 17 To record on a tape with its tab broken off cover the respective tab hole for side A or B with adhesive tape Use of a cassette with more ...

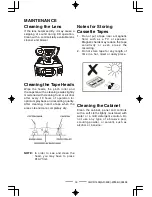
Page 19: ...oistened with water or a mild detergent solution Do not use any type of abrasive pad scouring powder or solvent such as alcohol or benzine 18 Notes for Storing Cassette Tapes 1 Do not put a tape near a magnetic field such as a TV or speaker Magnetic fields may reduce the tape sensitivity or even erase the recording 2 Do not store tape for any length of time in a hot moist or dusty place NOTE In or...

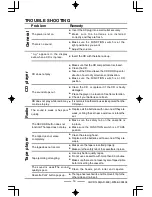
Page 20: ...ith more than 90 minutes Make sure there are no loose layers of tape visible before inserting the cassette 19 The tape does not erase completely Clean the heads pinch roller and capstan Insert the AC plug into a wall outlet securely Make sure the batteries are installed correctly and they are fresh Make sure that the CD compartment is closed Clean the CD Take out the CD and leave the CD DOOR open ...

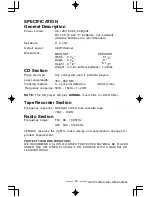
Page 21: ...8 108 MHz AM 530 1700 kHz PROTECT YOUR FINE FURNITURE WE RECOMMEND A CLOTH OR OTHER PROTECTIVE MATERIAL BE PLACED UNDER THE SET WHEN PLACING IT ON SURFACE WITH A NATURAL OR LACQUER FINISH Frequency response 50Hz 15kHz 1 2 dB 20 LENOXX reserves the right to make design and specification changes for product improvement NOTE This CD player will play NORMAL music CDs or CD R CDs MAIN SET SPEAKER AC 12...

Page 22: ...ucts which have been subject to misuse neglect or accident This warranty does not cover broken cord or cabinet UNDER NO CIRCUMSTANCES WILL LENOXX ELECTRONICS CORP BE LIABLE FOR ANY INCIDENTAL OR CONSEQUENTIAL DAMAGES Some states do not allow the exclusion or limitation of incidental or consequential damages so the above limitations or exclusions may not apply to you This warranty gives you specifi...

Reviews: