background image

E - 4

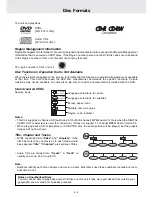
The unit can playback.

Region Management Information

Region Management Information: This unit is designed and manufactured to respond to the Region Management
Information that is encoded on DVD discs. If the Region number printed on the DVD disc does not correspond
to the Region number of this unit, this unit cannot play that disc.

The region number of this unit is 1.

Disc Function or Operation that is Not Available

When the 

 symbol appears on the  screen, it indicates that the function or operation attempted is not available

at that time. This occurs because the DVD disc manufacturer determines the specific functions. Certain
functions may not be available on some discs. Be sure to read the documentation provided with the DVD.

Notes on Unauthorized Discs
You may not be able to play back some DVD discs on this unit if they were purchased from outside your
geographic area or made for business purposes.

Title, Chapter and Tracks

• DVDs are divided into “titles” and “chapters”. If the

disc has more than one movie on it, each movie would
be a separate “title”“Chapters” are sections of titles.

• Audio CDs are divided into “tracks”. A “track” is

usually one song on an Audio CD.

Note :
• Numbers identify each title, chapter, and track on a disc. Most discs have these numbers recorded on them,

but some do not.

Icons Used on DVDs

Sample lcons

Language selections for audio

Language selections for subtitles

Screen aspect ratio

Multiple camera angles

Region code indicator

Notes:
• This Unit supports 2-channel (L/R) audio and 5.1ch (Multi-channel) MPEG Audio 1/2 (only when the DIGITAL

AUDIO OUT coaxial jack is used for connection). It does not support 7.1 channel MPEG Audio Version 2.0.

• When playing back a CD-G (Graphics) or CD EXTRA disc, the audio portion will be  played, but the graphic

images will not be shown.

Disc Formats

2

2

2

1. English
2. French

1. English
2. French

LB

Audio CDs
[8cm/12cm disc]

DVDs
[8cm/12cm disc]

Summary of Contents for STS92D

Page 1: ...OWNER S MANUAL OWNER S MANUAL DVD HOME THEATER SYSTEM CD R 1 ...

Page 2: ...unit by placing it in a place with poor air flow by covering it with a cloth or by placing it on carpeting FCC Information This device complies with Part 15 of FCC Rules Operation is subject to the following two conditions 1 This device may not cause harmful interference and 2 This device must accept any interference received including interference that may cause undesirable operation Shield cable...

Page 3: ...aken so that the grounding or polarization means of an appliance are not defeated 12 Power Cord Protection Power supply cords should be routed so that they are not likely to be walked on or pinched by items placed upon or against them paying particular attention to cords at plugs convenience receptacles and the point where they exit from the appliance 13 Cleaning The appliance should be cleaned on...

Page 4: ...rol 6 PartsandFunctions 7 Setup 8 10 ConnectingyourTV 8 Connectinganothersource 8 Connectingyouraudioplayer 8 Connectingthespeakers subwoofer 9 Positioningthespeakersandsubwoofer 9 Mountingrearsurroundspeakers 10 TurningontheUnitandTV 10 PowerConnection 10 Adjusting the Sound 11 PlayingaDisc 12 13 PlayingaDisc 12 Pausingplayback stillmode 12 Stoppingplayback 13 Toskiptoadifferenttrack 12 FastFowar...

Page 5: ...d from outside your geographic area or made for business purposes Title Chapter and Tracks DVDs are divided into titles and chapters If the disc has more than one movie on it each movie would be a separate title Chapters are sections of titles Audio CDs are divided into tracks A track is usually one song on an Audio CD Note Numbers identify each title chapter and track on a disc Most discs have th...

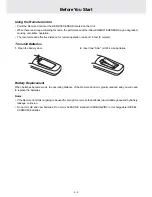
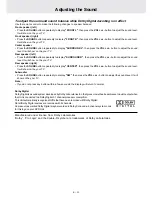
Page 6: ... avoid damage caused by battery leakage corrosion Do not mix old and new batteries Do not mix ALKALINE standard CARBON ZINC or rechargeable NICKEL CADMIUM batteries 2 Insert two AAA or UM 4 size batteries Using the Remote Control Point the Remote Control at the REMOTE SENSOR located on the Unit When there is a strong ambient light source the performance of the infrared REMOTE SENSOR may be degrade...

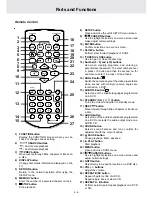
Page 7: ... Selects sound balance and tone controls for adjustment with the cursor buttons 20 PAUSE button Pause playback frame advance 21 PLAY button Start playback 22 MENU button Open and close DVD s menu 23 CURSOR buttons Use to highlight selections on a menu screen and adjust certain settings 24 GOTObutton Skip directly to a specific location on a DVD disc 25 VOL buttons Adjust the volume 26 REPEAT DISC ...

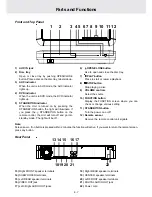
Page 8: ...ator When the unit is in AUX mode the AUX indicator lights up 4 DVD indicator When the unit is in DVD mode the DVD indicator lights up 5 STANDBY ON indicator When the Unit is turned on by pressing the STANDBY ON button the light will illuminate If you press the STANDBY ON button on the remote control the Unit will turn off and go into standby mode The light will be off 6 OPEN CLOSEbutton Use to op...

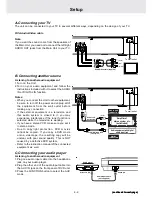
Page 9: ... you may experience interference if the tuner function is selected while the television is working If you have a stereo VCR make sure you set it in stereo mode Due to copyright protection DVD movies cannot be copied If you copy a DVD movie onto a videotape the resulting copy will be unclear with poor sound quality This is NOT caused by a defective DVD system Refer to the instruction manual of the ...

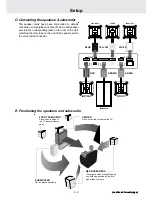
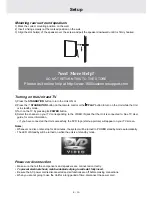
Page 10: ...matching the color tube on the end of the speaker wire to the color coded connector E Positioning the speakers and subwoofer CENTER Place on the top of or below the TV REAR SPEAKERS Place right beside or slightly behind your listening position and a little higher than your ears SUBWOOFER Can be placed anywhere FRONT SPEAKERS Place on both sides of the TV equal distances apart SUBWOOFER RIGHT FRONT...

Page 11: ... automatically The LED of Standby will be turned on while the unit is at standby mode Power cord connection Make sure that all the components and speakers are connected correctly To prevent electrical shock match wide blade of plug to wide slot fully insert Be sure the AC power cord is disconnected and all functions are off before making connections When you are not going to use the Unit for a lon...

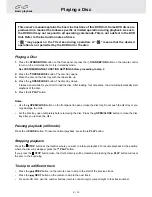
Page 12: ...will show on the your TV Rear speaker right Press the SOUND button repeatedly to display CENTER then press the VOL or button to adjust the sound level It will show on the your TV Subwoofer Press the SOUND button repeatedly to display SW then press the VOL or button to adjust the sound level It will show on the your TV Note If you do not press any button within a few seconds the display will return...

Page 13: ...Unit to load the disc After loading for some discs the Unit will automatically start playback of the disc 5 Press the PLAY button Notes Use the OPEN CLOSE button on the front panel to open or close the disc tray Do not push the disc tray or you may damage the Unit Let the disc tray open completely before removing the disc Press the OPEN CLOSE button to close the disc tray after you remove the disc...

Page 14: ...d If only one angle is recorded 1 1 is displayed Audio selection On some discs the sound is recorded in two or more formats Follow the directions below to select the type of playback 1 While a disc is playing press the AUDIO button to show the current audio format number 2 Press the AUDIO button repeatedly to select the desired audio format Notes If only one audio format is recorded the number doe...

Page 15: ...now the chapter track number you want to play you can locate a specifc chapter track by directly selecting a chapter track number 1 Press the GOTO button to search your desired chapter track 2 Press or button to highlight a chapter track and press the corresponding number button s for the chapter you want 3 Press the ENTER button to confirm The Unit will start playback about 3 seconds later DVD DV...

Page 16: ... Press the PLAY button to start the programmed playback Note If you press the STOP button twice at programmed playback mode the programmed playback function will be cancelled CD DVD programmable memory Advanced playback Programmable memory Track programmed playback 1 Press the MEMORY button while the disc is stopped 2 Enter the track numbers in 3 Use or button to other field 4 Repeat steps 2 to 3 ...

Page 17: ... track is played repeatedly Repeating a whole disc 2 While the disc is playing press the REPEAT DISC button until the REP REP ALL indicator displays on the screen The whole disc is played repeatedly To resume normal playback 3 Press the REPEAT DISC button until the REP OFF indicator displays on the screen Repeating a specific section You can play a specific section repeatedly 1 While the disc is p...

Page 18: ... while to load the disc automatically begin playback Press the or CURSOR button to view and select the files you want to listen to then press ENTER button to confirm and this selected file will be played Notes You can press the II PAUSE button to interrupt playback and press the PLAY button to resume playback You also can use GOTO function or use the numbered buttons to enter the number to quickly...

Page 19: ... When wide screen video is played this mode clips the right and left sides of the image so that it can be viewed on a conventional screen Some wide screen DVDs that do not permit Pan Scan mode playback are automatically played in letterbox mode black bands top and bottom Letter Box When wide screen video is played in this mode on a conventional screen black bands appear at the top and bottom of th...

Page 20: ... to their content The contents allowed by parental lock level and the way a DVD disc is controlled may vary from disc to disc For example if the disc allowed you could lock out violent scenes unsuitable for children or you could lock out playback of the disc altogether You cannot play DVD discs rated higher than the level you selected unless you cancel the parental lock function The parental lock ...

Page 21: ...as benzine or alcohol to clean the disc Do NOT use irregular shape discs example heart shaped octagonal etc They may cause malfunctions Cleaning the Unit Be sure to turn the Unit off and disconnect the AC power cord before maintaining the Unit Wipe the Unit with a dry soft cloth If the surfaces are extremely dirty wipe clean with a cloth which has been dipped in a weak soap and water solution and ...

Page 22: ...ol down No picture The region number of the disc doesn t match the region number of this Unit The TV is not set to receive DVD signal output The video cable is not connected The TV is not turned on The picture is not clear Clean the disc The disc is scratched Severe hum or noise is Check that the speakers and equipment are connected securely heard Check that the connecting cords are away from a tr...

Reviews: