Dura
Build
3
3
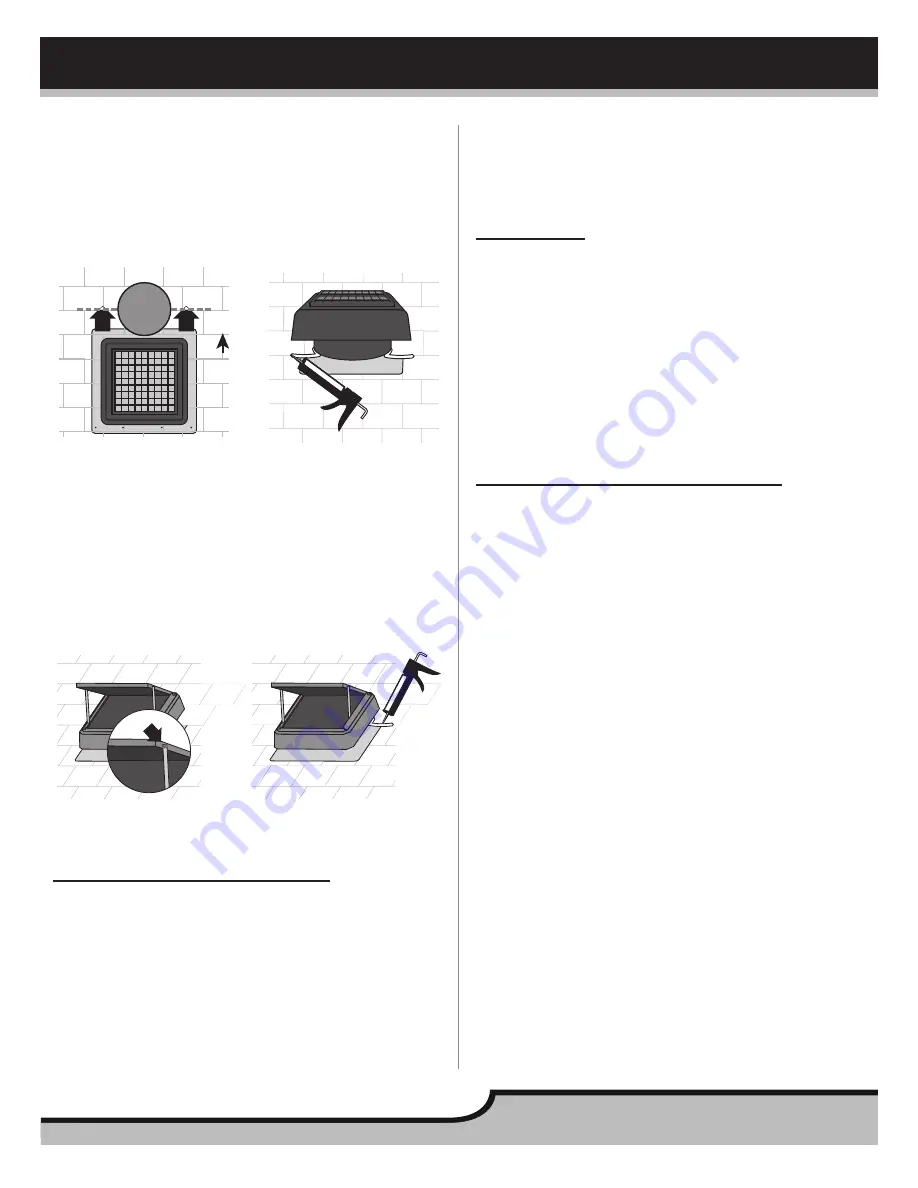
8. Using four (4) roofing nails, secure the solar fan to the roof.
The solar fan should be secured across the bottom of the
flashing.
9. Apply waterproof roofing sealant to the nail heads. Use
more roofing nails as needed to secure any loose shingles.
Always apply waterproof roofing sealant to the backside
of any loose shingles or nails heads that have been added
(Fig. 8).
UP
Fig. 7
Fig. 8
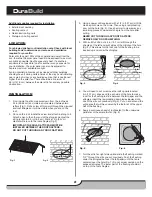
10. Loosen the screw on the clip/screw assembly located on
each side of the solar panel bracket (Fig. 9). Adjust the
solar panel to a position that will collect the most sunlight
throughout the day. Tighten screws at the desired position.
11. To ensure water tightness, roofing caulking must be used
to seal between all the edges of the base and the roof,
especially bottom and side areas of base not covered by
shingles (Fig. 10).
Fig. 9
Fig. 10
REPLACE AN EXISTING VENT
This solar attic fan is ideal for replacement of an existing
static vent provided the original attic vent has a similarly sized
footprint. This product requires a roof opening of 12 in
(30.48 cm) to 14 in (35.56 cm) diameter. The position of the
existing vent also needs to be in a suitable location. Confirm the
correct location with the specifications on page 2 of the original
installation instructions.
1. Begin by removing the existing attic vent. Pull back any
shingles surrounding the base. Save shingles for reuse. Re-
move any screws or nails that have been used to fasten the
attic vent to the roofing substrate. Clean the substrate area
of any old cement, caulking or glue or other debris to ensure
a tight seal for the new solar attic fan base.
2. After removal as described above, follow the installation
instructions in section 6.
WARRANTY
This product is guaranteed for five (5) years against corrosion
and defects in material or workmanship when used for normal
residential purposes. If the unit should fail to operate correctly
within 5 years from the date of purchase, please go to our
website: www.qualitycraft.com and click on customer support
.
This warranty covers product defects only. The company’s sole
obligation is to repair or replace the unit.
This warranty is void, if in the opinion of Quality Craft, the unit
has been tampered with, altered, misused, damaged or abused.
The warranty is for homeowner use only and does not cover
units used in commercial situations.
WARRANTY CLAIM PROCEDURE
If a claimable defect occurs, please fill out a claim form through
our website at www.qualitycraft.com and click on customer
support. Before you make your claim, please make sure
you have:
1. The description of the product
2. Proof of sale
3. Details regarding the defect
4. Name and address of the owner
Claims must be filled out in writing and returned within six (6)
months of appearance of defect. Failure to comply with this
stipulation will make the warranty null and void. We reserve the
right to a thirty-day (30) delay following receipt of claim in which
to inspect the product. We assume no responsibility for labor
costs, removing/replacing a previously installed product,
transportation, or return of a product.
Imported by
Quality Craft
Laval, Quebec, Canada H7C 0A5
1-800-459-4409
Monday - Friday / 8:30am - 5:00pm EST
www.qualitycraft.com
Made in China


