13
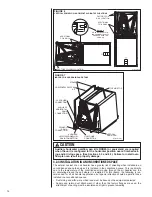
DRIP LOOP NOTE:
When installing the unit in down or horizontal right discharge appli-
cations, make sure the wires going to the blower motor form a proper drip loop to force
any condensate that might form on the wires to drip off the lowest point of the wiring
instead of entering the motor or motor control. This may require cutting the wire-tie and
installing a new wire-tie to form a new drip loop.
IMPORTANT:
To comply with certification agencies and the National Electric Code for
down discharge applications, the circuit breaker(s) on field-installed electric heater kits
must be re-installed per procedure below so that the breaker switch “on” position and
marking is up and the “off” position and marking is down.
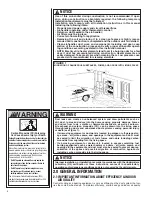
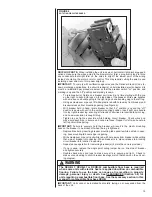
- To turn breaker(s): Rotate one breaker pair (circuit) at a time starting with the one
on the right. Loosen both lugs on the load side of the breaker. Wires are bundles
with wire ties, one bundle going to the right lug and one bundle going to the left lug.
- Using a screwdriver or pencil, lift white plastic tab with hole away from breaker until
breaker releases from mounting opening (see Figure 5).
- With breaker held in hand, rotate breaker so that “on” position is up and the “off”
position is down with unit in the vertical mounting position. Insert right wire bundle
into top right breaker lug, ensuring all strands of all wires are inserted fully into lug,
and no wire insulation is caught in lug.
- Tighten lug as tight as possible while holding circuit breaker. Check wires and
make sure each wire is secure and none are loose. Repeat for left wire bundle in
left top circuit breaker lug.
IMPORTANT:
Failure to securely hold the breaker will result in the plastic mounting
boss on the breaker to be broken off when the lug is tightened.
- Replace breaker by inserting breaker mounting tab opposite white pull tab in open-
ing, hook mounting tab over edge in opening.
- With screwdriver or pencil, pull white tab with hole away from breaker while setting
that side of breaker into opening. When breaker is in place, release tab, locking
circuit breaker into location in opening.
- Repeat above operation for remaining breaker(s) (if more than one is provided).
-
If one is used, replace the single point wiring jumper bar on line side of breaker
and tighten securely.
- Double check wires and lugs to make sure all are secure and tight. Check to
make sure unit wiring to circuit breaker load lugs match that shown on the unit wir-
ing diagram.
IMPORTANT:
Units cannot be installed horizontally laying on or suspended from the
back of the unit.
WARNING
The RXHB-17, RXHB-21 or RXHB-24 combustible floor base is required
when some units with electric heat are applied downflow on combustible
flooring. Failure to use the base can cause a fire resulting in property
damage, personal injury or death. See CLEARANCES (Section 3.4) for
units requiring a combustible floor base. See the accessory section in this
manual for combustible floor base RXHB.
!
FIGURE 5
ROTATING CIRCUIT BREAKER


