Rev.4
29
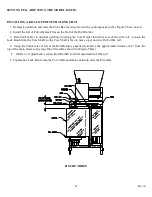
JAW AIR CYLINDER ADJUSTMENT & REPLACEMENT
CAUTION: TURN THE MAIN DISCONNECT ON THE CONTROL PANEL TO THE "OFF"
POSITION AND REMOVE THE AIR SUPPLY FROM THE MACHINE BEFORE MAKING
ADJUSTMENTS.
After a period of machine operation, the Jaw Cylinder will need to be replaced. When replacing the Air
Cylinder, the Cylinder Stroke determines how far the jaws open and close. The jaws should open as wide as the
Product Chute so there is NO ledge between them. This will prevent bridging of your product in the fill opening
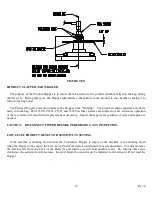
area. Adjust the jaw opening by threading the Cylinder Shaft into the Clevis. The Jaw Opening will decrease in
size the further the Cylinder Shaft is threaded into Clevis. The Jaw Opening will increase as you back the Cylinder
Shaft out of the Clevis. (See Figure Five).
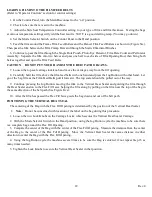
To Replace Air Cylinder:
1. Disconnect Air Fittings from Air Cylinder.
2. Undo Jam Nut holding Clevis in place.
3. Separate Cylinder Shaft from Clevis by turning Air Cylinder Shaft.
4. Separate Air Cylinder Jam Nut to remove Air Cylinder from Guide Rail Angle / Cylinder Mount.
5. Slide New Air Cylinder into place and fasten to Guide Rail Angle / Cylinder Mount with Air Cylinder Jam
Nut.
•
Note: Keep Air Fitting Hole to top of Air Cylinder.
6. Re-install Clevis Jam Nut.
7. Turn Air Cylinder Shaft into Clevis.
8. See “JAW AIR CYLINDER ADJUSTMENT & REPLACEMENT” above for proper Cylinder Stroke setting;
tighten Jam Nuts to secure in place.
9. Reconnect Air Fittings to Air Cylinder.
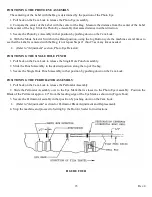
JAW LINER ALIGNMENT
Jaw Liners will wear out and need to be replaced. Jaws need to be centered underneath the Product Chute to
keep the unfilled bag centered for the bag to be properly opened awaiting product filling. Jaw Liners need to also
line up end to end. This will keep Jaws square to each other and aligned for proper opening and closing of Fill
Opening (See Note Below).
•
Note: Proper Jaw alignment in the closed position is when outside UHMW Jaw edges touch. Over
compression of UHMW jaws can cause breakage or undo wear.
To adjust Jaw Liners end to end:
1. Loosen Jam Nuts on Tie Rod.
2. Turn Tie Rod in the appropriate direction to bring Jaw Liner ends flush together and centered with Product
Chute. See “JAW LINER ALIGNMENT” above.
3. When correct position of Jaw Liners is accomplished, retighten Jam Nuts to secure in place.
Summary of Contents for Hamer 540
Page 2: ......
Page 4: ......
Page 7: ...Rev 4 SECTION ONE MODEL 540 FORM FILL AND SEAL MACHINE...
Page 8: ......
Page 14: ......
Page 40: ...Rev 4 31 FIGURE EIGHT FIGURE NINE...
Page 47: ......
Page 55: ...Rev 4 45 SECTION TWO MODEL 540 ASSEMBLY DRAWINGS...
Page 56: ......


