Rev.4
35
FILM FEED BELT TENSION:
If the Film Feed Belts are drooping or sagging, you will need to check the belt tension by inspecting all of the
Belt Tensioners (6) and slack pulleys (2) as shown in (Figure Eleven).
1. Slightly loosen the Hex Bolt that secures the main body of the Belt Tensioner.
2. While holding the Hex Bolt with one Wrench, use a second Wrench to rotate the main body of the Belt
Tensioner so the Tensioner Arm and Pulley are deflected against the Film Feed Belt until sufficient belt tension is
achieved. (Approx. 15° deflection.) (See Figure Seven) DO NOT OVER TENSION.
3. Then tighten the Hex Bolt to secure the Belt Tensioner in that position.
4. Repeat steps #1 thru #3 for adjusting the remaining Belt Tensioners.
KNURLING BELTS
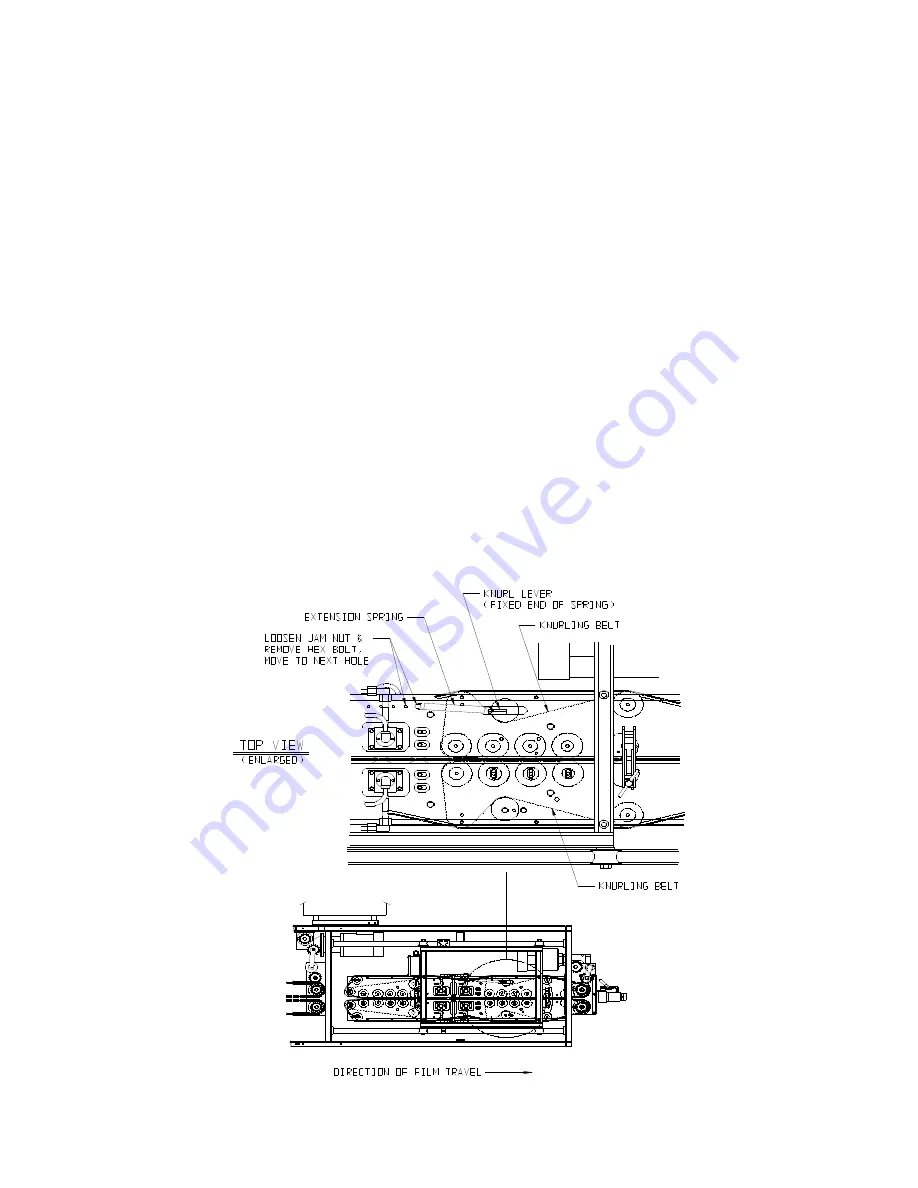
There are two Knurling Belts that press the hot film halves together to create a solid seal. There may be a need to
adjust the pressure of the Knurling Belts depending on the film thickness. The pressure on the Knurling Belts is
maintained by means of an Extension Spring (See Figure Thirteen). One end of the spring is fixed to the Knurl
Lever; the opposite end of the spring is mounted to a Hex Bolt. The Hex Bolt is threaded into one of five equally
spaced tapped holes in the Left Base Plate.
To increase pressure, loosen the Jam Nut that secures the Hex Bolt. Then remove the Hex Bolt from the plate.
As shown in (Figure Thirteen) move the Hex Bolt down to the next tapped hole while still maintaining the
connection of the spring.
If more pressure is needed, repeat procedure to next tapped hole. Then tighten the Jam Nut, locking the Hex Bolt
in position.
FIGURE THIRTEEN
Summary of Contents for Hamer 540
Page 2: ......
Page 4: ......
Page 7: ...Rev 4 SECTION ONE MODEL 540 FORM FILL AND SEAL MACHINE...
Page 8: ......
Page 14: ......
Page 40: ...Rev 4 31 FIGURE EIGHT FIGURE NINE...
Page 47: ......
Page 55: ...Rev 4 45 SECTION TWO MODEL 540 ASSEMBLY DRAWINGS...
Page 56: ......

