background image

4

INSTALLATION  INSTRUCTIONS  

FOR CONVERTING  A  CLASS-A  

METAL CHIMNEY  OR  MASONRY  

CHIMNEY TO  A  DIRECT  VENT  

SYSTEM

These instructions apply to the DuraVent 
Direct Vent Conversion Kits for factory-
built Class A metal chimneys and masonry 
chimneys. These venting systems, in 
combination with the gas appliance, have 
been tested and listed by a major testing 
agency such as UL, AGA, Omni or Warnock 
Hersey.  Check the manufacturer’s rating 
plate and instruction manual to confirm that 
a DuraVent Direct Vent Chimney Conversion 
system is approved for use on the brand 
name appliance you have selected.

IMPORTANT

Read all instructions carefully before starting 
the installation.   Failure to follow these 
instructions may create a fire or other safety 
hazard, and will void the warranty.  Be sure 
to check the appliance manufacturer’s 
installation instructions for specific venting 
and clearance to combustible requirements, 
which may vary from one appliance to 
another.

INSTALLATION  PRECAUTIONS

The DuraVent Direct Vent System is an 
engineered product that has been designed 
and tested for use with an approved list of 
direct vent gas appliances.  The DuraVent 
warranty will be voided, and serious fire, 
health, or other safety hazards may result 
from any of the following actions:
• Installation of any damaged Direct Vent   
component.
• Unauthorized modification of the Direct 
Vent System
• Installation of any component part not 
manufactured or approved by DuraVent.

• Installation other than as instructed by 
DuraVent and the appliance manufacturer.
Consult your local building codes before 
beginning the installation. 

Have the existing installation inspected by 
a qualified chimney sweep or professional 
installer, prior to converting to direct vent.  
The existing chimney system must be in 
serviceable condition, and functionally 
sound.  The direct vent conversion described 
herein applies only to factory-built metal 
ceiling-supported type systems and masonry 
through-the-wall type systems.  Note:  You 
cannot install a Conversion Kit in a through-
the-wall type factory-built metal chimney.

GENERAL

Two different types of direct vent conversion 
systems are described here.  One is through 
an existing factory built metal chimney going 
through the ceiling.  The other is through the 
wall of an existing masonry chimney.  Follow 
the appropriate directions for your situation.  
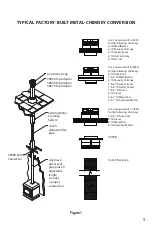
A typical direct vent conversion of a factory 
built metal chimney is shown in Figure 1.  
The concept of direct vent conversion is 
to connect an adapter to an Underwriters 
Laboratories listed 4-inch diameter aluminum 
flex pipe (DuraVent’s DuraFlex is an example 
of an UL listed flex pipe).  This is then passed 
this down through the center of the existing 
metal chimney system. Three sizes of Top 
Adapters are available which should fit 
most sizes and makes of metal chimney 
systems.  The Retro Connector (909B) is then 
attached to the bottom of the flex pipe.  Both 
the Top Adapter, and the Retro Connector 
are attached to the existing chimney with 
sheet metal screws.  The appliance is then 
connected to the chimney with appropriate 
black direct vent pipe, and an adjustable 
length section.
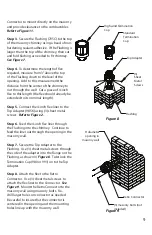
A typical conversion of an existing masonry 
chimney is shown in Figure 6.  For installation 
through the wall of an existing masonry 

Summary of Contents for DirectVent Pro

Page 1: ...DirectVent Pro Converting a Class A Metal Chimney or Masonry Chimney to a Direct Vent System Installation Instructions ...

Page 2: ...is instruction will void the manufacturer s warranty and may have an effect on your homeowner s insurance and UL listing status Keep these instructions for future reference Dear Customer Installer or End User We welcome any comments regarding matters pertaining to our DuraVent products We welcome any ideas input or complaints to help improve our product offering Send your emails to president durav...

Page 3: ...ion 5 Converting a Factory Built Metal Chimney 6 Converting a Masonry Chimney 8 Typical Masonry Chimney Conversion illustration 8 Warranty 11 DirectVent Pro CONVERTING CLASS A METAL OR MASONRY CHIMNEY TO A DIRECT VENT For the most up to date installation instructions see www duravent com ...

Page 4: ...Consult your local building codes before beginning the installation Have the existing installation inspected by a qualified chimney sweep or professional installer prior to converting to direct vent The existing chimney system must be in serviceable condition and functionally sound The direct vent conversion described herein applies only to factory built metal ceiling supported type systems and ma...

Page 5: ...Use Conversion Kit B 0932 for the following chimneys 6 ID Dura Vent 7 8 ID Metalbestos 6 ID Security Chimney 7 8 ID Jackes Evans 7 8 ID Hart Cooley 7 8 ID Pro Jet 6 ID Air Jet 6 7 ID Metal Fab 6 7 ID American Metals Use Conversion Kit C 0933 for the following chimneys 7 8 ID Dura Vent 8 ID Air Jet 8 ID Metal Fab 8 ID American Metals Existing Metal Chimney System 4 inch aluminum flex pipe Any black...

Page 6: ...e flex should already be extended to its nominal length Step 3 Connect the end of the flex pipe section to the underside of the Top Adapter you have selected using 3 sheet metal screws Figure 2 Step 4 Pass the flex pipe down through the center of the chimney system and center the adapter on the top of the chimney pipe Drill 4 1 8 inch diameter holes through the adapter and into the chimney top Ins...

Page 7: ...ttach it to the support box or decorative sleeve for double wall solid packed pipe with the Sheet Metal Screws furnished The holes in the Retro Connector are pre punched Figure 5 Termination Cap Sheet Metal Screws 3 Sheet Metal Screws 3 Sheet Metal Screws Drill 4 1 8 inch diameter holes Existing Ceiling Support Box ...

Page 8: ... Be careful if the hole is too large the Retro Connector might not mount properly and if the hole is too small then the appliance might starve for intake air If there is a frame wall in front of the masonry wall cut and frame a 10 clear square opening in wall centered around the 6 masonry opening If there is sheet rock only no studs in front of the masonry the 10 clear opening is still needed but ...

Page 9: ...using 3 sheet metal screws Refer to Figure 2 Step 6 Feed the 4 inch flex liner through the Flashing into the chimney Continue to feed the liner out through the opening in the masonry wall Step 7 Secure the Top Adapter to the Flashing Use 3 sheet metal screws through the side of the adapter into the flange on the Flashing as shown in Figure 8 Twist lock the Termination Cap 980 or 991 on to the Top ...

Page 10: ...ing Figure 11 If needed add a section of direct vent pipe to the Retro Connector in order to extend through the opening in the Wall Thimble Cover Step 10 The connection between the appliance and the Retro Connector may be completed with section of black direct vent pipe together with adjustable length pipe section Retro Connector Masonry Chimney Stud Wall 10 x 10 framed opening in wall Retro Conne...

Page 11: ......

Page 12: ...stallation and continuing throughout the warranty period by a Nationally Certified Chimney Sweep orVentinox installer The Liner and Components warranty is further subject to compliance with the following requirements throughout the warranty period The chimney must have a chimney cap and chemical chimney cleaners must not be used when cleaning the Liner or Components Plastic bristle flue cleaning b...

Reviews: