background image

Montageanleitung

Whirlwannen mit Möbelverkleidung

Mounting Instruction

Whirltubs with furniture panel

Notice de montage

Baignoires avec habillage bois

Montagehandleiding

Baden whirlpools met meubelbekleding

Istruzioni di montaggio

Vasche idromassaggio con pannello di rivestimento in legno

Instrucciones de montaje

Bañeras de hidromasaje con revestimiento

Happy D

# 710178
# 710179
# 710180

Paiova

# 710039
# 710040
# 710041
# 710042
# 710192
# 710193
# 710218
# 710219
# 710220
# 710221
# 710222
# 710223

Seadream

# 710113
# 710114

Leben im Bad 

Living bathrooms

Summary of Contents for Happy D 710178

Page 1: ...eiding Baden whirlpools met meubelbekleding Istruzioni di montaggio Vasche idromassaggio con pannello di rivestimento in legno Instrucciones de montaje Bañeras de hidromasaje con revestimiento Happy D 710178 710179 710180 Paiova 710039 710040 710041 710042 710192 710193 710218 710219 710220 710221 710222 710223 Seadream 710113 710114 Leben im Bad Living bathrooms ...

Page 2: ......

Page 3: ... deliver 21 Accessories 21 Mounting 22 Cleaning and Care 30 it Indice Legenda 5 Nota 7 Installazione Elettrica 9 Installazione Idraulica 10 Modello con pannello per vasca da appoggio a parete angolare dx angolare sx o nicchia Pezzi in dotazione 10 Accessorio 11 Montaggio 14 Modello con pannello per vasca a centro stanza Pezzi in dotazione 21 Accessorio 21 Montaggio 24 Pulizia e Manutenzione 31 fr ...

Page 4: ...n peut entraîner des dommages corpo rels ou matériels légers Information Désigne les conseils d utilisation et autres informations utiles en Explanations of the symbols Danger Indicates an imminent danger by electric shock Non observance of these instructions can lead to serious injuries that could become fatal Warning Indicates a possible imminent danger Non observance of these instructions can l...

Page 5: ...uni o danni materiali NOTA Indica consigli d uso e altre informazioni utili es Explicación de los símbolos PELIGRO Indica un posible peligro inminente por electrocución No tener en cuenta estas indicaciones puede conllevar lesiones graves hasta ocasionar la muerte ADVERTENCIA Indica un posible peligro inminente El no tener en cuenta estas indicaciones puede conllevar daños peligro de vida y desper...

Page 6: ...t effet nous recommandons notre bande isolante 790104 00 0 00 0000 en Note Warning NO DEMOUNTING OF SYSTEM COMPONENTS The components of the whirl system may not be tampered with Should this happen the guarantee will be void By no means the security loop of the Air system may be loosened from the whirltub revision The panelling have to be lift for revision Please avoid placing steps or building the...

Page 7: ...entes de la bañera de hidromasaje no pueden ser desmontados ya que esto causa la perdida de la garantía En ningún caso puede quitarse la vuelta de seguridad del tubo de aire de la bañera de hidromasaje revision Bañera con revestimiento el revestimiento debe ser desmontable para la revisión Los peldaños colocados delante de la bañera o empotrar ésta en el suelo dificulta en caso de mantenimiento el...

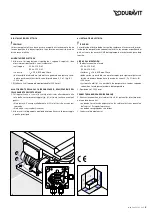
Page 8: ...er également de les regrouper à l aide d un collier 2 Etablir la liaison équipotentielle de Elektroinstallation en Electrical Installation en Electrical Installation DANGER The electrical installation may only be carried out by an autho rized and certified electrician The electrical installation has to be carried out in accordance with the country specific standards for low voltage installations t...

Page 9: ...nire i cavi con dei fissacavi 2 Allacciare il collegamento equipotenziale della vasca idromassaggio a quello principale es Instalación Electrica Peligro La instalación eléctrica debe ser realiza conforme a las normas de insta lación de las compañías de suministro eléctrico las normas específicas del país así como las normas UNE del reglamento electrotécnico para baja tensión LÍNEA DE ALIMENTACIÓN ...

Page 10: ...e vasche con alimentazione integrata si deve installare un tubo fles sibile di allacciamento Per evitare il rischio di rotture tra la vasca idro massaggio e le tubature dell acqua non devono esserci tubi rigidi en WATER INSTALLATION The water supply connection may only be carried out by a certified plumber The installation has to correspond to the regulations of the regional water supply authority...

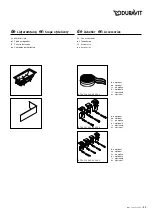
Page 11: ...kket it Pezzi in dotazione es Contenido del embalaje 790123 00 0 00 0000 790104 00 0 00 0000 790103 00 0 00 0000 de optional en optional fr en option nl optionele it opzionale es opcional de optional en optional fr en option nl optionele it opzionale es opcional de optional en optional fr en option nl optionele it opzionale es opcional MAL_53455 05 10 5 11 ...

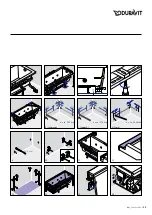
Page 12: ...cher anzeichnen For Happy D Mark 4 holes for the brackets 8 Für Paiova 3 Wannenankerlöcher anzeichnen For Paiova Mark 3 holes for the brackets 9 Die Löcher bohren Dübel einsetzen Drill the holes Insert the raw plugs 10 Wannenanker befestigen Affix the wall brackets 11 Wannenränder mit einem sauberen Tuch und Haushaltsbenzin von Schmutz Staub und Fettrückständen befreien Den schmalen Streifen an de...

Page 13: ... muur aan waar de gaten voor de muursteunen geboord moeten worden 8 Pour Paiova Marquer les 3 trous pour les appliques Voor Paiova Teken op de muur aan waar de gaten voor de muursteunen geboord moeten worden 9 Percer les trous Insérer les chevilles De gaten boren De pluggen in de muur aanbrengen 10 Fixer les appliques murales De badverankering bevestigen 11 Coller les bandes étroites au bord verti...

Page 14: ...sizione dei fori per le staffe Para Paiova Marque los 3 taladros para los soportes murales 9 Praticare i fori Inserire i tasselli di espansione Taladre agujeros Coloque los tacos 10 Fissare i tiranti di ancoraggio della vasca Fije el anclaje de bañera 11 Appiccicare la parte sottile della striscia di compensazione al bordo orizzontale posteriore della vasca Per favorire il montaggio consigliamo di...

Page 15: ...10 x ca 140 ca 140 ca 140 X x ca 105 mm Ø 10 mm x ca 105 mm Seadream x ca 170 mm 1 2 3 4 5 7 Happy D 8 Paiova 6 9 10 11 12 13 15 16 14 MAL_53455 05 10 5 15 ...

Page 16: ...anschließen Die Wanne bis zum Überlauf mit Wasser füllen und das System auf Dichtheit prüfen System 30 Minuten aktivieren Connect the siphon to the outlet Fill the tub to check if the outlet and overflow fittings are water tight Activate system for 30 minutes in order to check water tightness 20 Möbelverkleidung ausrichten Möbelverkleidung an den Magneten des Gestells des Winkels anbringen Align t...

Page 17: ...d inspectieluik voorzien worden 19 Raccorder le siphon à la conduite d évacuation Remplir la baignoire jusqu au trop plein pour vérifier l étanchéité Mettre le système en route durant 30 minute Sifon aan afvoer aansluiten Vul de badkuip helemaal met water om te controleren of het dicht is Het systeem gedurende 30 minuten activeren 20 Aligner l habillage façon meuble par rapport à la baignoire Fixe...

Page 18: ...verse un registro adicional 19 Collegare il sifone allo scarico Riempire d acqua la vasca fino al livello del troppopieno per verifi carne l impermeabilità Attivare il sistema per 30 minuti Conectar el sifón al desagüe Llenar la bañera hasta el rebosadero con agua para comprobar la estan queidad Activar el sistema durante 30 minutos 20 Allineare il rivestimento della vasca Posizionare il rivestime...

Page 19: ...min 150 mm 17 18 19 20 21 22 MAL_53455 05 10 5 19 ...

Page 20: ......

Page 21: ...de Modelle en Models fr Les modèles nl Modellen it Modello es Modelos de Zubehör en Accessories fr Les accessoires nl Toebehoren it Accessorio es Accesorios 1 2 3 4 5 6 7 MAL_53455 05 10 5 21 ...

Page 22: ...der Wannenfüße und einer Wasserwaage die Wanne ausrichten Die Höhe zwischen der Unterkante der Wanne und dem Boden muss x mm betragen x Höhe der Möbelverkleidung Align the tub with the help of the feet and a spirit level The distance between the sub rim of the tub and the floor must be x mm x height of the panel 6 Einen Abstand von 10 mm zwischen Boden und Sifon einhalten Keep a 10 mm gap between ...

Page 23: ...et d un niveau à bulles La hauteur entre le rebord inférieur de la baignoire et le sol doit être de x mm x hauteur de l habillage en bois Met behulp van de badvoeten en een waterpas het bad in de juiste positie brengen De hoogte tussen de onderkant van het bad en de bodem moet x mm bedragen x Hoogte van de meubelommanteling 6 Respecter une distance de 10 mm entre le sol et le siphon Respecteer de ...

Page 24: ... Asegúrese que al instalar la bañera no aplaste ningún tubo de agua o instalación eléctrica en el suelo 5 Per raggiungere l altezza ottimale della vasca svitare i piedini affinché questi raggiungano lo stesso livello Determine la altura óptima para la bañera ajustando las patas enroscables 6 Mantenere una distanza di 10 mm tra il pavimento e il sifone Mantener la distancia de 10 mm entre suelo y s...

Page 25: ...10 Ø 8 mm 1 2 3 4 5 7 8 6 9 10 11 12 13 15 16 14 MAL_53455 05 10 5 25 ...

Page 26: ... the tub are located within the skirting 20 Wanne bis zum Überlauf mit Wasser füllen um die Wanne auf Dich tigkeit zu prüfen Fill the tub to check if the outlet and overflow fittings are water tight 21 Wasser ablassen Drain off the water 22 Wanne wieder aus der Verkleidung heben Lift the tub out of the skirting 23 Wanne Ab und Überlaufgarnitur den flexiblen Schlauch den Siphon und alle Verbindunge...

Page 27: ...standhouder zich binnen de bekleding bevindt 20 Remplir la baignoire jusqu au trop plein pour vérifier l étanchéité Vul de badkuip helemaal met water om te controleren of het dicht is 21 Evacuer l eau Het water laten weglopen 22 Extraire à nouveau la baignoire du tablier Til de kuip uit de bekleding 23 Contrôler l étanchéité du vidage avec trop plein du flexible du siphon ainsi que tous les autres...

Page 28: ...ua la vasca fino al livello del troppopieno per verifi carne l impermeabilità Llene la bañera con agua hasta el rebosadero para comprobar la estan queidad de los juegos de desagüe y de rebosadero 21 Scaricare l acqua Deje salir el agua 22 Togliere nuovamente la vasca dal rivestimento Extraiga de nuevo la bañera del faldón 23 Verificare accuratamente l impermeabilità di vasca colonna di scarico tub...

Page 29: ...17 18 19 20 21 23 24 22 25 MAL_53455 05 10 5 29 ...

Page 30: ... altération des surfaces acryl Pour réparer les rayures ou autres dégâts en surface utiliser le Kit d entretien et de réparation pour sur faces acryliques Duravit voir croquis II en Cleaning and Care AcrylIC Surface cleaning Clean the surface with a soft cloth and soapy water Do not use abrasive cleaning liquids For removing stains we advise using the Duravit care kit for acrylic surfaces see pict...

Page 31: ...es normales puede limpiarse el acrilo de forma fácil con un paño suave y húmedo Por favor evite aplicar sustancias abrasivas Para una limpieza a fondo y para quitar manchas recomendamos tam bién el kit para el cuidado de la superficie de acrilo de Duravit mirar la imagen I Las suciedades más resistentes pueden eliminarse también con agua caliente y un limpiador multiusos lavavajillas o lejía Manch...

Page 32: ...r 36 78132 Hornberg Germany Phone 49 78 33 70 0 Fax 49 78 33 70 289 info duravit de www duravit de Best Nr 53455 05 10 5 We reserve the right to make technical improvements and enhance the appearance of the products shown ...

Reviews: