


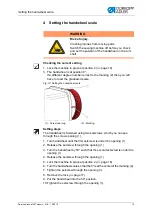

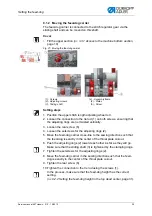


Positioning the toothed belt pulleys
Service manual 567 classic - 01.0 - 10/2015
21
6
Positioning the toothed belt pulleys
The two toothed belt wheels must be positioned one on top of the other
such that the toothed belt can run correctly.
Order
• Always check the position of the other toothed belt pulley after making
a change on either of the toothed belt pulleys.
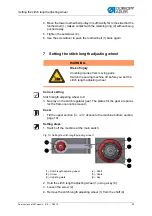
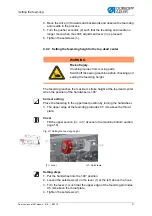
6.1
Upper toothed belt pulley
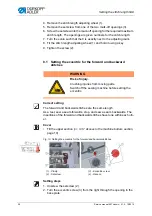
Correct setting
The 2 setscrews for the upper toothed belt pulley are seated flush on the
flat. The distance between the winder wheel and the upper toothed belt
wheel is 0.8 mm.
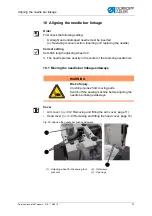
Cover
•
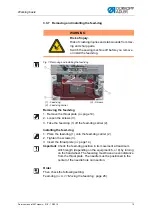
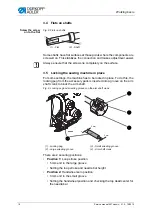
3.3.2 Removing and fitting the arm cover
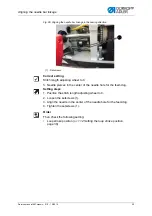
Fig. 14: Setting the upper toothed belt pulley
Setting steps
1. Loosen the setscrews (2).
2. Turn the upper toothed belt pulley (1) such that the setscrews (2) are
seated flush on the flat (5) of the arm shaft.
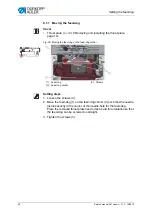
WARNING
Risk of injury.
Crushing injuries from moving parts.
Switch the sewing machine off before you check
and set the upper toothed belt wheel.
(1) - Upper toothed belt pulley
(2) - Setscrews
(3) - Winder wheel
(4) - Toothed belt
(5) - Surface of arm shaft
①
④
③
⑤
②
Summary of Contents for 567 CLASSIC
Page 1: ...567 classic Service manual...
Page 20: ...Working basis 18 Service manual 567 classic 01 0 10 2015...
Page 79: ......


