- 17 -
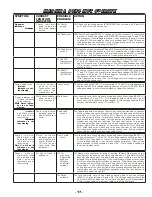
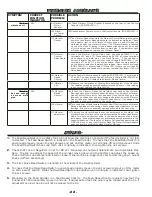
M A C H I N E D O E S N O T O P E R AT E
SYMPTOM
CORRECT
FUNCTION
INDICATOR
POSSIBLE
PROBLEM
ACTION
No power
indicator.
No display.
Po w e r i n d i c a t o r
goes on and off
with main power
switch.
(A) Power
supply.
(A) Check the incoming power (208-230VAC) at terminals #29 and #30
or L1 and L2 on the contactor.
(B) Contactor.
(B) Check the voltage (24VAC+/-) at the coil of the contactor. If the voltage
is present, check the voltage (208-230VAC) at terminals T1 and T2 on
the contactor. If the voltage is present, the contactor is good. Proceed
to step (E). If the voltage at the coil is present and T1 and T2 have no
voltage replace the contactor. If the voltage at the coil is not present,
proceed to the next two steps (C and D).
(C) Main power
switch.
(C) Check the switch terminals B4 and B5. Terminals B4 and B5 should have
24VAC+/- when the switch is in the off position and 0 volts when the
switch is in the on position. If the voltage stays at 24VAC+/- replace
the switch. If the voltage stays at 0 volts proceed to step (D).
(D) 24VAC
Transformer.
(XSFMR-1)
(D) Check the transformer primary input voltage (208-230VAC) at terminal
L1 and L2. Check the transformer secondary voltage (24VAC+/-) at
the coil of contactor. If the voltage at the coil is not present and step
(C) is correct replace the transformer. (This transformer is for the
contactor only)
(E) 24VAC
Transformer.
(XSFMR-2)
(E) Check the transformer primary input voltage (208-230VAC) at terminal
T1 and T2. Check the transformer secondary voltage (24VAC+/-) at
terminals # 22 and # 24. If the voltage at terminals #22 and #24 is
not present replace the transformer.
(This transformer is for all the low voltage control circuits except for
the coil of the contactor)
Power indicator on.
Initiate
indicator is not
functioning.
Initiate indicator
g o e s o n w i t h
footswitch and
o f f a f t e r t h e
machine cycles.
Footswitch.
Check the voltage (24VAC+/-) at terminals #17 and # 21 while depressing
the footswitch. This voltage reading should go from 0 to 24VAC. If this
voltage reading is not correct replace or repair Footswitch.
Power indicator on.
Initiate indicator
is functioning.
Weld timer indica-
tor is not func-
tioning.
Weld timer indicator
goes on and off
with every cycle.
Weld timer.
Turn the weld time to the highest setting and check the voltage (24VAC+/-)
at terminals #14 and #17. This voltage should come on then go off
every time the footswitch is depressed. If this voltage reading is not
correct replace weld timer. (0 – 24VAC – 0)
Power, Initiate,
and Weld timer
indicators are
functioning.
Feed reed switch
indicator is not
functioning.
Feed reed switch
indicator goes on
and off with every
cycle
Feed reed
switch.
The feed reed switch is a safety that will not allow the machine to operate
if feed cylinder has not fully retracted. To test the feed reed switch jump
terminals #14 to #19 or #35 to #36. Now try to cycle the machine
with this jumper in place. If machine operates this means that the feed
reed switch is not functioning. This reed switch is located on the feed
cylinder and may be out of position. To check the position, turn power
off (remove jumper from pervious test) and loosen setscrews on reed
switch. Now put an ohmmeter on terminals #14 and #19 or #35 and
#36. Slide reed switch back and forth near the rear of the cylinder
until the meter reads continuity. Now lock setscrews. If this procedure
cannot be accomplice replace feed reed switch.
Po w e r, I n i t i a t e ,
Weld timer and
Feed reed switch
indicators are
functioning.
D w e l l s o l e n o i d
indicator is not
functioning.
D w e l l s o l e n o i d
indicator goes on
and off with every
cycle. (Stays on
150ms longer
than feed reed
indicator.)
Short cycle
relay.
Turn the weld time to the highest setting and check the voltage (24VAC+/-)
at the terminals #17 and #19. This voltage reading should go from 0
to 24VAC and then back to 0 every time the footswitch is depressed.
If this voltage reading is not correct recheck symptom. Now do the
same procedure at terminals #9 and #24. If this voltage reading is
incorrect replace relay.
Po w e r, I n i t i a t e ,
Weld timer, Feed
reed switch and
dwell solenoid
indicators are all
functioning.
All lights flash in
sequence.
(A) Air
pressure,
Adjustable
exhaust
Mufflers
and Dwell
cylinder.
(A) Check main regulator for proper setting (80psi). Now press yellow
test bottom located on the Dwell solenoid body. If the Dwell cylinder
does not operate check the adjustable exhaust mufflers on the dwell
solenoid for proper adjustment. If the mufflers are closed or restricted
it will not allow the dwell cylinder to operate. Also check the cylinder
by turning the air off and then move the shaft in and out. Shaft should
move freely. If the mufflers (these mufflers control the speed of the
up and down motion on the cylinder) are properly adjusted and have no
restrictions and the Dwell cylinder operates when the test bottom is
pressed proceed to step (B).
(B) Dwell
solenoid.
(B) Turn the weld time to the highest setting and check the voltage
(24VAC+/-) at terminals #9 and #24. The voltage reading should go
from 0 to 24VAC and back to 0 every time the footswitch is depressed.
If this voltage reading is correct replace the Dwell solenoid.


