background image


RM 6V SERIES 

DIGITAL ANGLE TORQUE WRENCH 

PRODUCT INFORMATION MANUAL 

Manuel informations du produit 

Manual información del producto 


English 

Français 

Español 

THIS  MANUAL  CONTAINS  IMPORTANT  INFORMATION  REGARDING  SAFETY, 

OPERATION, MAINTENANCE AND STORAGE OF THIS PRODUCT. 
CE MANUEL CONTIENT DES INFORMATIONS IMPORTANTE CONCERNANT LA 

SECURITE,  L'OPERATION,  LA  MAINTENANCE  ET  LE  STOCKAGE  DE  CE 

PRODUIT. 
ESTE  MANUAL  CONTIENE  INFORMACIÓN  IMPORTANTE  ACERCA  DE  LA 

SEGURIDAD, FUNCIONAMIENTO, MANTENIMIENTO Y ALMACENAMIENTO DE 

ESTE PRODUCTO. 

DO NOT

 ATTEMPT TO OPERATE THE TOOL UNTIL YOU HAVE READ AND UNDERSTOOD ALL 

INSTRUCTIONS  AND  SAFETY  RULES  CONTAINED  IN  THIS  MANUAL.  FAILURE  TO  COMPLY 

MAY  RESULT  IN  ACCIDENTS  INVOLVING  FIRE,  ELECTRIC  SHOCK,  OR  SERIOUS  PERSONAL 

INJURY.  SAVE  THIS  OWNER’S  MANUAL  FOR  FUTURE  REFERENCE  AND  REVIEW  IT 

FREQUENTLY FOR SAFE OPERATION. 

NE PAS

 TENTER D'OPERER L'OUTIL TANT QUE VOUS N'AVEZ PAS LU ET COMPRIS TOUTES 

LES INSTRUCTIONS ET REGLES DE SECURITE CONTENUES DANS CE MANUEL. SINON VOUS 

RISQUEZ  DES  ACCIDENTS  TELS  QU'UN  INCENDIE,  UNE  ELECTROCUTION,  OU  DES 

BLESSURES CORPORELLES GRAVES. CONSERVEZ CE MODE D'EMPLOI EN CAS DE BESOIN ET 

RELISEZ-LE SOUVENT POUR UTILISER VOTRE OUTIL EN TOUTE SECURITE. 

NO

  UTILICE  ESTA  HERRAMIENTA  HASTA  HABER  LEÍDO  Y  COMPRENDIDO  TODAS  LAS 

INSTRUCCIONES  Y  NORMAS  DE  SEGURIDAD  CONTENIDAS  EN  ESTE  MANUAL.  SI  NO  LO 

HACE  PODRÍA  PROVOCAR  ACCIDENTES  CON  FUEGO,  DESCARGA  ELÉCTRICA  O  LESIONES 

PERSONALES SERIAS. GUARDE ESTE MANUAL DE INSTRUCCIONES PARA SU CONSULTA EN 

EL FUTURO Y REVÍSELO FRECUENTEMENTE PARA UN USO SEGURO.  


40733125-NA

Summary of Contents for RM 6V Series

Page 1: ...SULT IN ACCIDENTS INVOLVING FIRE ELECTRIC SHOCK OR SERIOUS PERSONAL INJURY SAVE THIS OWNER S MANUAL FOR FUTURE REFERENCE AND REVIEW IT FREQUENTLY FOR SAFE OPERATION NE PAS TENTER D OPERER L OUTIL TANT QUE VOUS N AVEZ PAS LU ET COMPRIS TOUTES LES INSTRUCTIONS ET REGLES DE SECURITE CONTENUES DANS CE MANUEL SINON VOUS RISQUEZ DES ACCIDENTS TELS QU UN INCENDIE UNE ELECTROCUTION OU DES BLESSURES CORPOR...

Page 2: ...ETY SYMBOLS WORDS AND LABELS The safety instructions provided in this manual are not intended to cover all possible conditions and practices that may occur when operating maintaining and cleaning power tools Always use common sense and pay particular attention to all the DANGER WARNING CAUTION and NOTE statements of this manual This is the safety alert symbol It is used to alert you to potential p...

Page 3: ... against flex stops on flex head can cause head breakage An out of calibration torque wrench can cause part or tool breakage Broken hand tools sockets or accessories can cause injury Excess force can cause crow foot or flare nut wrench slippage WORK AREA Keep children and bystanders away while operating a power tool Distractions can cause you to lose control Keep work area clean and well lit Clutt...

Page 4: ...t such as dust mask non skid safety shoes hard hat or hearing protection used for appropriate conditions will reduce personal injuries Do not overreach Keep proper footing and balance at all times This enables better control of the power tool in unexpected situations Do not expose digital torque tools to rain or wet conditions Water entering a digital torque tool will increase the risk of electric...

Page 5: ...e described in this manual Do not use this digital torque tool as a hammer Do not use the digital torque tool if it is not working properly or if it has suffered any damage Be sure all components including wrenchs extensions drivers and sockets are rated to match or exceed the torque being applied with tool Do not disassemble the digital torque tool Observe all equipment system and manufacturer s ...

Page 6: ...nly by qualified repair personnel Service or maintenance performed by unqualified personnel may result in a risk of injury When servicing a tool use only identical replacement parts Follow instructions in the Maintenance section of this manual Use of unauthorized parts or failure to follow Maintenance Instructions may create a risk of shock or injury SPECIFIC SAFETY RULES AND SYMBOLS Recommended o...

Page 7: ...utton 2 Reverse Control Button 3 LCD Panel 4 Operation Button 5 LED Warning Light 6 Anti slip Handle 7 1 2 Square 8 Calibrate Button Inside 9 Beeper 10 Battery Cover 11 Torque Value Display 12 Measuring Units 1 13 Power Reset Button 14 Up Button 12 16 15 13 14 17 11 3 4 2 5 6 1 7 8 9 10 ...

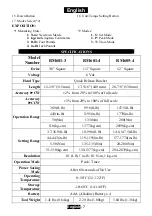
Page 8: ...0 to 100 of full scale Accuracy CCW 3 from 20 to 100 of full scale Operation Range 36 9 ft lb 99 6 ft lb 147 5 ft lb 443 in lb 1195 in lb 1770 in lb 50 Nm 135 Nm 200 Nm 510 kg cm 1377 kg cm 2039 kg cm Setting Range 3 7 36 9 ft lb 10 99 6 ft lb 14 8 147 5 ft lb 44 443 in lb 119 1195 in lb 177 1770 in lb 5 50 Nm 13 5 135 Nm 20 200 Nm 51 510 kg cm 138 1377 kg cm 204 2039 kg cm Resolution 0 1 ft lb 1 ...

Page 9: ...rsely 1 When cell capacity is low the digits on the display will be not clear 2 Remove the batteries if stored for a long period of time 3 Keep spare batteries on hand when going on a long trip or to cold areas 4 Do not mix the type of batteries or combine used batteries with new ones 5 Sweat oil and water can prevent a batteries terminal from making electrical contact To avoid this wipe both term...

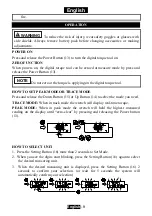
Page 10: ...ress and release the Down Button 15 or Up Button 14 to select the mode you need TRACE MODE When in track mode the wrench will display real time torque PEAK MODE When in peak mode the wrench will hold the highest measured reading on the display until zero clear by pressing and releasing the Power button 13 HOW TO SELECT UNIT 1 Press the Setting Button 16 more than 2 seconds to Set Mode 2 When you s...

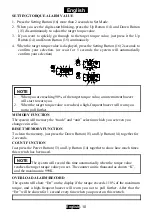
Page 11: ...rget torque value is reached a high frequent buzzer will warn you not to pull further MEMORY FUNCTION The system will memory the mode and unit selection which you set even you change coin cells RESET MEMORY FUNCTION To clean the memory just press the Down Button 15 and Up Button 14 together for 2 seconds COUNT FUNCTION Just press the Power Button 13 and Up Button 14 together to show how much times...

Page 12: ... POWER OFF POWER OFF This wrench will be shut off automatically after 60 seconds of no use Or directly shut off the wrench just press the Power Button 13 more than 2 seconds HOW TO USE AS A TORQUE WRENCH Connects this wrench and a socket together Then handle the wrench handle center as shown below INCORRECT OPERATION The torque or force only applies on the handle center NOTE ...

Page 13: ... the wrench LUBRICATE 1 The wrench s internal mechanism is permanently lubricated during assembly Do not attempt to lubricate the internal mechanism ACCESSORIES Use only accessories that are recommended by the manufacturer for your model Accessories that may be suitable for one tool may become hazardous when used on another tool Recommended accessories for use with your tool are available at extra...

Page 14: ...tion Agency to find out about special restrictions on the disposal of tool or return them to a certified service center for recycling For technical support call 886 4 25683366 Service address Mobiletron Electronics Co Ltd No 85 Sec 4 Chung Ching Rd Ta Ya Taichung 428 Taiwan www durofix com tw ...

Page 15: ...ERVEZ CES INSTRUCTIONS EN CAS DE BESOIN FUTUR SACHEZ RECONNAITRE LES SYMBOLES LES MOTS ET LES AVIS DE SECURITE Le but des instructions de sécurité fournies dans ce manuel n est pas de couvrir tous les cas possibles pouvant se présenter pendant le fonctionnement la maintenance et le nettoyage des outils Faites toujours preuve de bon sens et faites particulièrement attention aux instructions marquée...

Page 16: ...sive sur les arrêtoirs de la tête articulée peut entraîner une cassure de la tête Une clé dynamométrique qui n est plus étalonner peut entraîner une cassure de l outil ou d un composant L utilisation d outils manuels de douilles ou d accessoires cassés risque d engendrer des blessures Une force excessive peut causer un glissement du pied de biche ou de la clé polygonale ouverte ESPACE DE TRAVAIL G...

Page 17: ...ardez constamment vos appuis et votre équilibre Ceci permet de mieux contrôler votre outil électrique dans des situations inattendues N exposez pas les outils électriques à la pluie ou à l humidité Toute pénétration d eau à l intérieur de l outil augmentera les risques de choc électrique Le mécanisme de cliquet peut glisser ou casser si des composants sont sales mal adaptés ou usés ou si le levier...

Page 18: ... il a été endommagé Vérifiez que tous les composants y compris les clés les extensions les moteurs d entraînement et les douilles supportent un couple équivalent ou supérieur au couple appliqué par l outil Ne démontez pas l outil dynamométrique numérique Respectez tous les avertissements du fabricants les précautions et les procédures d utilisation de cet outil des équipements et du système Utilis...

Page 19: ...être effectuée par un technicien qualifié Toute réparation ou maintenance effectuée par un technicien non qualifié risquera de causer des blessures Lors de la réparation d un outil utilisez uniquement des pièces de rechange identiques Suivez les instructions dans la section Maintenance de ce manuel L utilisation de pièces non autorisées ou le non respect des instructions de maintenance créera un r...

Page 20: ...S 1 Bouton de libération de la douille 2 Bouton de marche arrière 3 Écran LCD 4 Bouton d opération 5 Témoin lumineux d avertissement 6 Poignée anti dérapante 7 1 2 Carré 8 Intérieur du bouton d étalonnage 9 Avertisseur 10 Capot du compartiment à piles 3 4 2 5 6 1 7 8 9 10 ...

Page 21: ... 3 T Mode tracé SPÉCIFICATIONS Numéro de modèle RM601 3 RM601 4 RM605 4 Entraînement 3 8 Carré 1 2 Carré 1 2 Carré Tension 6 Vdc Type de tête Cliquet à libération rapide Long 12 3 8 315 mm 17 5 16 440 mm 20 7 8 530 mm Précision CW 2 de 20 à 100 de l échelle totale Précision CCW 3 de 20 à 100 de l échelle totale Plage d opération 36 9 ft lb 99 6 ft lb 147 5 ft lb 443 in lb 1195 in lb 1770 in lb 50 ...

Page 22: ...C 14 à 140 F Piles AAA Alkaline Batterie x 4 Poids de l outil 1 41 lbs 0 64kg 2 20 lbs 1 00kg 3 04 lbs 1 38kg MONTAGE INSTALLATION ET REMPLACEMENT DES PILES Desserrez les 2 vis sur le capot des piles avec un tournevis 1 Préparez 4 piles AAA 2 Installez les dans le compartiment à piles 3 Installez le compartiment à piles dans la poignée de l outil 4 Remettez le capot sur la poignée de l outil 5 Ser...

Page 23: ...s portez un masque ou des lunettes de sécurité avec écrans latéraux Retirez toujours la batterie avant de changer les accessoires ou de faire des réglages ALLUME Appuyez et relâchez le bouton Marche Arrêt 13 pour mettre l outil dynamométrique numérique sous tension FONCTION ZERO Lors de la mise sous tension l outil dynamométrique numérique peut être mis à zéro en mode de mesure en appuyant et en r...

Page 24: ...atiquement votre sélection CONFIGURATION DE LA VALEUR DE L ALARME DU COUPLE 1 Appuyez sur le bouton Marche Arrêt 16 pendant plus de 2 secondes pour définir le mode 2 Lorsque les chiffres commencent à clignoter appuyez sur le bouton haut 14 et le bouton bas 15 de manière discontinue pour régler la valeur cible du couple 3 Pour aller directement à la valeur cible du couple appuyez simplement sur le ...

Page 25: ...aleur cible que vous avez définie L unité du compteur est le millier comme l indique le K et le maximum est 999K ALARME DE SURCHARGE ENREGISTREMENT Le système affiche Err à l écran si le couple excède 110 du couple maximum et une alarme stridente se déclenchera pour vous avertir de ne plus tirer Par la suite Err s affichera pendant 1 seconde à chaque fois que vous allumez cette clé La surcharge en...

Page 26: ...re pour nettoyer la clé et l écran LCD 2 Nettoyez la clé dynamométrique en l essuyant N immergez pas l outil 3 Stockez la clé dynamométrique dans un boîtier de protection et réglez la sur son couple le plus faible Ne forcez pas la poignée au delà du réglage le plus faible 4 Si la clé est mouillée essuyez la aussitôt avec une serviette sèche Le sel dans l eau salé est particulièrement corrosif AVER...

Page 27: ...ntre de services local pour un coût supplémentaire IMPORTANT Pour garantir la SÉCURITÉ et la FIABILITÉ les réparations la maintenance et les réglages doivent être effectués par des centres de services certifiés ou d autres organisations de services agréées en utilisant toujours des pièces de rechange identiques PROTECTION DE L ENVIRONNEMENT Avant de jeter les composants endommagés vérifiez auprès ...

Page 28: ...CIONES PARA SU REFERENCIA EN EL FUTURO RECONOCER LOS SIMBOLOS PALABRAS Y ETIQUETAS DE SEGURIDAD Las instrucciones de seguridad ofrecidas en este manual no pretenden cubrir todas las condiciones y prácticas posibles que puedan ocurrir al utilizar mantener y limpiar las herramientas de corriente Utilice siempre el sentido común y preste especial atención a todos los avisos de PELIGRO ADVERTENCIA PRE...

Page 29: ...romperse con un torque excesivo Si se fuerzan los topes de flexión sobre el cabezal de flexión puede provocar la rotura del cabezal Una llave con el torque fuera del límite de calibrado puede provocar que la herramienta o alguna parte se rompan Las herramientas de mano bocas o accesorios rotos pueden provocar lesiones Si aplica fuerza excesiva puede provocar que la llave para racores se escape ÁRE...

Page 30: ...eguridad antideslizantes casco duro y protección auditiva cuando se utiliza en las condiciones adecuadas reducirá las lesiones personales No realice sobreesfuerzos Manténgase bien apoyado y equilibrado con los pies en todo momento Esto permite un mejor control de la herramienta de potencia en situaciones inesperadas No exponga las herramientas de torque digital a la lluvia o ambientes húmedos Si e...

Page 31: ...crito en este manual No utilice esta herramienta de torque digital como martillo No utilice la herramienta de torque digital si no funciona correctamente o si ha sufrido daños Asegúrese de que todos los componentes incluyendo llaves extensiones destornilladores y bocas están clasificados para coincidir o exceder el torque que se va a aplicar con la herramienta No desmonte la herramienta de torque ...

Page 32: ...s sólo por personal técnico cualificado La reparación o mantenimiento realizados por personal no cualificado podría provocar el riesgo de lesiones Cuando repare una herramienta utilice solamente partes de repuesto idénticas Siga las instrucciones de la sección Mantenimiento en este manual El uso de partes no autorizadas o si no sigue las instrucciones de mantenimiento puede provocar el riesgo de d...

Page 33: ...el zócalo 2 Botón de control inverso 3 Pantalla LCD 4 Botón de operación 5 LED de luz de advertencia 6 Agarre antideslizante 7 Cuadro 1 2 8 Botón interno de calibración 9 Sonido 10 Tapa de la batería 11 Pantalla de valor del torque 12 Unidades de medida 1 12 16 15 13 14 17 11 3 4 2 5 6 1 7 8 9 10 ...

Page 34: ...a Trinquete de liberación rápida L 12 3 8 315 mm 17 5 16 440 mm 20 7 8 530 mm Precisión CW 2 de 20 a 100 de toda la escala Precisión CCW 3 de 20 a 100 de toda la escala Rango de operación 36 9 ft lb 99 6 ft lb 147 5 ft lb 443 in lb 1195 in lb 1770 in lb 50 Nm 135 Nm 200 Nm 510 kg cm 1377 kg cm 2039 kg cm Rango de ajuste 3 7 36 9 ft lb 10 99 6 ft lb 14 8 147 5 ft lb 44 443 in lb 119 1195 in lb 177 ...

Page 35: ...la llave 4 Cubra el mango de la llave con la tapa de las pilas 5 Apriete los tornillos para fijar la tapa de las pilas Cuando realice el cambio repita los pasos a la inversa 1 Cuando la capacidad de la pila sea baja los dígitos de la pantalla no aparecerán claros 2 Quite las pilas si la herramienta se ha almacenado durante mucho tiempo 3 Tenga pilas a mano cuando vaya a un viaje largo o a zonas mu...

Page 36: ... presionando y liberando el botón de corriente 13 No ponga a cero cuando esté aplicando el torque en la herramienta de torque digital COMO AJUSTAR EL MODO PICO O EL MODO DE SEGUIMIENTO Presione y suelte el botón Abajo 15 o el botón Arriba 14 para seleccionar el modo necesario MODO DE SEGUIMIENTO Cuando está en modo de seguimiento la llave mostrará un torque en tiempo real PODO PICO Cuando está en ...

Page 37: ...o 15 4 Cuando aparezca el valor de torque deseado presione el botón de Configuración 16 durante 2 segundos para confirmar su selección o espere 5 segundos hasta que el sistema confirme automáticamente su selección 1 Cuando alcance el 90 del valor de torque deseado comenzará un timbre intermitente de aviso 2 Cuando se alcance el valor de torque deseado un timbre más frecuente le avisará para que no...

Page 38: ...iso Err aparecerá 1 segundo cada vez que encienda esta llave La sobrecarga dañará esta llave y hará que pierda su precisión Por favor devuelva esta llave a un centro de servicios autorizado para su calibrarlo y eliminar el mensaje Err APAGADO AUTOMATICO APAGADO Esta llave se apagará automáticamente tras 60 segundos si no se utiliza O directamente apague la llave simplemente presionando el botón de...

Page 39: ... puede ser muy dañina 5 No utilice disolventes orgánicos como alcohol o disolventes de manchas cuando limpie la llave LUBRICAR 1 El mecanismo interno de la llave es lubricado continuamente durante el montaje No lubrique el mecanismo interno ACCESORIOS Utilice solamente accesorios recomendados por el fabricante para su modelo Los accesorios que pueden ser útiles para una herramienta pueden converti...

Page 40: ...idad dañada consulte a su Agencia de Protección Medioambiental si existen restricciones especiales sobre la retirada de herramientas o para devolverlas a un centro de servicios para su reciclaje Para soporte técnico llame al 886 4 25683366 Dirección del servicio Mobiletron Electronics Co Ltd No 85 Sec 4 Chung Ching Rd Ta Ya Taichung 428 Taiwán www durofix com tw ...

Reviews: