background image

27

HM3 - 

Teile und Zusammensetzung

A. Station

B. Handrührgerät

C. Auswurfknopf

D. Geschwindigkeitsregler

E.

Schneebesen

F. Rechter

 Knethaken

G. Linker

 Knethaken 

Summary of Contents for HM3

Page 1: ...HM3 SM3 Mixer PLEASE READ ALL THE INSTRUCTIONS BEFORE USE ...

Page 2: ...2 ...

Page 3: ...3 English Manual Manuel d utilisation en français Gebrauchsanleitung auf Deutsch Manual de Instrucciones en Español Manuale D istruzioni In Italiano 5 15 25 35 45 Contents ...

Page 4: ...4 Gebrauchsanleitung auf Deutsch Manual De Instrucciones En Español Manuale D istruzioni In Italiano Manuel d utilisation en Français ...

Page 5: ...5 English Manual ...

Page 6: ...6 SM3 Parts Assembly A Mixing Bowl B Hand Mixer Body C Eject button D Speed Button E Unlock button F Stand Mixer Body G Beaters H Dough Hook ...

Page 7: ...7 HM3 Parts Assembly A Base B Hand Mixer Body C Eject Button D Speed Button E Beaters F Left Dough Hook G Right Dough Hook ...

Page 8: ...ating mixing bowl available Operation 1 Clean the bowl and attachments before use 2 Put your ingredients into the bowl Note A The stand mixer body is not required if the total weight is less than 170g B The maximum capacity for flour is 800g 3 The mixing bowl should be set in the holder SM3 4 Install the beaters or hooks into the Hand Mixer body ...

Page 9: ...ect holes 5 Lock the Hand Mixer HM3 into the Stand SM3 6 Make sure the speed button is on 0 before plugging into mains 7 There are 5 speeds for choosing The details are as follows flour is used as an example Big hole for hook with ring Small hole for hook without ring ...

Page 10: ...ur Speed 3 will work 1 2 minutes to make dough Speed 4 will work 2 minutes to make soft dough Speed 5 will work 3 4 minutes to make smooth dough 8 Once it has finished working please press the unlock button and remove the hand mixer 9 Press the eject button to remove the attachments Eject Button Lock Button ...

Page 11: ...et Do not use any metal objects or harsh materials near the mixer as it may scratch the surface Always disconnect the appliance from the socket if it is not in use left unattended or being assembled disassembled Hooks should be installed in the correct holes Please stop the mixer after every 3 min utes of operation and allow it to cool down for 15 mins before using again This will ensure the long ...

Page 12: ...ust not be used by persons with reduced physical sensory or mental capabilities or lack of experience and knowledge unless they have been given supervision or instruction concerning use of the appliance by a responsible person in a safe way and they understand the hazards involved Cleaning and maintenance Always make sure the appliance is switched off and plugged out before any cleaning or mainten...

Page 13: ... when mixing The attachments are installed incorrectly There is more than 800g flour which exceeds the capacity No Power Install the attachments correctly Switch the appliance off and remove some flour The appliance does not work even when plugged in No Power Check to see if the appliance is correctly installed and the household voltage corresponds with the rating label Specifications Analysis and...

Page 14: ...rposes 4 It does not cover wear and tear malicious damage misuse neglect inexpert repairs or consumable parts 5 Shine Mart Ltd has no responsibilities for accidental or consequential loss or damage 6 Shine Mart Ltd are not liable to carry out any type of servicing work under the guarantee 7 Valid in the UK only This product is fitted with CE 1363 plug and fuse Imported by Shine Mart Ltd RM3 8SB In...

Page 15: ...15 Manuel d utilisation en français ...

Page 16: ...16 SM3 Aperçu des éléments A Mixing Bowl B Hand Mixer Body C Eject button D Speed Button E Unlock button F Stand Mixer Body G Beaters H Right Dough Hook I Right Dough Hook ...

Page 17: ...17 HM3 Aperçu du produit A Base B Hand Mixer Body C Eject Button D Speed Button E Beaters F Left Dough Hook G Right Dough Hook ...

Page 18: ...le bol et les accessoires avant de les utiliser 2 Placez vos ingrédients dans le bol Note A Pour le SM3 le support n est pas nécessaire si le poids total à mixer est inférieur à 170 gr B La capacité maximum de farine qui peut être versée dans le bol est de 800 gr 3 Pour le SM3 le bol s insère sur le support 4 Insérez les accessoires souhaités batteurs crochets à pétrir dans le mixeur ...

Page 19: ...t sélectionnée avant de brancher l appareil 7 5 vitesses peuvent être sélectionnées Note Make sure the hooks are installed in the correct holes L orifice d insertion droit est plus petit pour le batteur sans anneau L orifice d insertion gauche est plus gros pour le batteur avec l anneau ...

Page 20: ...utes to make dough Speed 4 will work 2 minutes to make soft dough Speed 5 will work 3 4 minutes to make smooth dough 8 Une fois le processus terminé appuyez sur la touche de déverrouillage et retirez le mixeur 9 Pressez la touche d éjection et retirez les accessoires Touche de déverrouillage des accessoires Touche d éjection du mixeur ...

Page 21: ...l ils pourraient endommager la surface Débranchez toujours l appareil de sa prise s il n est pas utilisé laissé sans supervision ou si vous procédez à l assemblage ou au démontage des accessoires Les accessoires doivent être insérés en suivant les consignes décrites précédemment Veuillez laisser le moteur du mixeur refroidir pendant 15 minutes après 3 minutes d utilisation Ceci a pour but de garan...

Page 22: ...areil ne peut pas utilisé par les personnes dont les capacités physiques sensorielles ou mentales sont réduites ou s ils n ont pas reçu les instructions nécessaires par la personne responsable de leur sécurité Nettoyage et maintenance Assurez vous toujours que l appareil soit éteint et débranché avant de procéder à son nettoyage ou sa maintenance Nettoyez toujours le moteur et le support avec un t...

Page 23: ...ine lors du mixage Les accessoires sont installés incorrectement Plus de 800 grammes de farine ont été versés dans le bol SM3 Aucune puissance Installez les accessoires correctement Eteignez l appareil et retirez la farine L appareil ne fonctionne pas même lorsque l appareil est branché Aucune puissance Vérifiez si l appareil est correctement inséré et si l alimentation est bien branchée sur une p...

Page 24: ...es déchets ménagers et doivent être séparés pour procéder au traitement et recyclage des composants Afin de recycler ce produit veuillez déposer tous les composants marqués WEEE au site de recyclage le plus proche où ce produit sera repris gratuitement Ce geste a pour but d aider la préservation des ressources précieuses et prévient les potentiels effets négatifs que ces composants ou tout autre c...

Page 25: ...25 Gebrauchsanleitung auf Deutsch ...

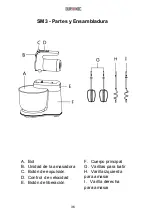
Page 26: ...26 SM3 Teile und Zusammensetzung A Rührschüssel B Handrührgerät C Auswurfknopf D Geschwindigkeitsregler E Entriegelungshebel F Motoreinheit G Schneebesen H Rechter Knethaken I Linker Knethaken ...

Page 27: ...27 HM3 Teile und Zusammensetzung A Station B Handrührgerät C Auswurfknopf D Geschwindigkeitsregler E Schneebesen F Rechter Knethaken G Linker Knethaken ...

Page 28: ...lich Benutzung 1 Reinigen Sie die Schüssel und das Zubehör vor der ersten Benutzung 2 Geben Sie Ihre Zutaten in die saubere trockene Schüssel Hinweis A Dieser Mixer ist nicht für Mengen kleiner als 170g geeignet B Die maximale Kapazität für Mehl beträgt 800g 3 SM3 Setzen Sie die Rührschüssel auf die Motoreinheit 4 Rasten Sie die Schneebesen bzw Knethaken in ihre vorgesehenen Löcher ein ...

Page 29: ...ten Sie den Handmixer HM3 auf der Motoreinheit SM3 ein 6 Stellen Sie sicher dass der Geschwindigkeitsregler auf O steht bevor Sie den Stecker einstecken 7 Wählen Sie die geeignete Geschwindigkeit anhand des folgenden Beispiels mit Mehl aus Das große Loch ist für den Knethaken mit dem Ring Das kleine Loch ist für den Haken ohne Ring ...

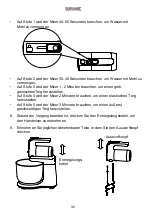
Page 30: ...n grob gemischtenTeig herzustellen Auf Stufe 4 wird der Mixer 2 Minuten brauchen um einen elastischen Teig herzustellen Auf Stufe 5 wird der Mixer 3 Minuten brauchen um einen äußerst geschmeidigen Teig herzustellen 8 Sobald der Vorgang beendet ist drücken Sie den Entriegelungshebel um den Handmixer zu entnehmen 9 Entnehmen Sie jeglichen abnehmbaren Teile in dem Sie den Auswurfknopf drücken Auswurf...

Page 31: ...ndere scharfe Materialien da diese die Oberfläche beschädigen können Nehmen Sie den Stecker aus der Steckdose während das Gerät nicht verwendet zusammengesetzt oder auseinandergenommen wird Achten Sie darauf dass die Knethaken in die korrekten Löcher eingesteckt werden Schalten Sie den Mixer nach drei Minuten Betrieb aus und erlauben Sie eine 15 minütige Pause zur Abkühlung bevor Sie ihn erneut ve...

Page 32: ...rwendung von Personen geeignet Kinder eingeschlossen die verminderte körperliche sensorische oder geistige Fähigkeiten haben oder nicht über ausreichende Erfahrung und Kenntnisse verfügen sofern sie von einer Person die für Ihre Sicherheit verantwortlich ist Anweisungen für den Gebrauch des Gerätes erhalten haben oder von dieser beaufsichtigt werden Reinigung und Instandhaltung Stellen Sie stets s...

Page 33: ...erhaft eingesteckt Mehr als die zulässige Menge von 800g Mehl wurde verwendet Stecken Sie das Zubehör korrekt ein Stellen Sie das Gerät aus und entnehmen Sie einen Teil des Mehles Das Gerät nimmt den Betrieb nicht auf obwohl der Stecker eingesteckt ist Fehlerhafte Stromzufuhr Keine Stromzufuhr Überprüfen Sie dass das Gerät korrekt aufgebaut wurde und das die Netzspannung der auf dem Klassifizierun...

Page 34: ...schädigung Missbrauch Vernachlässigung und unsachgemäße Reparaturen sind von der Gewährleistung ausgeschlossen 5 Shine Mart Ltd übernimmt keine Verantwortung für zufällige oder Folgeschäden 6 Shine Mart Ltd ist nicht für Wartungsarbeiten zuständig Diese fallen nicht unter die Gewährleistung 7 Gültig in der EU Dieses Produkt ist mit fitted CE geprüfte Typ F Euro Stecker BS Stecker ausgestattet Von ...

Page 35: ...35 Manual De Instrucciones En Español ...

Page 36: ... y Ensambladura A Bol B Unidad de la amasadora C Botón de expulsión D Control de velocidad E Botón de liberación F Cuerpo principal G Varillas para batir H Varilla izquierda para amasar I Varilla derecha para amasar ...

Page 37: ...37 HM3 Partes y Ensambladura A Base B Unidad de la amasadora C Botón de expulsión D Control de velocidad E Varillas para batir F Varilla izquierda para amasar G Varilla derecha para amasar ...

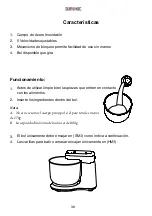
Page 38: ... 1 Antes de utilizar limpie bien las piezas que entren en contacto con los alimentos 2 Inserte los ingredientes dentro del bol Nota A No es necesario el cuerpo principal si el peso total es menos de 170g B La capacidad máxima de harina es de 800g 3 El bol únicamente debe encajar en SM3 como indica a continuación 4 Las varillas para batir o amasar encajan únicamente en HM3 ...

Page 39: ...é en la posición 0 antes de enchufarlo a la red eléctrica 7 Hay 5 velocidades para elegir Demostramos sus funciones a continuación El termino Harina es como ejemplo Nota Asegúrese de que las varillas estén en el correcto orificio Orificio pequeño para la varilla sin anillo Orificio grande para la varilla con anillo ...

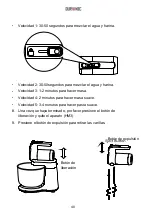
Page 40: ...locidad 3 1 2 minutos para hacer masa Velocidad 4 2 minutos para hacer masa suave Velocidad 5 3 4 minutos para hacer pasta suave 8 Una vez que haya terminado por favor presione el botón de liberación y quite el aparato HM3 9 Presione el botón de expulsión para retirar las varillas Botón de expulsión Botón de liberación ...

Page 41: ...a No use objetos metálicos ni materiales duros cerca del mezclador ya que podría rasguñar la superficie Desconecte siempre el aparato de la toma si no está en uso desatendidos o cuando este montado o desmontado Las varillas deben estar en los orificios correctos Por favor pare el aparato después de cada 3 minutos de operación y deje que se enfríe durante 15 minutos antes de volverlo a utilizar Est...

Page 42: ...tico El aparato no puede ser utilizado por personas con reducido capacidades físicas sensoriales o mentales o falta de experiencia y conocimiento si son supervisados o instruidos con respecto a utilizar el aparato de forma segura y entender los riesgos involucrados Limpieza y Mantenimiento Siempre asegúrese de que el aparato esté apagado y desconectado antes de cualquier limpieza o mantenimiento S...

Page 43: ...tá en funcionamiento Los accesorios no estas puestos correctamente Se está excediendo la capacidad de 800g Sin alimentación Instale los accesorios correctamente Apague el aparato y retire un poco de harina El aparato no arranca Sin alimentación Compruebe si el dispositivo está correctamente instalado y el voltaje doméstico corresponde con la etiqueta de clasificación Especificaciones Análisis y So...

Page 44: ...s inexpertas o partes consumibles 5 Shine Mart Ltd no será responsable por cualquier daño consecuente accidentes o pérdidas 6 Shine Mart Ltd no es responsable ah llevar a cabo cualquier tipo de servicio bajo la garantía 7 Valido solamente dentro de la EU Este producto esta equipado con enchufe fusible Europeo Importado por Shine Mart Ltd RM3 8SB Información sobre la eliminación de residuos para lo...

Page 45: ...45 Manuale D istruzioni In Italiano ...

Page 46: ...46 SM3 Componenti del prodotto A Ciotola B Sbattitore elettrico C Pulsante di sgancio D Pulsante velocità E Pulsante di rilascio F Planetaria G Fruste H Gancio da impasto I Gancio da impasto ...

Page 47: ...47 HM3 Componenti del prodotto A Base B Sbattitore C Pulsante di sgancio D Pulsante velocità E Fruste F Gancio da impasto G Gancio da impasto ...

Page 48: ...ruzioni per l uso 1 Pulire la ciotola e gli accessori prima dell uso 2 Versare gli ingredienti all interno della ciotola NB A La planetaria non è necessaria se il peso totale dell impasto è inferiore a 170g B La capacità massima di farina è di 800g 3 La ciotola va posizionata nell apposito vano della planetaria SM3 4 Inserire gli accessori da impasto desiderati nello sbattitore ...

Page 49: ...ia su 0 prima di collegare l apparecchio alla presa di corrente 7 Sono presenti 5 livelli di velocità Le funzioni sono come di seguente Come esempio è utilizzata la farina NB Assicurarsi che i ganci siano installati nei fori corrispondenti Il foro più largo per il gancio con l anello Il foro più piccolo per il gancio senza anello ...

Page 50: ...nuti per preparare un impasto Velocità 4 opererà 2 minuti per preparare un impasto morbido Velocità 5 opererà 3 4 minuti per preparare un impasto liscio 8 Quando l operazione si interrompe premere il pulsante di sgancio e rimuovere lo sbattitore 9 Premere il pulsante di rilascio per rimuovere gli accessori installati Pulsante di rilascio Pulsante di blocco ...

Page 51: ... utilizzare alcun oggetto metallico o appuntito per evitare di danneggiare l apparecchio Scollegare sempre l apparecchio dalla presa di corrente quando non in uso Assicurarsi di inserire i ganci da impasto nel foro corrispondente Si prega di non utilizzare l apparecchio per più di 3 minuti in modo continuo Lasciarlo dunque raffreddare per almeno 15 minuti prima di riutilizzarlo Ciù prolungherà la ...

Page 52: ...opo domestico L apparecchio non deve essere utilizzato da persone con ridottre capacità motorio sensoriali e mentali o con mancanza di esperienza e conoscenza a meno che non abbiano ricevuto istruzioni e supervisione da parte di un adulto responsabile della loro sicurezza ed essendo al corrente dei pericoli coinvolti nell utilizzo dell apparecchio Pulizia e manutenzione Assicurarsi sempre che l ap...

Page 53: ...allati correttamente È stata versata più di 800g di farina che eccede la capacità del prodotto Installare correttamente gli accessori Spegnere l apparecchio e rimuovere della farina L apparecchio non entra in funzione quando collegato alla presa di corrente Assenza di corrente Assicurarsi che l apparecchio sia correttamente collegato alla presa di corrente e che la tensione corrisponda a quella ri...

Page 54: ...odotto deve essere restituito al rivenditore con la prova d acquisto originale 2 Il prodotto deve essere installato e usato seguendo le istruzioni contenute nel manuale 3 Il prodotto va utilizzato solo per scopi domestici Non è da utilizzarsi per uso commerciale 4 La garanzia non copre usura danni volontari abuso negligenza riparazioni inesperte o consumo dei materiali 5 Shine Mart Ltd non è respo...

Page 55: ......

Page 56: ......

Reviews: