Seite
10
M
ONTAGEANLEITUNG
A
SSEMBLY
I
NSTRUCTIONS
I
NSTRUCTIONS DE
M
ONTAGE
GB
D
It is absolutely important to read the installation instructions before beginning the installation.
1. Line up the canopy roof against the outside wall and mark the mounting holes.
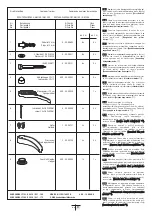
2. With a 12mm masonry bit, drill the plug holes and insert the hole plugs No 1. Drill the holes as deep as the length of the screw.
3. Glue the foam rubber No. 5 onto the backside of the canopy.
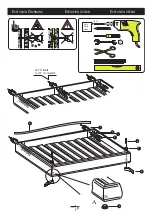
4. Fasten the water drain No. 8 with fastener No 7 and screw No. 6 to the canopy roof. Make sure that you insert the fastener into the designed
hole from above. Hold up the water drain from underneath and screw it in. When there is only one water drain, the opposite side must be
stopped up with a plug No. 9, and sealed with commercial silicone (see illustration A).
5. Now fasten the canopy roof to the wall with bolts No 3 (using a 17mm spanner), washers No. 2 and covering caps No. 4.
6. Caulk along the joint where the canopy meets the outside wall with the correct joint-sealing substance (silicone or something similar).
The bevelled top edge of the canopy must be generously caulked, and then smoothed out sloping up to the wall, to avoid water collecting there.
F
Avant le montage, lisez impérativement l’instruction de montage.
1. Ajustez l’auvent contre le mur de la maison à l’emplacement souhaité et marquez l’emplacement des trous de fixation sur le mur.
2. Percez les trous avec un foret à béton de 12 mm et mettez les chevilles n° 1 en place. La profondeur des trous doit être égale à la longueur des
vis.
3. Collez la pièce en caoutchouc cellulaire n° 5 à l’arrière de l’auvent.
4. Fixez les gouttières n° 8 et les supports n° 7 à l’auvent avec les vis n° 6. Enfoncez le support par le haut dans l’ouverture prévue dans l’auvent,
soutenez la gouttière par dessous et vissez-la. Si l’auvent n’a de gouttière que d’un seul côté, il faut obturer l’autre côté avec le bouchon n° 9 et
le sceller avec un mastic silicone du commerce (fig. A).
5. Montez maintenant l’auvent avec les vis n° 3 (clé plate de 17 mm), les rondelles n° 2 et les caches n° 4.
6. Il faut boucher le joint entre l’auvent et le mur avec un produit adéquat (mastic silicone, par exemple). Enduisez de mastic toute la longueur du
rebord supérieur biseauté de l’auvent. Étalez le mastic vers le haut jusqu’au mur, afin d’éviter que l’eau ne stagne.
Vor Montagebeginn unbedingt Hinweise der Montageanleitung beachten.
1. Richten Sie das Haustürvordach an der Hauswand aus und zeichnen die Befestigungslöcher an.
2. Mit einem 12 mm Steinbohrer die Dübellöcher bohren und Dübel Nr.1 einsetzen. Bohren Sie die Löcher so tief, wie die Schrauben lang sind.
3. Kleben Sie den Moosgummi Nr.5 an der Rückseite des Vordaches fest.
4. Befestigen Sie die Wasserabläufe Nr.8 und die Halterungen Nr.7 mit den Schrauben Nr.6 an dem Vordach. Dazu die Halterung in die vorge-
sehene Öffnung des Vordaches von oben einsetzen, den Wasserablauf von unten gegenhalten und verschrauben.
Bei einseitigem Wasserablauf ist die Gegenseite mit dem Verschlußstopfen Nr.9 zu verschließen und mit einem handelsüblichen Silikon zu ver-
siegeln (Abb.A).
5. Montieren Sie jetzt das Vordach mit den Schrauben Nr.3 (17mm Schraubenschlüssel), den Scheiben Nr.2 und den Kappen Nr.4.
6. Das Haustürvordach ist gegenüber der Wand durch ein geeignetes Fugendichtungsmittel abzudichten (Silikon oder ähnliches). Die abgeschrägte
Oberkante des Haustürvordaches ist voll mit Fugendichtungsmittel abzudichten, und dieses schräg nach oben zur Wand hin zu verstreichen, um
Wasserstau zu vermeiden.


