4
Distributed by Rockler Companies, Inc.
Medina, MN 55340
57664
Rev 12/17
Assembly
1. Turn over the Case (1) so the bottom is facing up.
2. Thread the Leveling Feet and Adjustment Nuts (2) into
the holes on the Case (1). You will fine-tune and secure
the height of the Leveling Feet and Adjustment Nuts
once you place the unit in its final location.
3. From inside the Case, insert the Dust Port (3) in the
hole in the rear of the Case and align the mounting
holes in Dust Port’s flange with the holes in the rear
of the Case. Secure with the four Small Pan-Head
Screws (14) through the Case and into the tapped
holes in the Dust Port’s flange. Do not fully tighten
until all the screws are installed.
4. Attach the Right Edge Lip (4), Left Edge Lip (5) and
Rear Edge Lip (6) to the Case (1) with three Lock
Knobs (10) in each. Make sure that the folded edges
of the Right and Left Edge Lips face outward and
that the rounded corners are at the front of the unit.
The Right and Left Edge Lips can be raised and lowered
and the Back Edge Lip removed to accommodate
workpieces of different sizes.
5. Attach the Handles (9) to the sides of the Case (1),
using two Large Pan-Head Screws (13) for each handle
6. If they’re not already in place, fit the flexible Rubber
Grommets (8) into the large holes in the Downdraft
Plates (7). Place the Downdraft Plates in position
on the Base (1).
7. Thread the Stopper Nuts (12) onto the Stopper
Bolts (11). You will insert these in the Rubber
Grommets in the Downdraft Plates to hold smaller
workpieces and keep them from shifting.
8. Attach a 4" dust hose with hose clamp (not included)
or other fitting to the Dust Port.
9. Place the unit where it will be used and adjust the
Leveling Feet (2) as needed.
Holding your Workpiece
The Right and Left Edge Lips (4 and 5) can be raised
or lowered and the Back Edge Lip (6) removed to
accommodate a variety of workpiece sizes, and the Stopper
Bolts (11) and Nuts (12) can be used as a sort of bench dog
to keep workpieces from shifting.
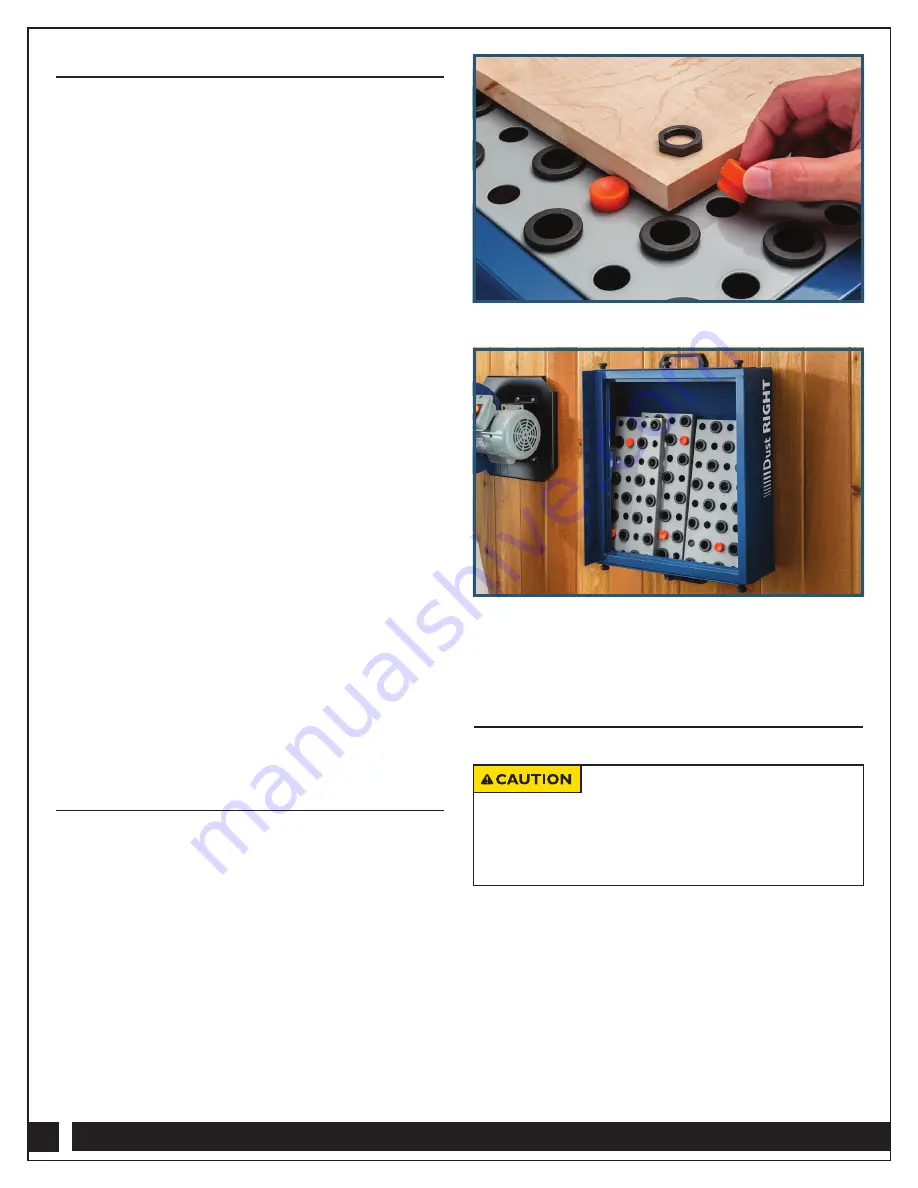
1. To use the Stopper Bolts (11) and Nuts (12) to hold
a workpiece while you’re working on it, place the
workpiece on the Downdraft Table and insert Stopper
Bolts in the appropriate smaller holes in the Downdraft
Plates.
Fig. 1. Remove the workpiece, carefully lift the
Downdraft plates and, from underneath, thread a
Stopper Nut onto each Stopper Bolt. Then reinstall
the Downdraft Plates in the Case.
2. If your workpiece won’t fit within the Downdraft Table,
you can lower the Right and Left Edge Lip (4 and 5) and
remove the Back Edge Lip by loosening the Lock
Knobs (10), making the adjustments and retightening
the Lock Knobs.
Storing your Downdraft Table
1. Identify a wall location with enough space to fit the unit.
2. Drill a pilot hole and drive a 3/8" x 4" lag bolt (not
included) into a wall stud. Make sure that the lag bolt
is secure in the wall stud but also extends far enough
from wall to account for the Leveling Feet.
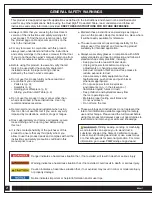
3. Place the three Downdraft Plates (7) vertically inside
the Case (1) for storage and hang the unit on the lag
bolt, using the keyhole in the Case bottom.
Fig. 2.
Check Rockler.com for updates. If you have further questions, please
contact our Technical Support Department at 1-800-260-9663
or support@rockler.com
Lag bolt must be driven into a wall
stud to be able to support the weight of the Downdraft
Table. Failure to do so could result in the Downdraft
Table crashing down, potentially causing property
damage and/or personal injury.
Fig. 1
Fig. 2


