background image

4

ENGLISH


Batteries

Batteries: Preparation


DANGER:


During battery installation and any type of battery maintenance, the operator must be provided with the necessary 


personal protection devices (gloves, goggles overalls, etc.) to limit the risk of injury. Keep clear of naked flames, avoid 


short circuiting the battery poles, avoid sparks and do not smoke.

Batteries are normally supplied filled with acid and ready for use. If the batteries are dry, proceed as follows before installing them 

in the machine.Remove the caps and fill all elements with sulphuric acid solution specific for batteries until the plates are entirely 

covered (this requires at least a couple of passes for each element). Leave the batteries stand for 4-5 hours to allow air bubbles to 

come to the surface and the plates to absorb the electrolyte.

Make sure the level of electrolyte is still above the plates and if necessary top up with sulphuric acid solution. Close the caps.

Install the batteries in the machine (following the procedure described below). Charge the batteries before starting up the machine 

for the first time. Follow the instructions in the “Battery maintenance and charging” section.

Batteries: installation and connection


DANGER:


Check that all switches on the control panel are in the “0” (off) position. Make sure you connect the terminals 


marked with a “+” to the positive poles of the battery.Do not check the battery charge by sparking. Meticulously 


follow the instructions given below as short circuiting the batteries could cause them to explode.

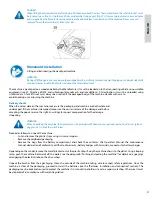
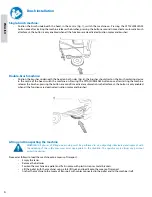
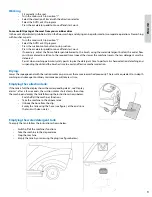
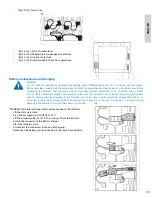
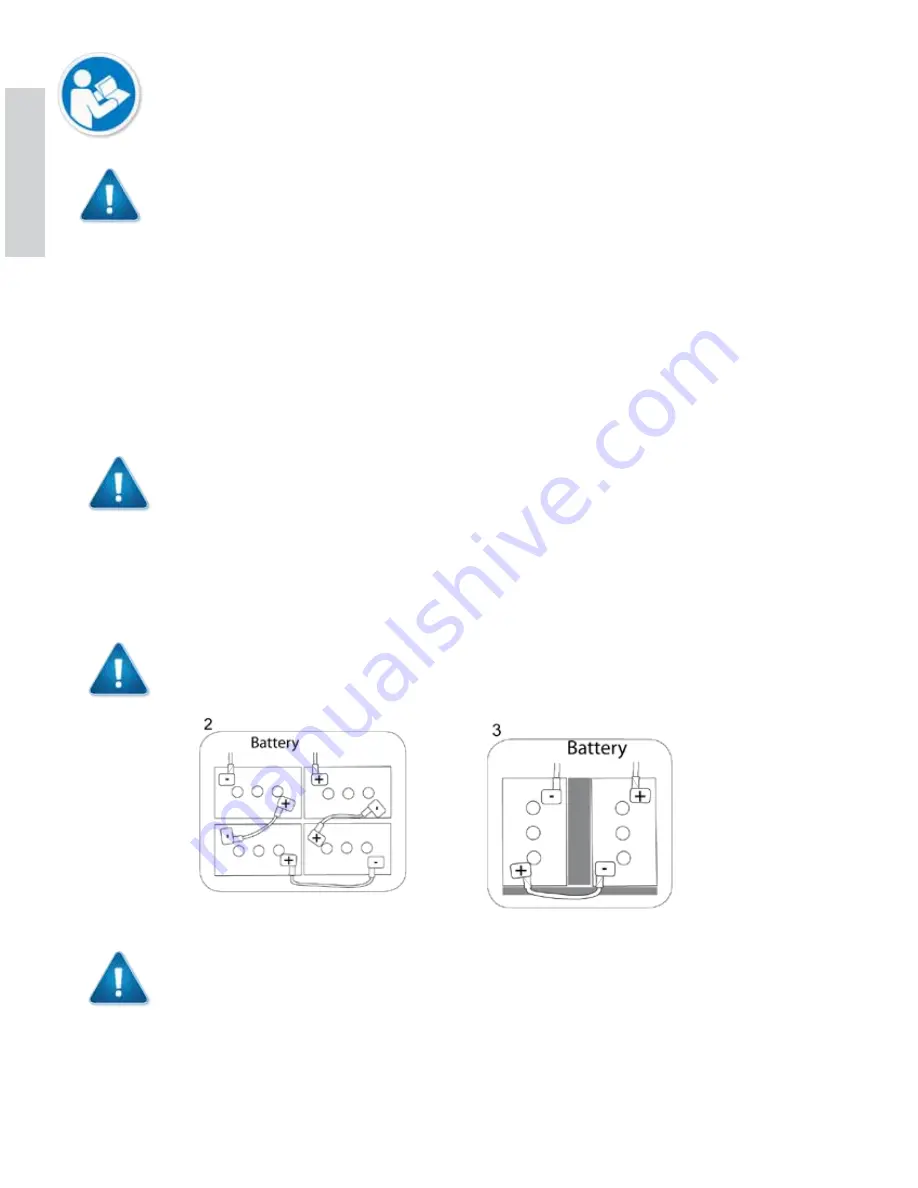
Place the batteries in the battery compartment, orienting them as shown in the drawings (figs. 2 and 3). On machines fitted with 

two batteries, place the polystyrene spacers supplied between the compartment and the batteries, see the drawing (fig. 3) Referring 

to the cable layout shown in the above diagram, connect the battery cables and bridge terminals to the battery poles. Arrange the 

cables as shown in the diagram, tighten the terminals on the poles and coat with Vaseline. Lower the tank into the working position.

When using the machine, follow the instructions below. 


WARNING: 


Never allow the batteries to become excessively flat as this could damage them irreparably.

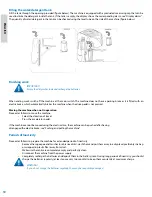
Batteries: removal


DANGER:


When removing the batteries, the operator must be equipped with suitable personal protection devices (gloves,


goggles, overalls, safety shoes, etc.) to reduce the risk of injury. Make sure the switches on the control panel ar


in the “0” position (off) and the machine is turned off. Keep away from naked flames, do not short circuit the 


battery poles, do not cause sparks and do not smoke. Proceed as follows.

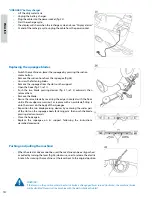
• 

Disconnect the battery cables and bridge terminals from the battery poles.

• 

If necessary, remove the devices fixing the battery to the base of the machine.

• 

Lift the batteries from the compartment using suitable lifting equipment.

Summary of Contents for Hurricane Rally 21

Page 1: ...d opérations Hurricane Rally 21 Auto Scrubber Auto récureuse Code 19366 Serial Number Numéro de série ______________________ Date of Purchase Date d achat _________________________ More info Plus d info www dustbane ca 2015 10 ...

Page 2: ......

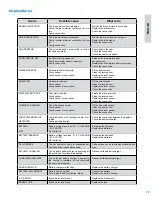
Page 3: ... industrial premises The scrubber drier spreads a solution of water and detergent in the correct concentration on the floor and then scrubs it to remove the dirt By carefully choosing the detergent and brushes or abrasive disks from the wide range of accessories available the machine can be adapted to a wide range of combinations of types of floor and dirt A suction system incorporated in the mach...

Page 4: ... to transport people or goods or to tow things DO NOT tow the machine NEVER rest objects of any weight on the machine for any reason NEVER obstruct the ventilation and heat dispersion openings NEVER remove modify or circumvent safety devices Numerous unpleasant experiences have shown that a wide range of personal objects may cause serious accidents Before beginning work remove jewellery watches ti...

Page 5: ...make sure the carrier is aware of the damage and before accepting the goods reserve the right in writing to request compensation for the damage Unpacking WARNING When unpacking the machine the operator must be provided with the necessary personal protection devices gloves goggles etc to limit the risk of injury Proceed as follows to unpack the machine Cut and remove the plastic straps using scisso...

Page 6: ...marked with a to the positive poles of the battery Do not check the battery charge by sparking Meticulously follow the instructions given below as short circuiting the batteries could cause them to explode Place the batteries in the battery compartment orienting them as shown in the drawings figs 2 and 3 On machines fitted with two batteries place the polystyrene spacers supplied between the compa...

Page 7: ...sert the wires into the connector contacts and squeeze them forcefully with suitable pliers Respect the polarity red wire black wire when inserting the wires into the connector Squeegee Installation and Adjustments Switch the machine on lower the squeegee by pressing the suction motor button Place the squeegee in the slots provided on the support fig 4 then tighten the fastening knobs and insert t...

Page 8: ...s the brushes pressing the button a second time activates automatic brush attachment the button is only enabled when all the functions are deactivated suction motor and brushes Lifting and transporting the machine WARNING All phases of lifting and moving must be performed in an adequately illuminated environment with the adoption of the safety measures most appropriate to the situation The operato...

Page 9: ...ntact the Manufacturer Use products suitable for the floor and dirt to be removed only ollow the safety regulations on use of detergents given in the section Safety regulations Preparing the machine for work Proceed as follows before starting work Check that the display shows the batteries to be fully charged Recharge if necessary See the Battery maintenance and charging section Make sure that the...

Page 10: ...N WITH TWO BRUSHES ONLY In the AUTO or ECO program changes to this parameters will terminate the selected program and activate manual mode Attach release brushes CLICK ON OFF fig 12 ref 4 used to automatically attach and detach the brushes Pressing the button once after starting the machine releases the brushes pressing it a second time activates automatic brush attachment The button is only enabl...

Page 11: ... washing particularly dirty points to give the detergent time to perform its chemical action detaching and suspending the dirt and the brushes time to exert an effective mechanical action Drying Lower the squeegee and with the suction motor on pass over the same area washed previously The result is equivalent to in depth washing and subsequent ordinary maintenance will take less time Emptying the ...

Page 12: ...in operation Proceed as follows to move the machine Select the direction of travel Press the accelerator pedal If the machine cannot be moved using the electric drive the machine can be pushed after having disengaged the electric brake see Pushing and pulling the machine Periods of Inactivity Proceed as follows to prepare the machine for extended periods of inactivity Remove the squeegee and brush...

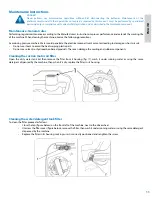
Page 13: ...artment or motors leading to damage or short circuits Do not use steam to avoid the heat warping plastic parts Do not use solvents or hydrocarbon based products These can damage the cowling and rubber components Cleaning the suction motor air filter Open the dirty water tank lid then remove the filter from it housing fig 17 wash it under running water or using the same detergent dispensed by the m...

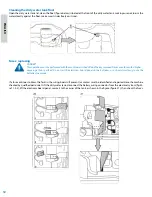
Page 14: ... Never usea fuse with a higher amperage than specified Do not rest the electronic board panel on the batteries as a short circuit may cause the batteries to explode If a fuse continues to blow the fault in the wiring boards if present or motors must be identified and repaired Have the machine checked by qualified personnel Lift the dirty water tank disconnect the battery wiring connector from the ...

Page 15: ...flow in the battery and battery charger compartment In the case of gel batteries use a specific charger for gel batteries only To avoid permanent damage to the batteries do not run them down completely Charge the batteries as instructed in the battery charger manual Disconnect the connectors at the end of charging To avoid permanent damage to the batteries do not run them down completely STANDALON...

Page 16: ...rsing the edge in contact with the floor until all four edgesare worn out or replace with a new blade fitting it onto the screws on the body of the squeegee Reposition the two blade pressing devices by centering the wider part of the slots on the squeegee body fastening pins then push the blade pressing devices inwards Close the hook again Replace the squeegee on its support following the instruct...

Page 17: ... of the detergent CAUSE SOLUTION 1 The tap upstream of the filter is closed 1 Open the tap 2 Damaged solenoid valve 2 Replace 3 Dirty solenoid valve 3 Check 4 The detergent tank is empty 4 Top up 5 The hose delivering detergent to the brush is blocked 5 Unblock 6 Blown fuse 6 Replace Periodic Checks Check Empty and wash the dirty water tank X Clean the squeegee blades and check them for wear X Che...

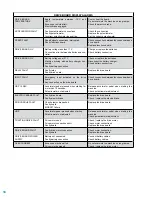
Page 18: ...eck 3 The dirty water tank float is activated or is blocked by dirt or is faulty 3 Empty the dirty water tank check the float 4 Blockage in the suction hose 4 Check 5 The suction hose is not connected to the squeegee or is damaged 5 Check 6 Suction motor not powered or faulty 6 Check PROBLEM The machine does not move CAUSE SOLUTION 1 The batteries are flat 1 Recharge the batteries 2 Drive wheel ac...

Page 19: ...the dirty water tank Clean the level sensor Replace the level sensor Check the connection CHEMICAL FINISHED Chem Dose tank empty Stuck sensor Faulty sensor or connection Fill the Chem Dose tank Clean the level sensor Replace the level sensor Check the connection FUNCTON BOARD NOT DETECTED Communication with functions board inter rupted Faulty auxiliary boards Check the connection between the board...

Page 20: ...LT Emergency input activated on the drive board Key connection on the drive board Check connection between functions board and drive board HDP 10 SEC Accelerator pedal pressed when starting for more than 10 seconds Potentiometer not adjusted Release accelerator pedal when starting the machine Check potentiometer adjustment ELECTRIC BRAKE FAULT Faulty drive board Faulty electric brake Replace the d...

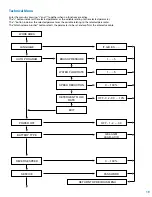
Page 21: ...u by pressing and together when no functions are active The button increases the selected parameter or the variable relating to the selected parameter The button increases the selected parameter or the variable relating to the selected parameter The Attach release brushes button selects the parameter to be set and confirms the entered vari able WORK AREA LANGUAGE IT GB ES 1 5 1 5 0 100 OFF 0 2 0 3...

Page 22: ...20 ...

Page 23: ...ment which has been subject to misuse negligence or accident or which shall have been repaired or altered by a person or persons outside a Dustbane authorised repair depot in any way so as in the judgement of Dustbane Products Limited to affect adversely its performance and reliability normal maintenance services and the replacement of service items including but not limited to electric cord paint...

Page 24: ......

Reviews: