background image

SETUP

SUPPORT

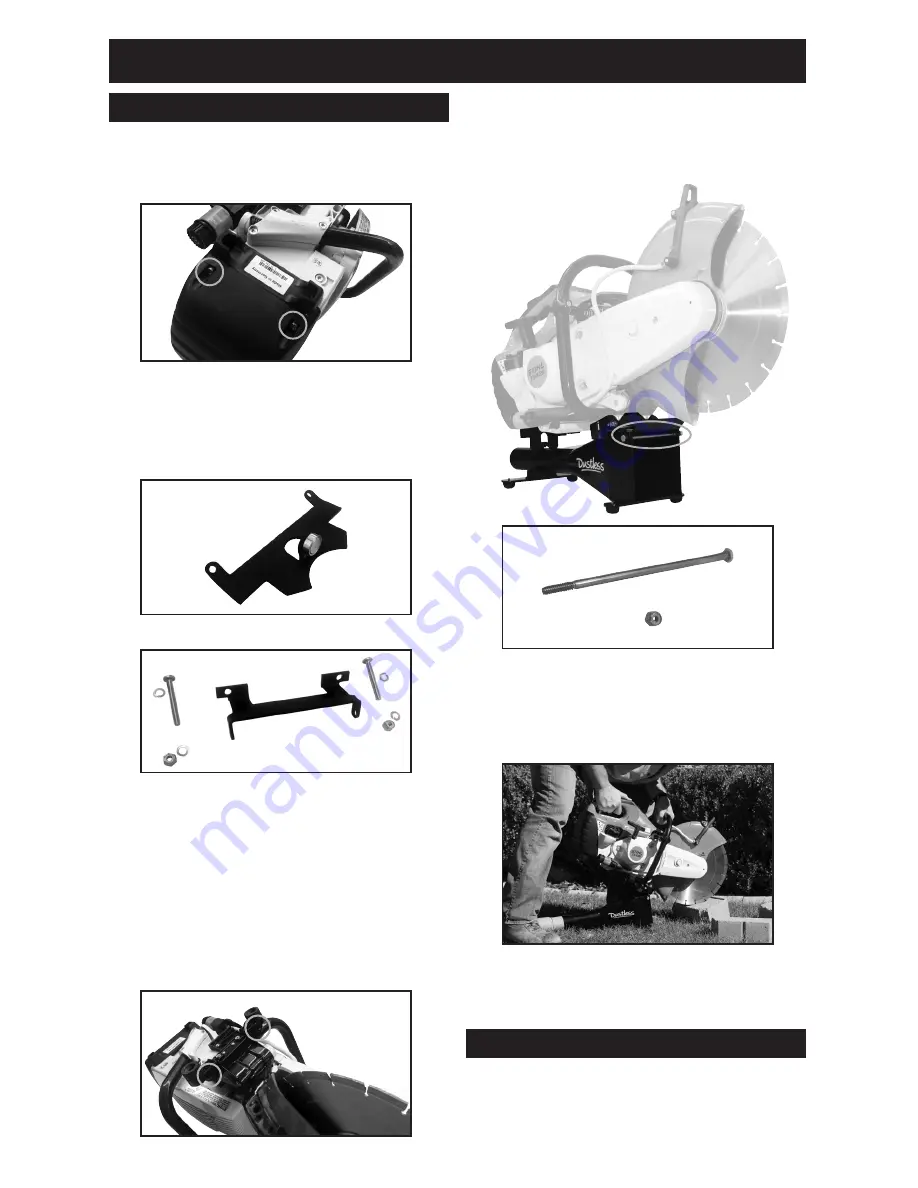
1.  Loosen and remove the 2 screws  

(circled) from the back of the underside 
of the Gas Saw.

2.  Install the rear bracket by placing it with 

the magnet facing to the back, in the 
screw holes and replacing the screws, 
tighten down.

3.  Install the front bracket by placing it 

in-front of the front feet of the gas saw 
(circled) with the bracket facing forward. 
Insert (2) 1 ¾ bolts with a lockwasher 
through holes in the feet of the gas saw 
and the holes in the front bracket. Place 
washer and Nyloc nut on the end of the 
bolt and tighten down.

4.  Place gas saw on top of the DustBull and 

install 6” bolt through the holes (Circle) of 
the front bracket and the holes in the top 
of the DustBull. Secure with Nyloc nut and 
tighten down. 

5.  Attach 2” vac hose to the back of the 

DustBull.

www.dustlesstools.com

OM019_0116

Installation instructions for the STIHL Gas Saw

Rear Bracket

Front Bracket

Summary of Contents for D1765

Page 1: ...ree in the U S dustlesstools com PATENT NO 8137165 Dust Shroud For Gas High Speed Saws Stops Dust Storms DustBull D1763 fits Husqvarna gas highspeed saws DustBull D1764 fits STIHL gas highspeed saws DustBull D1765 fits Makita gas highspeed saws And Fits many more saws ...

Page 2: ...acket facing forward Insert 2 1 bolts with a lockwasher through holes in the feet of the gas saw and the holes in the front bracket Place washer and Nyloc nut on the end of the bolt and tighten down 4 Place gas saw on top of the DustBull and install 6 bolt through the holes Circle of the front bracket and the holes in the top of the DustBull Secure with Nyloc nut and tighten down 5 Attach 2 vac ho...

Page 3: ...o screws and magnet plate Set the mounting bracket on the DustBull over the two screw holes and reinstall the screws and tighten till secure Magnet plate not needed The rubber foot of the rear bracket will rest on the bottom side of the Makita gas saw 4 Install the DustBull to your Makita gas saw by lining up the holes in the bell of the DustBull with the holes on the front bracket Insert the 6 bo...

Page 4: ...tighten down the nut to the body of the saw till secure 3 Install the rear mounting bracket by remov ing all four screws from the bottom back side of the saw circled Install the rear mounting bracket and replace the screws and tighten till secure Magnet plate should be located at the back of the saw 4 Install the DustBull to your Husqvarna gas saw by lining up the holes in the bell of the DustBull...

Reviews: