5
Step 7: Install the Jack
Note:
If you have also purchased the Dusty Harp Jack Clamp, please follow its accompanying instructions for installing the
jack and fitting the clamp on your harp.
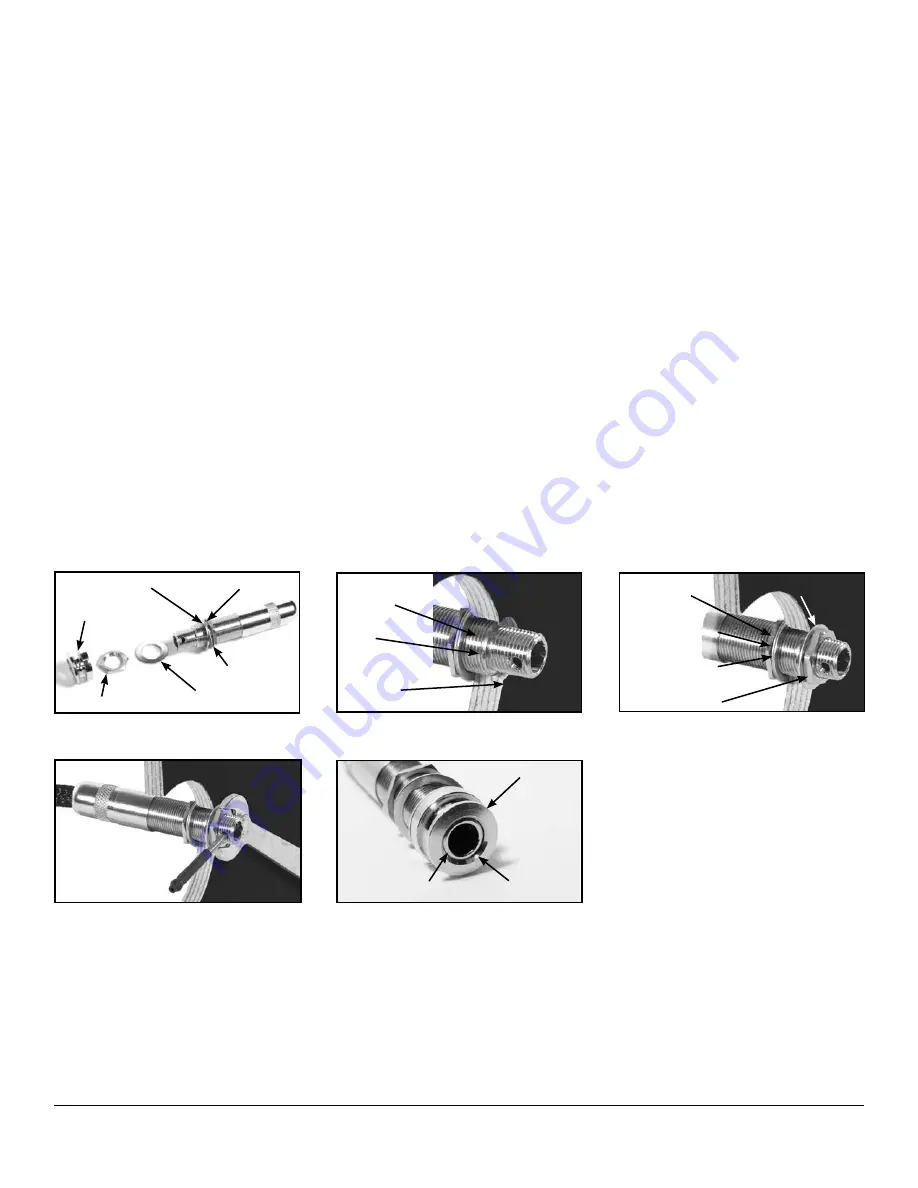
Remove the tip nut, the retaining nut, and the outer washer from the jack
1.
(see figure 9a).
Leave the lock washer, flat
washer, and inner nut in place.
Reach inside the harp and carefully push the end of the jack up through the hole you drilled in the back of the harp.
2.
Adjust the inner nut so the step to the wider threads sits about ¹⁄₁₆
"
(1.5mm) below the outer surface of the harp
body
(see figure 9b).
Put the outer washer on the jack followed by the retaining nut
3.
(see figure 9c).
Snug down the retaining nut finger-
tight. The jack should be firmly held in place. If the jack is loose in the hole, loosen the retaining nut and adjust the
inner nut so that the retaining nut can fully seat against the surface of the harp.
Place the ½
4.
"
wrench on the retaining nut. Insert the jack-tightening pin through the cross-drilled hole in the threads
of the jack. Hold the jack in position with the pin and use the ½
"
wrench to firmly tighten the retaining nut
(see
figure 9d).
Screw on the tip nut finger-tight. If correctly installed, the end of the threaded portion of the jack should be slightly
5.
visible in the chamfer at the end of the tip nut
(see figure 9e).
The cable needs to be able to make a firm connection
with the jack; it should snap distinctly into place when inserted. If the threaded portion of the jack is too far inside
the tip nut, the cable can be stopped by the tip nut before it makes a good connection with the jack. If this is the
case, you will need to remove the tip nut, loosen the retaining nut, adjust the position of the inner nut so that the
end of the jack barrel is very slightly farther out, and retighten the retaining nut.
Step 8: Test
Plug the pickup system into an amplifier and lightly tap the backside of the soundboard near each pickup element to
make sure each is giving a signal. You can play your harp and use the pickup safely, but avoid moving or jostling your
harp for 24 hours. The tone and signal strength will improve over the next day as the super glue cures to full hardness.
Congratulations! Now the installation process is complete. Please call us with any questions.
Dusty Strings • 3450 16th Ave. W., Seattle, WA 98119 • Toll Free 866-634-1656 • www.dustystrings.com
Figure 9 – Jack components and installation
Figure 9b – Jack installation
Wider
threads
Step
Surface
of harp
Figure 9c – Jack installation
Outer washer
Inner washer
Retaining nut
Inner nut
Lock washer
Figure 9a – Jack components
Tip nut
Retaining nut
Outer washer
Inner nut
Inner washer
Lock washer
Figure 9d – Tighten the jack
Figure 9e – Optimal alignment
Tip nut
End of jack
Chamfer
rev. 8/9/13


