background image

5

2. Installation and use

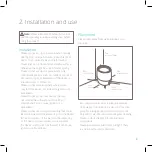
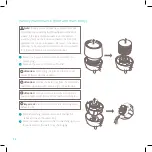
Front: 

at least 50cm

Back: 

at least 50cm

Side: 

at least 50cm

Side: 

at least 50cm

Top: 

at least 100cm

 Note:

 Please take notice of below instructions 

and the separately included warning sheet before 
using the product.

Installation

• 

 Please do not set up in a place where humidity 
directly hits curtains, furniture, indoor plants or 
doors. It can cause stains and deformation.

• 

 Please place on a horizontal and stable surface, 
otherwise the might be a risk of water spilling.

• 

 Please do not set up in a place where only 
children are present such as children’s rooms. It 
can lead to injury or breakdown if the device is 
knocked over or climbed on.

• 

 Please do not place anywhere where items 
may fall from above.  It can lead to ignition or a 
breakdown.

• 

 Please do not set up near devices that are 
not compatible with water such as PCs or 
smartphones. It can cause ignition or a 
breakdown.

• 

 Please do not use in any surrounding that could 
lead to the water in the water tray or in the device 
to freeze. However, if the water in the water tray 
or the device is frozen please do not operate 
the device until the ice has thawed. It can cause 
ignition or a breakdown.

Placement

Please place away from walls, windows and 
furniture.

•  

Even when it is placed at a sufficient distance 
from walls or furniture, if it is used in the same 
place for a long period of time, it can become 
dirty with scale. We recommend regular cleaning. 
Please consult chapter 4 for maintenance 
instructions.

•  

Please avoid places with direct sunlight. There 

  is a risk that the device discolors.

Summary of Contents for Ovi

Page 1: ...1 user manual Ovi evaporative humidifier...

Page 2: ...products we aim to provide you the best possible indoor air quality Don t let his good looks distract you from its quality Ovi provides the best of both worlds great style with high performance humid...

Page 3: ...3 1 Product overview 4 2 Installation use 5 3 Functions 10 4 Maintenance 11 5 Technical specifications 14 6 FAQ 15 Table of contents...

Page 4: ...overview Water supply entrance 3 Top cover 1 Max water supply indicator Power mist output switch Water tray Power water supply indicator 2 Power plug Power cable Anti bacterial filter 4 5 6 8 Aromatic...

Page 5: ...anywhere where items may fall from above It can lead to ignition or a breakdown Please do not set up near devices that are not compatible with water such as PCs or smartphones It can cause ignition or...

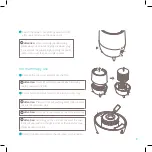
Page 6: ...a watering can Attention Please slowly pour in the water from a container as close to the top surface as possible If water is poured in from a high position or fast water can leak inside the device an...

Page 7: ...ply stop indicator water can spill over the top enter the device and can cause a breakdown 3 Supply water if power water supply indicator flashes red Note Even if the water supply stop indicator disap...

Page 8: ...not use when the power cord is bundled together 2 Turn the power mist output switch to the top or bottom to switch on the power Once the power is connected the power supply water indicator flashes an...

Page 9: ...not put aromatic oils in the water tray Attention Depending on the aromatic oils used the color in the oils can lead to a change in color of the aromatics tray Please be advised of this 3 Return the...

Page 10: ...main body from here Once the water tray is full all of the water supply stop indicators are displayed and water supply entrance is closed Attention When the water supply entrance is closed please do...

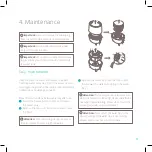
Page 11: ...o health Please follow the steps below every day after use 1 Switch the power button to OFF and remove the power plug 2 Remove the top cover from device and remove the filter Attention When removing t...

Page 12: ...2 Remove the cover and remove the filter Attention When lifting the filter and the top cover please lift them vertically upwards Attention Remove the water tray from the main body and throw away the w...

Page 13: ...assembling it 3 Check that each component including the filter has fully dried Then assemble the device and fully store it Spare parts Spare parts and accessories can be requested at the point of pur...

Page 14: ...cation of the device may be changed without notice Mist output 200ml h Main materials ABS PP Effective area 30m2 Power cord length 1 5m Weight 2 8 kg Power consumption 6 19w Max operation time 10h Mod...

Page 15: ...water supply indicator flashes red A Water supply is needed Please supply water from the top of the device Q Strange noises accompany the use of the product A This device evaporates using a fan Theref...

Page 16: ...BV P O Box 145 5400 AC Uden Netherlands www duux com 2016 Duux All rights reserved DUUX is a trademark of Duux International BV registered in the EU and other countries The brand cited belongs exclus...

Page 17: ...ns hors de port e des enfants Assurez vous de ne pas endommager le cordon de l adaptateur et vitez de tr bucher ou de tomber sur ce cordon N installez pas le produit pendant un orage Ne recouvrez pas...

Page 18: ...fsstelle zur ck wenn dieses M ngel oder Sch den aufweist Verwenden Sie ausschlie lich Zubeh rteile die vom Lieferanten empfohlen werden Andere Zube h rteile k nnen Sch den an dem Ger t verursachen und...

Reviews: