background image

2

Thank you for 

choosing Duux.

We’re so glad you decided to read the instructions to your new Duux air purifier! Many users casually dismiss 
instructions and seek to figure it out on their own. But studies show that people who read instructions will 
get up to speed more quickly and efficiently than those who poke around with trial and error.

At Duux we believe in the importance of a comfortable and healthy living environment. Enhancing your well-
being by designing appealing, functional and effective products is the passion that drives us every day. With 
our range of innovative air treatment products we aim to provide you the best possible indoor air quality.

Meet the cooling fan that surprises you with a gentle breeze, a vigorous gust of wind and everything in 
between. The Duux Whisper Flex has no less than 26 settings. In this way you can always find the perfect 
airflow environment. Thanks to the horizontal and vertical oscillation function, the Whisper Flex provides 
a pleasant coolness throughout any room. Choose yourself, which mode you prefer: fixed speed, ‘natural 
wind’ or perhaps the night mode, by which you are lulled into sleep by the whispering breeze. The separately 
available dock and battery pack allows you to freely move the device without wires.

Read the manual carefully to get the most out of your Whisper Flex fan.

Summary of Contents for Whisper Flex

Page 1: ...1 user manual gebruikershandleiding Bedienungsanleitung Mode d emploi manual de instrucciones Whisper Flex portable fan ...

Page 2: ...of innovative air treatment products we aim to provide you the best possible indoor air quality Meet the cooling fan that surprises you with a gentle breeze a vigorous gust of wind and everything in between The Duux Whisper Flex has no less than 26 settings In this way you can always find the perfect airflow environment Thanks to the horizontal and vertical oscillation function the Whisper Flex pr...

Page 3: ...3 1 Product overview 4 2 Installation 5 3 Settings 7 4 Technical specifications 11 Table of contents EN ...

Page 4: ...is packed in a separate bag which is referred to in the next chapter 1 User manual 2 Base unit 3 Extension tube 4 Motor 5 Front grill 6 Tools 7 Power adapter 8 Remote control h Oscillation mechanism LED control panel Adjustability of the mount Remote control receiver ...

Page 5: ...rew to secure the fan blades Note turn the screw anticlockwise firmly to secure it 1 Place the rear grill over the motor and tighten with the locking ring EN 4 Fit the front grill and rotate it a little clockwise until the arrow on the grill lines up with the left side marker ...

Page 6: ...e base and lower side of the motor To release the tube press the buttons on the bottom and back side 5 Fit the supplied screw to the underside of the grill and connect the two halves firmly together h 6 Attach the motor to the connector input on the base unit Refer to point 7 for attachment of extension tube motor base ...

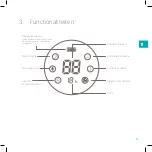
Page 7: ... mode h 3 Settings Battery life only visible when connected to dock sold separately Natural wind Horizontal oscillation Ventilation speed Vertical oscillation Set timer function Timer Set ventilation speed EN ...

Page 8: ...from top to bottom Timer The timer can be set to switch the fan off automatically This can be set to between 0 and 12 hours from the time that the fan is first turned on Natural wind The fan rotates at different speeds to simulate natural wind conditions Night mode By selecting this mode the LED display will automatically turn off after 10 seconds for an undisturbed night s sleep Battery mode Deta...

Page 9: ... increase battery life See below comparison chart for reference For reference only Test environment conditions 18 C 48 humidity Fan speed Oscillation Battery life 1 Off 18 H Horizontal or Vertical 8 H Horizontal Vertical 5 5 H 5 Off 15 5 H Horizontal or Vertical 6 9 H Horizontal Vertical 4 7 H 10 Off 11 8 H Horizontal or Vertical 5 6 H Horizontal Vertical 3 9 H 15 Off 8 H Horizontal or Vertical 4 ...

Page 10: ... the LED display 5 When a display icon is flashing you can set and adjust this setting by pressing the control ring When the desired position is reached press the control ring again to confirm the selection 6 When setting the fan speed and timer function the LED display will continue to flash until the desired setting is selected After this press the control ring again to confirm the selection 7 O...

Page 11: ...ons 880 mm 330 mm 330 mm Power consumption 3 27W Fan speed 26 speeds Weight 5 kg Noise level 13 50dBa Adjustable height 51 88 cm Display Digital LCD display Airflow 710 CBM hr Main material types ABS PP Model no DXCF04 05 LCD EN ...

Page 12: ...n innovatieve luchtbehandelingsproducten streven we er naar om jou van de best mogelijke luchtkwaliteit te voorzien Ontmoet de ventilator die je verrast met een zacht briesje een stevige windvlaag en alles daartussenin De Duux Whisper Flex kent maar liefst 26 standen Zo vind je altijd de perfecte luchtstroomsterkte Dankzij de horizontaal en verticaal oscillerende functie geeft de Whisper Flex over...

Page 13: ...13 Inhoudsopgave NL 1 Productoverzicht 14 2 Installatie 15 3 Functionaliteiten 17 4 Technische specificaties 21 ...

Page 14: ...aar in het volgende hoofdstuk wordt verwezen 1 Handleiding 2 Ventilator voet 3 Verlengbuis 4 Motor 5 Voorste rooster 6 Gereedschap 7 Voedingsadapter 8 Afstandsbediening Handgreep en Afstandsbediening houder h Oscillatiemechanisme LED bedieningspaneel Verlengbuis Afstandsbediening ontvanger ...

Page 15: ... ventilatorbladen vast te zetten Let op draai de schroef stevig linkswaard om vast te draaien 1 Plaats de achterzijde van de grill over de motoraandrijving en draai vast met de sluitingsring NL 4 Plaats de voorzijde van de grill en draai de grill kort rechtswaard zodat het pijltje gelijk staat aan het linker streepje ...

Page 16: ...ator hoger te maken moet u de mannelijke pinnen van de verlengbuis in de vrouwelijke connectors op de voet en onderzijde van de motor steken Om de buis te ontkoppelen drukt u op de knoppen aan de onderkant en achterzijde h motor basis 6 Bevestig de motor op de connectoringang van de basiseenheid Zie punt 7 voor de bevestiging van de verlengbuis ...

Page 17: ... wanneer aangesloten op het docking station afzonderlijk verkrijgbaar 3 Functionaliteiten Nachtmodus Natuurlijke wind Horizontale oscillatie Ventilatie snelheid Verticale oscillatie Instellen timerfunctie Timer Instellen ventilatiesnelheid NL ...

Page 18: ...graden verticaal van boven naar beneden Timer Stel zelf in wanneer de ventilator automatisch uitschakelt Dit kan tussen de 0 en 12 uur zijn Natuurlijke wind De ventilator draait met verschillende snelheden om een natuurlijke wind na te bootsen Nachtmodus Door deze modus te selecteren schakelt het ledscherm na 10 seconden automatisch uit voor een ongestoorde nachtrust Batterijmodus Verwijder de ven...

Page 19: ...rij te verlengen Zie onderstaande vergelijkingstabel voor referentie Alleen voor referentie Omstandigheden testomgeving 18 C 48 luchtvochtigheid Ventilator snelheid Oscillatie Batterij levensduur 1 Uitgeschakeld 18 H Horizontal of Vertical 8 H Horizontal Vertical 5 5 H 5 Uitgeschakeld 15 5 H Horizontal of Vertical 6 9 H Horizontal Vertical 4 7 H 10 Uitgeschakeld 11 8 H Horizontal of Vertical 5 6 H...

Page 20: ...eer een icon knippert kunt u deze functionaliteit aanpassen en instellen door op het LED display te drukken Wanneer de gewenste stand bereikt is drukt u nogmaals op het LED display op de keuze te bevestigen 6 Bij het instellen van de ventilatiesnelheid en timerfunctie blijft het LED display knipperen totdat de gewenste instelling is gekozen Hierna drukt u nogmaals op het LED display om de keuze te...

Page 21: ... 880 mm 330 mm 330 mm Stroomverbruik 3 27W Ventilatiesnelheid 26 standen Gewicht 5 kg Geluidsniveau 13 50dBa Verstelbare hoogte 55 88 cm Display Digital LCD display Luchtstroom 710 CBM hr Hoofdmaterialen ABS PP Model no DXCF04 05 LCD ...

Page 22: ...nnovativer Produkte zur Luftbehandlung möchten wir Ihnen die bestmögliche Luftqualität in Innenräumen bieten Dazu gehört auch dieser mobile Ventilator der Sie von einer sanften Brise bis hin zu einer kräftigen Windböe immer wieder überraschen wird Der Duux Whisper Flex bietet beeindruckende 26 Einstellungen Deshalb können Sie immer den perfekten Luftstrom einstellen Dank der horizontalen und verti...

Page 23: ...23 1 Produktübersicht 24 2 Installation 25 3 Einstellungen 27 4 Technische Daten 31 Inhaltsverzeichnis DE ...

Page 24: ...uf den im nächsten Kapitel Bezug genommen wird 1 Bedienungsanleitung 2 Basiseinheit 3 Verlängerungsrohr 4 Motor 5 Frontgitter 6 Tools 7 Netzteil 8 Fernbedienung Handgriff Fernbedienungshalter h Schwenkmechanismus LED Steuerung Fernbedienungsempfänger Verstellbarkeit der Halterung ...

Page 25: ...weis drehen Sie die Schraube gegen den Uhrzeigersinn fest um die Flügel zu sichern 1 Setzen Sie das hintere Gitter über den Motor und ziehen Sie es mit dem Sicherungsring fest DE 4 Befestigen Sie das Frontgitter und drehen Sie es leicht gegen den Uhrzeigersinn bis der Pfeil auf dem Gitter mit der Markierung auf der linken Seite übereinstimmt ...

Page 26: ... Ventilators zu vergrößern verbinden Sie die Stifte des Verlängerungsrohres mit den Buchsen an der Basis und der Unterseite des Motors Um das Rohr zu lösen drücken Sie die Knöpfe auf der Unterseite und der Rückseite 6 Befestigen Sie den Motor an der Steckerbuchse der Basiseinheit Die Befestigung des Verlängerungsrohres wird in Punkt 7 beschrieben motor basis ...

Page 27: ... Akkulaufzeit nur sichtbar wenn an das Dock angeschlossen separat erhältlich Nachtmodus Natürlicher Wind Horizontale Schwenkbewegung Drehzahl Vertikale Schwenkbewegung Timerfunktion einstellen Timer Drehzahl einstellen DE ...

Page 28: ...lfe des Timers kann der Ventilator automatisch ausgestellt werden Der Timer kann zwischen 0 und 12 Stunden ab dem Zeitpunkt des ersten Einschaltens des Ventilators eingestellt werden Natürlicher Wind Der Ventilator dreht sich mit unterschiedlichen Geschwindigkeiten um natürliche Wind verhältnisse zu simulieren Nachtmodus Wenn Sie diesen Modus wählen erlischt die LED Anzeige automatisch nach 10 Sek...

Page 29: ...kulaufzeit zu verlängern siehe untenstehende Vergleichstabelle als Referenz Orientierungswerte Testbedingungen 18 C 48 Luftfeuchtigkeit Drehzahl Schwenkbewegung Akkulaufzeit 1 Aus 18 H Horizontal oder vertikal 8 H Horizontal und vertikal 5 5 H 5 Aus 15 5 H Horizontal oder vertikal 6 9 H Horizontal und vertikal 4 7 H 10 Aus 11 8 H Horizontal oder vertikal 5 6 H Horizontal und vertikal 3 9 H 15 Aus ...

Page 30: ...nnen Sie diese Einstellung durch Drücken des Steuerrings einstellen und anpassen Wenn die gewünschte Position erreicht ist drücken Sie den Steuerring erneut um die Auswahl zu bestätigen 6 Bei der Einstellung der Ventilatordrehzahl und der Timerfunktion blinkt die LED Anzeige weiter bis die gewünschte Einstellung gewählt ist Drücken Sie anschließend erneut auf den Kontrollring um die Auswahl zu bes...

Page 31: ... 880 mm 330 mm 330 mm Stromverbrauch 3 bis 27 W Gewicht 5 kg Hauptmaterialien ABS PP Modellnr DXCF04 05 Luftstrom 710 m3 St Geräuschpegel 13 50dBa Display Digital LCD LCD Höhenverstellung 55 88 cm Drehzahl 26 velocidades DE ...

Page 32: ... innovatrices de traitement d air notre objectif est de vous donner la meilleure qualité d air possible Découvrez le ventilateur qui vous surprendra soit avec une brise légère soit avec une forte rafale de vent ou toutes les variations possibles entre les deux Le Duux Whisper Flex compte pas moins de 26 positions Cela vous permettra donc de toujours trouver l intensité parfaite de débit d air Grâc...

Page 33: ...33 1 Aperçu du produit 34 2 Installation 35 3 Fonctionnalités et fonctionnement 37 4 Spécifications techniques 41 Table des matières FR ...

Page 34: ...référence dans le chapitre suivant 1 Mode d emploi 2 Unité de base 3 Tube de rallonge 4 Tube de rallonge 5 Grille de calandre 6 Outils 7 Adaptateur secteur 8 Télécommande h Tube de rallonge Panneau de contrôle LED Mécanisme d oscillation Poignée Support de télécommande Récepteur de télécommande ...

Page 35: ...marque serrez la vis fermement dans le sens inverse des aiguilles d une montre 1 Placez l arrière de la grille sur l entraînement du moteur et serrez avec l anneau de fermeture la fixation du tube de rallonge FR 4 Placez l avant de la grille et tournez légèrement la grille vers la droite de façon à ce que la flèche soit la même que sur la ligne gauche ...

Page 36: ...ugmenter la hauteur du ventilateur connectez les broches mâles du tube de rallonge aux connecteurs femelles sur la base et le côté inférieur du moteur Pour libérer le tube appuyez sur les boutons situés en bas et à l arrière h barre base 6 Reliez le moteur à l entrée du connecteur sur l unité de base Reportez vous au point 7 pour ...

Page 37: ...lle est connectée à la station d accueil vendue séparément 3 Fonctionnalités Mode nuit Vent naturel Oscillation horizontale Vitesse de ventilation Oscillation verticale Réglage de la fonction de minuterie Minuterie Réglage de la vitesse de ventilation FR ...

Page 38: ...aut en bas entre 0 100 degrés Minuteur se règle lui même lorsque le ventilateur s arrête automatiquement Cette durée peut être comprise entre 0 et 12 heures Vent naturel le ventilateur tourne à différentes vitesses pour imiter un vent naturel Mode nuit En sélectionnant ce mode l affichage LED s éteint automatiquement après 10 secondes pour une nuit de sommeil tranquille Mode batterie Détachez le v...

Page 39: ...e de vie de la batterie Voir le tableau de comparaison ci dessous pour référence Pour référence seulement Conditions d environnement d essai 18 C 48 d humidité Vitesse du ventilateur Oscillation Autonomie de la pile 1 Désactivé 18 H Horizontal ou Vertical 8 H Horizontal Vertical 5 5 H 5 Désactivé 15 5 H Horizontal ou Vertical 6 9 H Horizontal Vertical 4 7 H 10 Désactivé 11 8 H Horizontal ou Vertic...

Page 40: ...e vous pouvez ajuster et régler cette fonctionnalité en appuyant sur l affichage LED Lorsque la position souhaitée est atteinte appuyez à nouveau sur l affichage LED pour confirmer la sélection 6 Lors du réglage de la vitesse de ventilation et de la fonction de minuterie l affichage LED continue de clignoter jusqu à ce que le réglage désiré soit sélectionné Appuyez de nouveau sur l affichage LED p...

Page 41: ...0 mm 330 mm 330 mm Consommation 3 27W Vitesse de ventilation 26 standen Poids 5 kg Niveau sonore 13 50dBa Hauteur réglable 51 88 cm Display Digital LCD display Flux d air 710 CBM hr Principaux matériaux ABS PP Model no DXCF04 05 LCD FR ...

Page 42: ... del aire deseamos ofrecerle la mejor calidad posible de aire interior Descubra al ventilador portátil que le sorprenderá con una suave brisa una intensa ráfaga de viento y todas las modalidades intermedias Duux Whisper Flex no ofrece menos de 26 configuraciones De esta manera encontrará siempre el ambiente de ventilación perfecto Gracias a la función de oscilación horizontal y vertical Whisper Fl...

Page 43: ...43 1 Vista general del producto 44 2 Instalación 45 3 Configuración 47 4 Datos técnicos 51 Índice ES ...

Page 44: ...ia en el capítulo siguiente 1 Manual de instrucciones 2 Unidad base 3 Tubo de prolongación 4 Motor 5 Rejilla delantera 6 Herramientas 7 Adaptador de corriente 8 Mando a distancia Mango Soporte del mando a distancia h Mecanismo de oscilación Panel de control LED Receptor de control remoto Tubo de prolongación ...

Page 45: ...ra fijarlo gire el tornillo firmemente en sentido contrario a las agujas del reloj 1 Coloque la rejilla trasera sobre el motor y apriételo con el anillo de bloqueo ES 4 Coloque la rejilla delantera y gírela un poco en sentido contrario a las agujas del reloj hasta que la flecha de la rejilla se alinee con el marcador del lado izquierdo ...

Page 46: ...ra del ventilador conecte las clavijas macho del tubo de prolongación a los conectores hembra de la base y de la parte inferior del motor Para soltar el tubo pulse los botones de la parte inferior y posterior barre base 6 Conecte el motor a la entrada del conector en la unidad base Consulte el punto 7 para la fijación del tubo de prolongación ...

Page 47: ...está conectada a la base se vende por separado 3 Configuración Modo nocturno Viento natural Oscilación horizontal Velocidad de ventilación Oscilación vertical Ajuste de la función de temporizador Temporizador Ajuste de la velocidad de ventilación ES ...

Page 48: ...mporizador se puede ajustar para apagar el ventilador automáticamente Permite una configuración de entre 0 y 12 horas desde el momento en que se enciende el ventilador por primera vez Viento natural el ventilador gira a diferentes velocidades para simular las condiciones naturales del viento Modo nocturno seleccionando este modo la pantalla LED se apagará automáticamente a los 10 segundos para no ...

Page 49: ...ón de la batería Vea la siguiente tabla comparativa para referencia Solo por referencia Condiciones ambientales de prueba 18 C 48 de humedad Velocidad del ventilador Oscilación Duración de la batería 1 Discapacitado 18 H Horizontal o Vertical 8 H Horizontal Vertical 5 5 H 5 Discapacitado 15 5 H Horizontal o Vertical 6 9 H Horizontal Vertical 4 7 H 10 Discapacitado 11 8 H Horizontal o Vertical 5 6 ...

Page 50: ...chage LED 5 Cuando un icono de la pantalla parpadea puede establecer y ajustar esta configuración pulsando el anillo de control Cuando obtenga la posición deseada pulse de nuevo el anillo de control para confirmar la selección 6 Cuando se ajusta la velocidad del ventilador y la función de temporizador la pantalla LED continuará parpadeando hasta que se seleccione la configuración deseada A continu...

Page 51: ... mm Consumo de energía 3 27W Velocidad del ventilador 26 velocidades Peso 5 kg Nivel de ruido 13 50dBa Altura ajustable 51 88 cm Pantalla LCD digital Flujo de aire 710 CBM hr Principales tipos de material ABS PP Modelo n º DXCF04 05 LCD ES ...

Page 52: ...l BV P O Box 145 5400 AC Uden Netherlands www duux com 2019 Duux All rights reserved DUUX is a trademark of Duux International BV registered in the EU and other countries The brand cited belongs exclusively to the respective owners Specifications are subject to modification without notice ...

Reviews: