background image

A5-C 

Sep ’15 


- 16 -

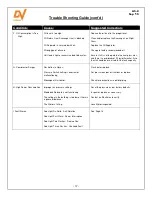
Trouble Shooting Guide (cont’d)


Condition: 

Cause: 

Suggested Correction: 


B. No or Insufficient Air Flow. 


Air Filter is dirty. 
 
Oil Separator is blocked. 
 
Intake Valve is faulty. 
 
Air leaks in the system. 
 
Pressure limits are incorrectly set. 
 
Blowdown Solenoid Valve is open. 
 
 
Belt is broken.


Replace the Air Filter. 
 
Replace the Oil Separator. 
 
Repair or replace the Intake Valve. 
 
Check the Unit and system for air leaks. 
 
Adjust the pressure settings. 
 
Check the wiring to the Solenoid and replace as 
necessary. 
 
Check Belt tension and that Belt is in good 
condition. 


C. Unit is overheating. 

 
Ambient temperature is too high. 
 
Blocked air circulation at the Unit. 
 
Heat Exchanger is dirty. 
 
Oil level is too low. 
 
Using wrong type of compressor oil. 
 
Thermo Valve is faulty. 
 
Oil Filter is blocked. 
 
Temperature Sensor is faulty. 
 
 
Cabinet door/panel is open/off. 

 
Check cooling air circulation. 
 
Check the air circulation in and around the Unit. 
 
Clean the Heat Exchanger 
 
Add oil as required. 
 
Change to the factory recommended oil. 
 
Check and repair as necessary. 
 
Replace the Oil Filter. 
 
Check the wiring to the Temperature sensor. 
Replace the Sensor if necessary. 
 
Secure the door/panel to the Unit. 


D. Compressor Starts Slowly. 

 
Intake Valve Seal is closed. 
 
Ambient temperature is too low. 
 
Minimum Pressure Valve leaking back to Air 
End. 
 
Minimum Pressure Valve setting is too high. 
 
Using wrong type of oil. 


Intake Valve is seized. Repair or replace. 
 
Stop and restart once ambient increases. 
 
Repair or replace the Minimum Pressure Valve. 
 
 
Adjust Minimum Pressure Valve setting to 65 psi. 
 
Change to factory recommended oil. 


E. Intake Valve Leaks Oil 

When Unit Stops. 


Intake Valve Seal leaks. 
 
Intake Valve stuck in open position. 
 
Blowdown Solenoid not functioning.


Repair using an Intake Valve Repair Kit. 
 
Repair or replace the Intake Valve. 
 
Replace the Solenoid. 


Summary of Contents for A5 (T)

Page 1: ...Contents Page Quick Start 2 Safety Precautions 4 Unpacking and Inspection 5 Installation Mechanical 6 Lubrication 8 Installation Electrical 9 Start up Procedures 11 Preventative Maintenance Schedule 12 Common Compressor Faults 14 Troubleshooting Guide 15 Warranty 18 Please read this manual before installing or using your Air Compressor Unit It contains valuable information that will help in the re...

Page 2: ...eight of the Compressor If installed in a compressor room ensure that the room is adequately ventilated Ensure the oil level in the Air End is between the top maximum or bottom minimum thread as shown The correct rotation is as shown The Unit is equipped with an Anti Rotation Switch Check that the rotation is correct Drain condensate water from oil tank If compressor work cycle experiences long pa...

Page 3: ...hen power has been applied to the unit Hour Meter Displays the number of running hours Using the disconnect or breaker to stop the Unit will not allow the Unit to go through an unloading sequence and could result in damage to the Motor Starter or other electrical components Damage caused in this manner is not covered by the manufacturers Warranty Start Stop Switch ON position Starts compressor OFF...

Page 4: ... off all power to the Unit before automatically do not come into attempting to repair or maintain contact with moving parts the Compressor Air compressed by the Unit is not Never breath untreated compressed suitable for inhaling It may contain air produced by the Compressor vapours harmful to your health Compressor Air End Motor and Never touch the Air End Motor or Tubing become hot when running T...

Page 5: ...as been received contact the transport company immediately to file a claim Depending on the problem it may be wise to photograph the damage Also it may be wise to discuss with the carrier representative the time allotted to give notice of loss or damage to the product there may be guidelines which limit timeframes of same 4 Do not attempt further unpacking or operation of the product Also do not d...

Page 6: ...around and 3 feet 915mm above the Unit for easy access to the various sides this being for both the proper ventilation of the Unit and ease of servicing Ensure that the floor under the Unit is smooth level and capable of bearing the weight of the Compressor The Compressor must sit squarely on the floor If installed in a compressor room ensure that the room is adequately ventilated One Horsepower p...

Page 7: ... both intake and exhaust ductwork helping the Unit to a draw in clean outside air and b exhaust the warmer air away from the Unit The warmer air may be used with the inclusion of a damper in the exhaust ducting to warm the interior of the building during the colder months of the year TYPICAL DUCTING INSTALLATION LAYOUT ...

Page 8: ...ng oil may be used for top ups The MK A5 Maintenance Kit includes 1 US Gallon 3 8 litre Oil DEV 3000 1 Oil Filter DSC 603 1 Air Oil Separator Filter DSC 002832 2 Air Filters DSC 001569 This Kit should be used in the regular servicing of your Unit Do not attempt to operate the Unit without first checking whether there is oil in the Air End Reservoir Add oil as required Serious damage may result fro...

Page 9: ...before the Compressor Unit The sales drawing found at the back of this booklet indicates the amp rating for the Unit This information is required in sizing a Disconnect Fuses and or a suitable Breaker As well an electrical schematic is enclosed for reference Electrical wiring and conduit from the building supply through the Compressor Cabinet and to the Switch in the Compressor Control Panel must ...

Page 10: ...l Electrical Connection The Electrician is to bring power to the Unit through the conduit hole located on the top of the unit The Electrical Panel is accessible by means of opening the Front Control Panel Cover 2 terminal blocks and 1 ground lug are provided for main power hook up Motors It is critical that the Motor and Air End in the Rotary Screw Unit be turning in the correct manner Irreparable...

Page 11: ...r 6 Once the Unit reaches 145 psi 10bar it will idle for 3 minutes and shut off 7 Open the Ball Valve slightly and allow the air to bleed from the Tank Once the pressure reaches approx 110 psi 7 6bar the Unit will start and begin to compress air after a short delay 8 Measure the amp draw when the Unit reaches the maximum pressure of 145 psi 10bar 9 Close the Ball Valve allow the Unit to reach maxi...

Page 12: ...mponents as well to combat this the oil must be changed more often than noted below When servicing the Air Compressor shut off all power to the Unit and drain it of air pressure It is the responsibility of the compressor owner to ensure that a regular Maintenance Schedule is followed Note For Compressor Units used in an environment where the ambient temperature is above 32 C 90 F the components ma...

Page 13: ...ient temperature is above 32 C 90 F or b where the Unit temperature runs regularly above 80 C 175 F the components marked with a must be changed twice as often example in 2000 hours instead of 4000 and not as noted above b A complete Oil change must be done every 4000 hours of Unit operation or every 12 months whichever occurs first Please refer to the Warranty on Page 18 for further information c...

Page 14: ...Unit will not operate until the Fault has been addressed Indication Description Most Common Items to Check On Solid Anti Rotation Rotation of Motor wrong Solenoid Valve not relieving pressure Intake Valve Orifice clogged Fast Flash Power Interruption Power failure occurred power was interrupted before Unit completed its Stop Sequence Two Flashes Excessive Temperature Ambient temp high Unit dirty l...

Page 15: ...ms Distributor Service Center Condition Cause Suggested Correction A Unit won t start No power to the Unit Loose and or missing wires in the electrical circuit Motor Overload is tripped Compressor over heated and stopped Unit shut off because pressure is not below 110 psi Automatic Idle Time stopped the Unit Power interruption Check that power at the disconnect or breaker is on Also check primary ...

Page 16: ...y Cabinet door panel is open off Check cooling air circulation Check the air circulation in and around the Unit Clean the Heat Exchanger Add oil as required Change to the factory recommended oil Check and repair as necessary Replace the Oil Filter Check the wiring to the Temperature sensor Replace the Sensor if necessary Secure the door panel to the Unit D Compressor Starts Slowly Intake Valve Sea...

Page 17: ...ould be oversized for the tank capacity G Compressor Surges Restriction in Hoses Pressure Switch setting is incorrect or malfunctioning Blockage at Unit outlet Flush out or replace Set pressure as per instructions or replace Check for obstructions in outlet piping H High Power Consumption Improper air pressure settings Blowdown Solenoid is not functioning The voltage in the building is too low or ...

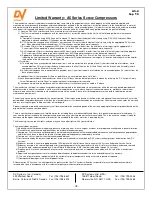
Page 18: ...ed in normal service and is not the result of misapplication misuse abuse neglect incorrect maintenance accident or normal wear Normal maintenance items requiring routine replacement are not warranted Please refer to the appropriate service bulletin to determine normal maintenance requirements The warranty covers parts and labour for the warranty period Either repair or replacement shall be at the...

Reviews: