E N 6 1 0 0 0 - 3 - 2 : 2 0 1 4 , E N 6 1 0 0 0 - 3 - 3 : 2 0 1 3 ,
E N 5 5 0 1 4 - 2 : 2 0 1 5 2 0 1 4 / 3 5 / E U ( L V D ) , E N
60335-1:2012+A11:2014+A13:2017
• Product norms IEC/EN 60335-1:2010 on the Electrical
safety of electrical machinery for domestic use and similar
• It uses UL/CSA/VDE homologated components
• It is RoHS compliant
8.3 WATER NETWORK CONNECTION
Make sure the pressure of the water network ranges between
2 bar and 8 bar; if pressure is higher than 8 bar, the installa-
tion of a pressure reducer is required. If it is lower than 2 bar,
the water softener will not function properly.
For a higher security, install a tap on the inlet pipe and
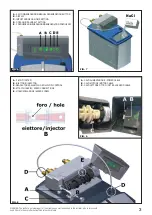
another tap on the outlet pipe (fig. 3, B, D); this allows to stop
the water in case of need.
Install a non-return valve (DVGW, DIN 1988 T2) on the water
softener outlet (fig. 3, A) to prevent hot water to return to the
softener as it may damage the fixture.
We advise you to perform the installation described in fig.
3, because it will allow you to use water in your fixture also
during maintenance.
At the end of installation, before you open the inlet and outlet
taps, the water softener must be set to work (see paragraph
11).
8.4 UNLOADING SYSTEM CONNECTION
While regenerating, the outgoing water must be unloaded
being conveyed through a plastic flexible pipe (included in the
package) and into the nearest unloading system (fig. 2, F).
Install the unloading pipe following the instructions below,
as a poor installation will cause malfunctioning to the water
softener.
• If possible, the unloading point must be at floor level;
• If the unloading point is placed higher than the water softe-
ner, the maximum height acceptable is 1.8 metres, provi-
ded that the distance is not longer than 5 metres and the
pressure of the supply water network is at least 2.8 bar
(fig. 5).
• Make sure the pipe is not flattened or bent, as water
should flow out without running into obstacles (fig. 4, A);
• The unloading system must never be directly connected
to a siphon or to other unloading pipes, in order to prevent
returns or pollution into the water softener.
8.5 BRINE CONNECTION
The installer must make sure the connection between the
valve and the brine must be perfectly sealed and airtight (fig.
8, D).
8.6 OVERFLOW PIPE CONNECTION
Install the overflow union joint (included in the package) on the
brine tank, to allow the unloading of possible excess of water
in the brine that may be caused by irregular refill or defects
in the functioning. Drill a hole in the brine, tight the overflow
union joint, insert the flexible pipe on the hose fitting, connect
the pipe to an unloading system placed lower than the union
joint, so that the water that may come out will not be under
pressure (fig. 3, E and fig. 4, B).
Do not connect the overflow pipe to the unloading pipe of the
water softener, in order to prevent any possible return of water
in the brine.
9) SETTING THE TIMER
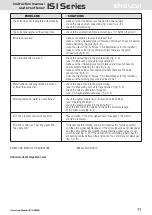
The ISI Series water softener can be set in a quick and sim-
ple way thanks to three buttons allowing to select time, salt
amount and the lapse of time between a regeneration and
the next (fig. 6).
During service, the display shows the time, while during re-
generation it will show two lines in vertical fall. Pressing the
button
, the display will show the current step of the re-
generation cycle.
Please notice that the clock settings only allow to set
hours and it is not possible to set minutes.
9.1 SETTING THE TIME (fig. 6, C):
If you set the current time, the ISI Series water softener will
perform the regeneration at 2 a.m. (fig. 6, B). Read the fol-
lowing examples to set regenerations at a different time.
They show that calculating the difference between the
current time and the regeneration time, and then de-
ducting it from 2 a.m., it is possible to set the desired
time.
• Example 1:
You wish regeneration to be performed in 15 hours.
(The display will have to show 2 a.m. in 15 hours)
2 – 15 = 11 (time to set on the display)
• Example 2:
You wish regeneration to be performed in 7 hours.
(The display will have to show 2 a.m. in 7 hours)
2 – 7 = 19 (time to set on the display)
Press and hold down
until the display shows the desired
time.
9.2 MEASURING OUT SALT FOR REGENERATION (fig. 6, D):
Press and hold down
until the display display shows the
value of the desired amount of salt.
The values for the salt amount go from 0.2 Kg to 6.0 Kg:
- for
ISI 5
set
0.30
- for
ISI 8
set
0.45
- for
ISI 12
set
0.60
9.3 REGENERATION FREQUENCY (fig. 6, E):
The ISI Series water softener allows you to set the lapse of
time between a regeneration and the next.
The values are 0 (no regeneration) , 0.3 (a regeneration every
8 hours), 0.5 (a regeneration every 12 hours), 1 (a regenera-
tion a day) and so on, up to 30 (a regeneration every 30 days).
Press and hold down
until the display shows the desired
value.
9.4 NOTES:
• If, during the setting, no button is pressed for more than 5
seconds, the display will show back the set time.
• In order to maintain data during a power supply black out,
the timer is provided with a buffer battery and can keep
memory of the time for 6 hours. After that, the time will
have to be set again.
10. MANUAL SETTINGS
10.1 POSTPONED REGENERATION (fig. 6, A):
If you press
, a flashing dot will appear on the display. This
means that the regeneration will be performed at the set time,
without modifying the program. If you press the button once
more, the flashing dot will disappear and the command will
be cancelled.
10.2 IMMEDIATE REGENERATION (fig. 6, A) :
To start a complete regeneration cycle immediately, press and
hold down
until the display shows two lines in vertical fall,
indicating that the regeneration is in progress.
Istruction Manual ISI SERIES
9
ENGLISH
instruction manual
water softener
ISI Series


