background image

Simplay Labs LLC

LIMITED WARRANTY

WARRANTY VALID ONLY IN THE U.S.A.

WARRANTY
Simplay Labs LLC  (Simplay Labs) warrants that the product to be delivered hereunder will, under normal use and conditions, at the time of shipment and for the warranty period set 

forth below, be free from defects in materials and workmanship and conform substantially to Simplay Lab’s relevant published specifications at the time of shipment.  
Simplay Labs further warrants that during the warranty period set forth below, the Simplay product identified at the bottom of the page, distributed in the U.S.A. that fails to function in 

accordance with its published specifications under normal use due to a manufacturing defect when installed and operated according to the owners manual for the unit, will be repaired 

or replaced with a unit of comparable value, at the option of Simplay, without charge to the customer for parts or actual repair work. Parts supplied under this warranty may be new 

or rebuilt et the option of Simplay Labs.
THIS LIMITED WARRANTY ONLY APPLIES TO THE ORIGINAL OWNER OF THIS SIMPLAY LABS PRODUCT DURING THE WARRANTY PERIOD, PROVIDED  

THE PRODUCT WAS PURCHASED FROM A SIMPLAY LABS AUTHORIZED RESELLER IN THE U.S.A. YOU WILL BE REQUIRED TO PROVIDE A SALES  

RECEIPT OR OTHER VALID PROOF OF PURCHASE SHOWING THE DATE OF ORIGINAL PURCHASE. IN THE EVENT SERVICE IS REQUIRED, THE 

PRODUCT MUST BE RETURNED WITHIN FIVE (5) DAYS FOLLOWING DELIVERY OF THE PRODUCTS, DELIVERED WITHIN THE WARRANTY PERIOD,  

TRANSPORTATION PREPAID, ONLY FROM WITHIN THE U.S.A. AS EXPLAINED IN THIS DOCUMENT. FAILURE TO RETURN THE PRODUCT WITHIN  

THE REQUIRED TIME CONSTITUTES ACCEPTANCE BY THE OWNER.  OWNER WILL BE RESPONSIBLE FOR REMOVAL AND INSTALLATION OF THE PRODUCT.  

SIMPLAY LABS WILL PAY TO RETURN THE REPAIRED OR REPLACEMENT PRODUCT TO THE OWNER WITHIN THE U.S.A. 

PRODUCT WARRANTY PERIOD (FROM DATE OF ORIGINAL PURCHASE) 

     Parts 

Labor

DVDO EDGE Video Processors 

 ...............................................................................................................................................  1 Year 

1 Year

WHAT IS NOT COVERED

IF THIS PRODUCT WAS NOT PURCHASED FROM AN AUTHORIZED RESELLER, THERE ARE NO WARRANTIES, EXPRESS OR IMPLIED, INCLUDING THE IMPLIED  
WARRANTY OF MERCHANTABILITY AND THE IMPLIED WARRANTY OF FITNESS FOR A PARTICULAR PURPOSE AND THIS PRODUCT IS SOLD STRICTLY “AS IS” AND 
“WITH ALL FAULTS”.

SIMPLAY LABS SHALL NOT BE LIABLE FOR ANY CONSEQUENTIAL AND/OR INCIDENTAL DAMAGES, OR FOR ANY OTHER DAMAGES IN EXCESS OF THE PRICE PAID BY 
THE OWNER FOR THE PRODUCT.

THIS LIMITED WARRANTY ONLY APPLIES DURING THE WARRANTY PERIOD AND DOES NOT COVER PRODUCT DEFECTS RESULTING FROM (I) OWNERS FAILURE TO 
FOLLOW SIMPLAY LABS’ ENVIRONMENTAL, INSTALLATION, OPERATION OR MAINTENANCE SPECIFICATIONS OR INSTRUCTIONS, (II) MODIFICATIONS, ALTERA-
TIONS OR REPAIRS TO THE PRODUCT MADE OTHER THAN BY THE OWNER OR AT THE DIRECTION OF THE OWNER, OR (III) BUYERS ABUSE, MISUSE, NEGLIGENCE, 
OR IMPROPER STORAGE, SERVICING OR OPERATION OF THE PRODUCT, OR ANY OTHER CAUSE THAT CAN BE ATTRIBUTED TO THE OWNER.  

THIS WARRANTY DOES NOT COVER THE COST OF PARTS OR LABOR WHEN SUCH IS PROVIDED BY A SERVICE CENTER NOT AUTHORIZED BY SIMPLAY LABS. PARTS 
AND LABOR MUST BE PROVIDED BY A SIMPLAY LABS AUTHORIZED SERVICE CENTER DURING THE PERIOD OF THIS WARRANTY. 

NO OTHER WARRANTIES

THE WARRANTY SET FORTH ABOVE IS THE SOLE AND EXCLUSIVE WARRANTY MADE BY SIMPLAY LABS OR ITS SUPPLIERS. TO THE EXTENT PERMITTED UNDER  

APPLICABLE LAW (A) SIMPLAY LABS HEREBY EXPRESSLY DISCLAIMS ANY AND ALL OTHER WARRANTIES EXPRESS OR IMPLIED INCLUDING, WITHOUT LIMITATION, 

THE IMPLIED WARRANTIES OF MERCHANTABILITY, FITNESS FOR A PARTICULAR PURPOSE OR NON-INFRINGEMENT. WITHOUT LIMITING THE FOREGOING; AND (B)  

THE WARRANTIES APPLICABLE TO THE PRODUCT ARE FOR A PERIOD NOT TO EXCEED THE WARRANTY PERIOD SET FORTH ABOVE (AND NO WARRANTY SHALL THERE-

AFTER APPLY). SOME STATES LIMIT THE EXTENT TO WHICH IMPLIED WARRANTIES CAN BE DISCLAIMED OR LIMUTIED IN DURATION AND SOME STATES DO NOT ALLOW  

CERTAIN EXCLUSIONS OR LIMITATIONS OF DAMAGES AND, SO THE ABOVE LIMITATIONS MAY OR MAY NOT APPLY TO YOU. THIS WARRANTY GIVES YOU SPECIFIC LEGAL 

RIGHTS AND YOU MAY HAVE OTHER RIGHTS WHICH MAY VARY FROM STATE TO STATE.

TO OBTAIN SERVICE
If Owner claims a product does not conform to the foregoing warranties, Owner’s exclusive remedy and Simplay Labs’ exclusive obligation shall be:
(a)  Owner must notify Simplay Labs in writing of alleged defect, and allow Simplay Labs a reasonable opportunity to inspect the allegedly defective product;

(b)  No Product may be returned without Simplay Labs’ consent, Simplay Lab’s Return Material Authorization must accompany all returns, and all returns must be delivered to Simplay  


Labs within the warranty period;

(c)  Owner may, then at its own expense, return the allegedly defective Product, freight pre-paid and in the original packaging, accompanied by a brief statement explaining the alleged  


defect to Simplay Labs;

(d)  If Simplay Labs determines that any returned Product is not defective, or if Simplay Labs determines that the defect is not covered by the warranty, Simplay Labs will return the  


Product to the Owner at Owner’s expense, freight collect, and Owner agrees to pay Simplay Labs’ reasonable cost of handling and testing;

(e)  Upon determining that a returned product is defective,  to receive warranty service Owner will need to present your sales receipt showing the name and location of the Authorized  


Reseller and date or the original purchase transaction. If shipping the unit, Owner will need to package it carefully and send it, transportation prepaid by a traceable, Insured  


method, to the Authorized Service Company. Package the product using adequate padding material to prevent damage in transit. The original container is ideal for this purpose.  


Include your name, return shipping address, email address and telephone number where you may be reached during business hours, inside the shipping package with the unit.   


Any replacement unit will be warranted under these Terms and Conditions for the remainder of the original warranty period or thirty (30) days whichever is longer.

(f)  Simplay Labs shall in no event be responsible for repair, replacement, or refund of the purchase price of any Product in the Owner’s distribution channels or in the possession of  


the Owner’s customers, any costs incurred by Owner incident to the replacement of any defective Product, including, but not limited to, any costs incurred by the Owner related  


to the repair or replacement of any Product not in Owner’s possession;

(g)  The warranties set forth in these Terms and Conditions shall extend to the Owner only and not to Owner’s customers. 


All complaints and concerns, or for hook-up and operation help in the U.S.A. call EDGE Customer Support at: 1-888-436-4411


The terms and conditions set forth herein, together with any distribution agreement (if applicable) represent the entire agreement and understanding between Simplay Labs and  


the Owner with respect to the subject matter hereof, and all prior quotations, invoices, negotiations, understandings and/or agreements of the parties, whether oral or written,  


are superseded in their entirety.  

Contact us for support at: 1-888-436-4411

http://www.simplaylabs.com/support 

 
DISPUTE RESOLUTION
Following our response to any initial request to Customer Support, should a dispute arise between you and Simplay Labs, Simplay Labs makes available its Complaint Resolution 

Program to resolve the dispute. The Complaint Resolution Program is available to you without charge. You are required to use the Complaint Resolution Program before you exercise 

any rights under, or seek any remedies, created by Title I of the Magnuson-Moss Warranty-Federal Trade Commission Improvement Act, 15 U.S.0 2301 et seq, or that may otherwise 

be available to you.

To use the Complaint Resolution Program call 1-888-436-4411 and explain to the customer service representative the problem you are experiencing, steps you have taken to have the 

product repaired during the warranty period and the name of the Authorized Reseller from whom the Simplay Labs product was purchased. After the complaint has been explained to 

the representative, a resolution number will be issued. Within 40 days of receiving your complaint, Simplay Labs will investigate the dispute and will either:

(1) respond to your complaint in writing informing you what action Simplay Labs will take, and in what time period, to resolve the dispute; or (2) respond to your complain in writing 

informing you why Simplay Labs will not take any action.

RECORD THE PLACE AND DATE OF PURCHASE FOR FUTURE REFERENCE

Model No. ____________________________________________ Serial No. ___________________________________________ Purchase Date _______________________

Purchased From ______________________________________________________________________________________________________________

KEEP THIS INFORMATION AND YOUR SALES RECEIPT IN A SAFE PLACE

Summary of Contents for iScan Duo

Page 1: ...O W N E R S M A N U A L D U A L O U T P U T H I G H D E F I N I T I O N V I D E O P R O C E S S O R ...

Page 2: ... and allow Simplay Labs a reasonable opportunity to inspect the allegedly defective product b No Product may be returned without Simplay Labs consent Simplay Lab s Return Material Authorization must accompany all returns and all returns must be delivered to Simplay Labs within the warranty period c Owner may then at its own expense return the allegedly defective Product freight pre paid and in the...

Page 3: ... Panel Overview 7 Back Panel Overview 7 Video Inputs 8 Video Outputs 8 Audio Inputs 8 Audio Outputs 9 12V Trigger Outputs 9 RS232 Serial Connection 9 Power Supply Input 9 Mini USB Port 9 IR Remote Control Jacks 9 S e c t i o n 3 I n i t i a l S e t u p 10 Initial Setup 10 STEP 1 Power Up 10 STEP 2 Connect the iScan Duo to the Display 10 STEP 3 Connecting the Sources to the iScan Duo 11 STEP 4 Conf...

Page 4: ...16 Audio Delay 16 Picture Controls 16 Brightness 17 Contrast 17 Color Saturation 17 Hue Tint 17 Detail Enhancement 17 Edge Enhancement 17 Mosquito NR 17 Output Setup 18 Test Patterns 18 Video Format 18 Underscan 18 1 1 Frame Rate 19 Frame Lock 19 Aspect Ratio 19 Color Space 19 Colorimetry 19 Video Level 20 Deep Color 20 Audio Output 20 Configuration 20 Input Priority 20 Rename Inputs 21 Auto Wake ...

Page 5: ...mponent Inputs 21 Select RGBS 22 LED Brightness 22 Factory Defaults 22 Update Firmware 22 Serial Port Rate 23 Wizard Launch 23 Display Wizard 23 Input Wizard 24 Information 24 TA B L E O F C O N T E N T S ...

Page 6: ......

Page 7: ...o HDMI 1 3 Outputs One HDMI 1 3 Audio Output for direct connection to an A V Receiver Multi standard high definition analog video decoder with 3D comb filter Two 12V Triggers to control other devices This Owner s Manual will help you set up your iScan Duo and provide the necessary information required to get the best picture quality to your displays and A V receiver It will also show you how to pr...

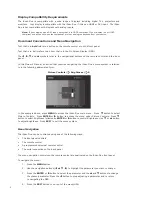
Page 8: ...o in the following abbreviated form Picture Controls _ Brightness _ 0 In the example above press MENU to access the iScan Duo main menu Press q button to select Picture Controls Press ENTER or button to access the menu under Picture Controls Press q button to select Brightness followed by ENTER or u button to control Brightness Use q or p button to adjust brightness Press EXIT to exit the menu sys...

Page 9: ...ion indicated 3 Remove the old batteries if applicable 4 Insert two new AAA batteries in the compartment as shown on the inside of the battery compartment Make sure the batteries are correctly inserted observing the proper polarity 5 After installation replace the cover and recycle the old batteries if applicable Remote Control The supplied remote control is used to operate the iScan Duo The table...

Page 10: ...tios are 1 85 1 or 2 35 1 11 PRESETS Selects preset aspect ratios including 16 9 Full Frame 4 3 Full Frame 4 3 Letterbox and Panorama 12 MENU Use this button to access the on screen main menu 13 EXIT Use this button to exit the current menu or the exit the on screen menu 14 t u pq ENTER Menu Navigation buttons Press ENTER to confirm a selection or to enter a new menu 15 ZOOM pq Use these buttons t...

Page 11: ...roducing equipment such as power amplifiers or other components that generate heat during use Expose the iScan Duo to high temperatures humidity steam smoke dampness or excessive dust Avoid installing the iScan Duo near radiators and other heat producing appliances Install the iScan Duo near unshielded TV or FM antennas cable TV decoders and other RF emitting devices that might cause interference ...

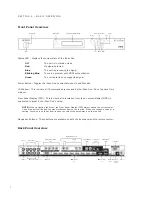
Page 12: ...ter 1 2 3 4 5 6 7 8 VGA SERIAL PORT VIDEO 3 Y G Pb B Pr R VIDEO S 12VDC 5A 1 2 1 2 1 2 1 2 3 L R L R D I G I T A L A U D I O I N P U T S AUDIO OUT TRIGGER OUT A N A L O G A U D I O I N P U T S 12VDC 50mA MAX 1 2 1 2 I N O U T S VIDEO AUDIO A N A L O G V I D E O I N P U T S H D M I I N P U T S H D M I O U T P U T S USB POWER IR HDMI Inputs 1 8 HDMI Outputs 1 2 Power Remote Control Jacks Mini USB Po...

Page 13: ... to a display that has a DVI input use either an HDMI to DVI cable or an adapter Audio Inputs There are fourteen 14 audio inputs on the iScan Duo Three 3 Optical Digital inputs One 1 Coaxial Digital inputs Two 2 Analog L R inputs Eight 8 HDMI 1 3 inputs While the digital and analog audio inputs can be assigned to any one of the video inputs the HDMI audio inputs are tied directly to the HDMI video...

Page 14: ...when system is on Signal is low when system is off 12V Trigger 2 port Signal is high when HDMI Video Output 1 is selected Signal is low when HDMI Video Output 2 is selected RS232 Serial Connection This connection is used as an interface to control the iScan Duo with an automation system Power Supply Input The iScan Duo comes with a 12V 5A AC to DC converter power supply which accepts 100 240 VAC a...

Page 15: ...white border around the edge of the screen otherwise the display is overscanning the signal from the iScan Duo This is very common and is known for cutting off sports scores at the bottom of the screen Use the Underscan control to shrink the size of the output image so that you can see the white border Press MENU button and use the on screen menu as shown Output Setup _ Underscan _ Adjust Value Ch...

Page 16: ... available Similarly use HDMI for audio if available otherwise use Digital Optical or Coaxial Finally use Analog Stereo output STEP 4 Configuring the Input Sources to Get Maximum Performance The basic rule for getting the best performance from input sources is to configure the sources to output the native resolution of the content and to let the iScan Duo perform the video processing necessary to ...

Page 17: ...DMI video outputs HDMI A V 1 Selects HDMI video output 1 default HDMI A V 2 Selects HDMI video output 2 The HDMI video output selection can also be made using the VIDEO button on the Output Select section of the remote control This button will toggle between the two HDMI video outputs If there is only one display connected to the iScan Duo it will not switch the video output Input Aspect Ratio Thi...

Page 18: ...d image As you move around you expose parts of the picture that were not visible Shift works only on a zoomed image The controls work like Stretch described on the previous page Use the p and q navigation buttons to move the image vertically and t and u buttons to move the image horizontally The ENTER button takes you to the previous screen or you can press the EXIT button on your remote to exit m...

Page 19: ...aspect ratio settings including picture and active aspect ratios zoom stretch and shift functions will be saved in User Preset Input Adjust This menu controls the settings on iScan Duo s inputs PReP PReP is an exclusive DVDO processing technology developed by Simplay Labs Standard definition SD formats such as 480p 576p were deinterlaced at some point before reaching iScan Duo Deinterlacing is a c...

Page 20: ...ed for interlace video based content Game Mode This mode is intended for use with game consoles like those from Sony Microsoft and Nintendo It minimizes video processing delay through the iScan Duo The total amount of delay is about half a frame of delay when the output frame rate is locked to the input frame rate Unlocked frame rates may increase this delay Deep Color Deep Color mode allows the i...

Page 21: ...video The iScan Duo will then treat them as a pair when switching inputs so that they switch together When you choose an audio input on this menu you are as sociating that audio input with the currently selected video input If your source device uses DVI for video output and you are connecting to the iScan Duo using a DVI to HDMI adapter cable you will have to connect audio via a separate cable an...

Page 22: ...nhancement Increase Detail Enhancement to enhance or sharpen the fine details in an image such as grass or the texture of a plaster wall Decrease Detail Enhancement to reduce noise in a noisy image Edge Enhancement Increase Edge Enhancement to sharpen object edges in an image Decrease Edge Enhancement to soften object edges in an image Mosquito NR The term noise in the context of video images refe...

Page 23: ...rred format is not on the list of standard formats shown on the Video Format menu listed below Use the INFO button on the remote or the Information screen in the menu to see the cur rent output format If you prefer not to use Auto Select you can choose one of the standard formats from the list on the Video Format menu List of formats in the Video Format menu Auto Select this is the default setting...

Page 24: ...sources or formats Aspect Ratio Aspect Ratio sets the display aspect ratio If you have an HDMI display Auto default is the safe choice Auto The iScan Duo outputs the preferred aspect ratio reported by the display 16 9 Sets the display aspect ratio to 16 9 4 3 Sets the display aspect ratio to 4 3 Color Space Color Space provides four choices for output color space If you are unsure what to use Auto...

Page 25: ...uts and powered up Video HDMI Use this setting if you want to send audio to your video display s speakers Audio HDMI Use this setting if you have an AV Receiver with an HDMI input Optical Use this setting if you have an AV Receiver without HDMI inputs The table below shows the connector choice for audio when Auto Select is chosen Output Connector Conditions Audio HDMI A V Receiver with HDMI inputs...

Page 26: ...cally power on If the iScan Duo is powered down with the remote then Auto Wake Up is turned off Mode 2 The iScan Duo will always automatically power on whenever an input signal is present on any input Auto Standby Auto Standby gives you control over the conditions in which the iScan will power itself down Off The iScan Duo never goes into standby mode This is useful in cases where you may not have...

Page 27: ...imum brightness off both LED and FPD Factory Defaults Factory Defaults is a quick way to undo any settings that have been made and restore the iScan Duo s original default settings Video Output Restores video format setting to Auto In Auto mode the iScan Duo will automatically communicate with your display and output your display s preferred format Picture Controls Restores default settings to Pic...

Page 28: ...K Wizard Launch The iScan Duo features two Wizards to guide you through setup of your display A V receivers and input devices Display Wizard The Display Wizard assists setup of your display and audio Using Display Wizard you can 1 Name your display 2 Select an output video format 3 Select an output connector for audio If you don t want to change anything press t to Exit the Wizard Changing the Dis...

Page 29: ...n the priority of the input for Auto input selec tion This takes you to the Input Priority menu Refer to the Input Priority section Changing the Associated Aud io Press ENTER or u if you want to associate an audio input with the video input This takes you to the Audio Input menu Refer to the Audio Input section Press EXIT to exit the Input Wizard Information The iScan Duo has several Info screens ...

Page 30: ... V 1 A new menu item is added in the Output Setup menu Main Menu _ Output Setup _ Second Output Off Secondary output is not activated On Secondary output is activated The secondary output always follows the resolution and other format characteristics of the primary output including audio The secondary output is also not deep color to ensure maximum compatibility 3 Day and Night Modes Added CMS Day...

Page 31: ...s in iScan Duo s CMS 1 1 Secondary Color Gamut Controls Cyan Magenta Yellow Secondary Color Adjustments x y Y are enabled in the Color Gamut menu For example Main Menu _ Output Setup _ Color Gamut _ Cyan x 1 2 Luminance Control for Color Gamut Color Gamut adjustments now come with luminance control Y The primary colors Red Green Blue and White each comes with a new luminance Y control For example ...

Page 32: ...r Zoom 0x46 only accepted integer values Front panel menu text and back light remained on when exiting main menu At 1080p output lower part of gamut selection menu remained at bottom of screen when opening edit control Changing the output resolution from SXGA to VGA and cancelling the operation would cause the system to be unresponsive CEC pass through did not work Info screen page rolled over on ...

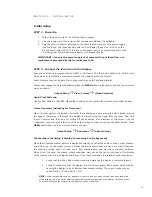
Page 33: ... a Use the menu system Main Menu _ Output Setup _ Test Patterns _ On b Use the Test Pattern On Off button on the remote control 3 Set all Color Gamut Offset and Gray Scale offset values to zero Alternatively turn on CMS Bypass see below 4 Go to the User menu and select the first item Red x Main Menu _ Output Setup _ User _ Red x The TPG automatically generates only the Red primary 75IRE 5 Enter th...

Page 34: ...ated as one format 576i 288p treated as one format 480p 576p 720p50 720p60 1080i50 1080i60 1080p24 1080p25 1080p30 1080p50 1080p60 VGA SVGA XGA SXGA The input settings that are saved include Picture Controls Deinterlacer Modes Game Mode Picture Aspect Ratio Active Aspect Ratio Panorama H V Zoom H V Pan Input Chromaticity Input color space Input colorimetry Audio delay 3 New Picture Controls Severa...

Page 35: ...only The iScan Duo will override the color space information that is obtained from the HDMI source from the HDMI link and use the color space specified by the user instead This new control is available in the Input Adjust menu Main Menu _ Input Adjust _ Input Color Space The menu selection is as follows Auto default RGB YCbCr 422 YCbCr 444 4 2 Input Colorimetry This control is for HDMI inputs only...

Page 36: ...order Level A border is created when the active aspect ratio of the input does not match the display aspect ratio For example if the active aspect ratio is 4 3 and the display aspect ratio is 16 9 the iScan Duo creates a left and right border on the resulting image The border level can now be adjusted from 0 IRE black to 100 IRE white with a slider bar control The default setting is 0 IRE This con...

Page 37: ...ault commands See Updated Serial Automation command document for more details IMPROVEMENTS Added 1080p30 pre defined output format Front Panel displays firmware version when Info Screen About is selected Zooming range is increased to 16x the input image size Improved input switching by reducing flashing and flickering Improved analog video performance by reducing noise levels Info Screen provides ...

Page 38: ... based on BT 709 The chromaticity can also be manually set from this menu which contains standard profiles in cluding RGBs 709 NTSC PAL SECAM SMPTE C CIE1931 AppleRGB and Adobe 1998 When the Chromaticity is selected the hint area of the on screen display shows corresponding color and white point x y values red xr yr blue xb yb green xg yg and white xw yw Note This control is currently not updating...

Page 39: ...signal from the CMS processor The units for these indicators as well as the adjustment values are in percentage of full range gamma corrected RGB 3 There are 8 chromaticity offset controls Red x Red y Green x Green y Blue x Blue y White x White y 4 When Red is being adjusted the Duo automatically generates a red test pattern Similarly when Green Blue and white are being adjusted the green blue and...

Page 40: ...u as described in the previous section 1 Support for Audio only optical and coax sources This feature is for users who have digital audio only coax and optical source i e no video source and want to use it with Duo Previously this feature is not available because the Duo goes into standby mode when there is no video input auto standby on The Duo now detects the presence of digital audio coax and o...

Page 41: ...36 ...

Page 42: ...www simplaylabs com Contact us directly at admin simplaylabs com Toll Free 1 888 436 4411 75 0300 02 ...

Reviews: