background image

All specifications and information are subject to changes without further notices 

Before Getting Started 

1.1  FusionHDTV Specification 


A Highly cost effective ATSC/ NTSC TV reception card 

You can enjoy HDTV at quite  a low price due to Dvico’s innovative  HDTV software decoding engine 
and enhanced Reception rate with Latest 5th generation chipset. 


Unrivaled crystal-clear picture quality 

FusionHDTV provides up to 5 times higher resolution  when  compared to analog TV, and provides 
crisp and crystal-clear picture quality to a PC screen. 


Good picture quality on LCD or low-resolution monitor   

FusionHDTV shows excellent and super-clear  on  HDTV screens and even on LCD TV’s and low 
resolution CRT due to Dvico’s proprietary decoding engine. 


Great system compatibility 

FusionHDTV  is  compatible with most video cards and motherboards.  FusionHDTV works on any 
recent VGA cards including Nvidia MX series or later chipsets, as well as ATI Radeon chipsets. It 
works quite well on Intel, VIA, SIS, and other motherboard chipsets. Minimum system requirements 
are  Pentium  4 1.6G and DDR266 memory (or RDRAM memory), or AMD’s Athlon™   XP 1600+ or 
faster processor,   if you don’t have the ATI Radeon VGA card. Pentium  3 800Mhz or faster will be 
enough if you have an ATI Radeon card. 


Recording and playback of the HDTV stream 

You can record live HDTV broadcasting streams to a PC and play them back anytime you want. 


Using most recent VSB tuner – Best DTV reception rate 


FusionHDTV uses the most recent VSB tuner to get the best reception rate, so you can get the un-
interrupted and stable HDTV screen. 


8VSB/64QAM/256QAM reception support 

FusionHDTV3 Gold works either with free to air digital TV(8VSB) and unencrypted digital cable 
TV(QAM) broadcasting channels. so you will have the ability to receive all the channels available to 
you at your location.   


All 18 ATSC formats compliant 

FusionHDTV supports all of the 18 formats of ATSC broadcasting, so you can experience the all of the 
full ATSC format -rich content available. 


AC3 audio output 

FusionHDTV provides AC3 audio decoding, which is the standard  audio  format for  ATSC. It can also 
bypass the AC3 audio to digital output and connect directly to an AV amplifier.   


High resolution still capture 

FusionHDTV  provides high resolution still screen capturing capability in live playback as well as file 
playback mode. 


Cut Edit feature – Cut the transport stream files 

You can cut out the wanted scenes from the captured file and reconstruct the video clip.   


Supports virtual channel 

Virtual channel is set on the channel list independent of physical channel. 

Summary of Contents for FusionHDTV 5 GOLD

Page 1: ...FusionHDTV 1 Before Getting Started 2 Software Installation 3 Hardware Installation 4 Using FusionHDTV ...

Page 2: ...s titles and copyrights in and to the products are owned by DViCO The Products are protected by copyright laws and international copyright conventions and treaties 4 Disclaimer of Warranty The Products are deemed accepted by Licensee The PRODUCTS are provided to Licensee AS IS and without warranty of any kind To the maximum extent permitted by applicable law DViCO further disclaims all warranties ...

Page 3: ...ent at any time by destroying the Products and all copies thereof 8 General Licensee acknowledges that he or she has read this Agreement understands it and that by using the Products Licensee agrees to be bound by the terms and conditions set forth in this Agreement Licensee further agrees that the Agreement is the complete and exclusive statement of the understanding between DViCO and Licensee wh...

Page 4: ...under Windows 2000 Professional 20 2 4 Driver installation under Windows XP 23 3 Hardware Installation 26 3 1 About the Board 26 3 2 Before Installation 27 3 3 Board Installation 27 3 4 Remote Installation 28 4 Using FusionHDTV 29 4 1 Starting and Quitting 29 4 2 Display setup 29 4 3 Configuration 32 4 4 Record 42 4 5 Playing Files 44 4 6 SnapShot Capturing 44 4 7 Using EPG 45 4 8 Cut Editing 48 4...

Page 5: ... Pentium 3 800Mhz or faster will be enough if you have an ATI Radeon card Recording and playback of the HDTV stream You can record live HDTV broadcasting streams to a PC and play them back anytime you want Using most recent VSB tuner Best DTV reception rate FusionHDTV uses the most recent VSB tuner to get the best reception rate so you can get the un interrupted and stable HDTV screen 8VSB 64QAM 2...

Page 6: ...ograms into favorite list before watching them HD to DVD or DivX format conversion Only GOLD series HD clips can be converted to MPEG2 DVD files or DivX format using FusionConverter tool Supports DVHS record and control Windows XP or above only Only GOLD series Direct DVHS capture recording playback with OHCI card Supports Titan EPG Supports recording and live viewing according to TitanTV EPG Embe...

Page 7: ...ide stereo connection jack to sound card for analog TV DxVA VGAs Pentium3 800MHz or faster with 128M memory Celeron 900Mhz or faster with 128M memory GeForce4 MX420 440 Fx5200 5600 Series Ti Series All ATI Radeon series VGAs WinME 2000 XP or later Ultra DMA66 enabled main board and HDD for recording nonDxVA VGAs Pentium4 1 6GHz or faster with 128M memory All Nvidia MX series VGAs and ATI Radeon se...

Page 8: ...utput Audio External connection cable FusionHDTV 5 Lite FusionHDTV card Setup CD Manual Internal cable to sound card for External output Audio Optional FusionHDTV remote transceiver and basic option for Plus Version FusionHDTV transceiver Receiver Important Notice First install the software before you plug the FusionHDTV card in your system It will ease the installation process If you plugged the ...

Page 9: ... Installing FusionHDTV Applications Insert FusionHDTV Installation CD into the CD ROM drive The setup window will automatically pop up if you downloaded the recent version on DVICO s website please run install exe or setup exe 2 1 1 Uninstall Drivers 1 When you select Uninstall Driver in the menu on the FusionHDTV INSTALLER program Select your FusionHDTV board type 2 It will remove all the old dri...

Page 10: ... or Windows XP Before you install FusionHDTV software be sure that you logged on as an account with Administrator privileges 1 Select Install FusionHDTV 2 At the FusionHDTV Installation dialog opens click on the Next button 3 The user Information window will show up Type in the serial number which is on the jacket of FusionHDTV installation CD then click on the Next button ...

Page 11: ...he Choose Destination Location window will appear Click on Next if you want to install the FusionHDTV in the default directory Otherwise you can choose a different directory by clicking on Browse 5 Press Next on the Destination Folder selection window 6 The Setup status window will appear ...

Page 12: ... 12 7 Choose your country then click OK 8 PC specification selection windows will appear Please select the appropriate system You can change the mode after installation with configuration menu of the application program You do not need to reinstall the program with different options ...

Page 13: ...All specifications and information are subject to changes without further notices 13 9 Select your FusionHDTV card and Press Next to install latest drivers 10 You will see the progress window ...

Page 14: ...cates the completion of the setup 13 By clicking the Finish button the software installation is done 14 When you reboot the system will ask for the 5 6 drivers Please click Yes when the digital signature window appears Notes In certain cases Windows will ask for the sys files You can locate the sys files in the C Program Files DVico FusionHDTV driver folder ...

Page 15: ...an account with Administrator privileges You can check the version of DirectX by typing dxdiag on the command line which appears with menu selection start run If you have DirectX 9 or later already you do not need to install DirectX 9 again 1 Run Install exe and then select Install Direct 9 2 Read the License Agreement carefully and check I accept the agreement and then click on Next if you agree ...

Page 16: ...e subject to changes without further notices 16 Tip If there is a DirectX already installed in the system a different window will show up instead of the one above 4 Click on Finish to restart system and complete installation of the DirectX ...

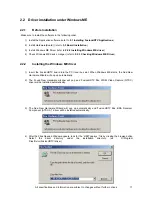
Page 17: ...Checking Windows ME Driver 2 2 2 Installing the Windows ME driver 1 Insert the FusionHDTV board into the PCI local bus slot When Windows ME starts the Add New Hardware Wizard will pop up automatically 2 The Found New Hardware window will pop and FusionHDTV 88x WDM Video Capture NTSC driver will be installed automatically 3 The Add New Hardware Wizard will pop up automatically and FusionHDTV 88x BD...

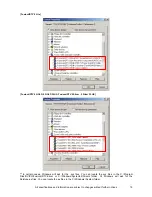
Page 18: ... automatically 8 The Add New Hardware Wizard will pop up automatically and FusionHDTV 881 WDM Audio Capture driver installation will be done automatically 9 The Add New Hardware Wizard will pop up automatically and FusionHDTV 88x BDA ATSC Tuner Demod LG062F driver installation will be done automatically 2 2 3 Checking Windows ME driver If all four drivers are found in the device manager the Window...

Page 19: ...OLD 5 GOLD PLUS FusionHDTV 5 Silver 5 Silver PLUS In certain cases Windows will ask for the sys files You can locate the sys files in the C Program Files DVICO FusionHDTV driver or C Windows System32 Drivers folder Or Windows will ask for the Kstvtune ax files You can locate the ax files in the C Windows System folder ...

Page 20: ... 2 Install hardware board refer to 3 3 Board Installation 3 Install the Windows 2000 Drivers refer to 2 3 2 Installing Windows 2000 driver 4 Check Windows 2000 device manager refer to 2 3 3 Checking Windows Driver 2 3 2 Installing Windows 2000 driver 1 Insert the FusionHDTV board into the PCI local bus slot When Windows 2000 starts the Add New Hardware Wizard will pop up automatically 2 When the D...

Page 21: ...88x WDM Crossbar drivers If a driver file look for click the browse button Select the driver directory under the installation directory ex C Program Files Dvico FusionHDTV driver or Driver folder of installation CD 2 3 3 Checking the Windows 2000 driver Right click the My Computer icon and select properties from the popup menu Select Hardware Device Manger You must see four devices properly instal...

Page 22: ...All specifications and information are subject to changes without further notices 22 FusionHDTV 5 Lite FusionHDTV 5 GOLD 5 GOLD PLUS FusionHDTV 5 Silver 5 Silver PLUS ...

Page 23: ...Board Installation 3 Install the Windows XP drivers with reference to 2 4 2 Installing Windows XP driver 4 Check Windows XP Device Manager with reference to 2 4 3 Checking Windows XP Driver 2 4 2 Installing Windows XP drivers If you already installed the FusionHDTV software insert the FusionHDTV board into the PCI local bus slot 1 When the Add New Hardware Wizard window appears select Install the ...

Page 24: ...nstall FusionHDTV 881 WDM Audio Capture FusionHDTV 88x BDA Receiver Component ATSC A FusionHDTV 88x BDA ATSC Tuner Demod LG062F FusionHDTV 88x WDM ATSC TvTuner LG062F FusionHDTV 88x WDM Crossbar drivers 2 4 3 Checking the Windows XP driver Right click the My Computer icon and select properties from the popup menu Select Hardware Device Manger You must see devices properly installed under the Sound...

Page 25: ...All specifications and information are subject to changes without further notices 25 FusionHDTV 5 Lite FusionHDTV 5 GOLD 5 GOLD PLUS FusionHDTV 5 Silver 5 Silver PLUS ...

Page 26: ...he terrestrial signal or cable Analog Audio Output Port For the audio of analog sources FusionHDTV 5 GOLD SILVER Antenna Connects to the terrestrial signal or cable VIDEO IN For external video sources SVideo IN For external video sources Analog Audio Output Port For the audio of analog sources Antenna VIDEO IN Analog Audio Output Port Antenna Analog Audio Output Port ...

Page 27: ...e system or the Board 3 Please remove the power cord from the PC 3 3 Board Installation 1 Connect the analog audio output port to the sound card CD IN or Aux for Videro or composite Windows ME requires for analog TV audio 2 Insert the board by holding the top part of the board and push it until it completely locks into the slot Fasten the screw on the bracket using a screw driver 3 Connect the Ant...

Page 28: ...ase reboot and start the configuration by right cliking the FusionRemote icon at the low right bottom of the screen If you do not see the FusionRemote icon in the tray please start the program by Start Program DViCO FusionRemote 3 Please select the port that IR receiver module is attached and press the any button on the remote transceiver A Dialog box with the remote transceiver buttons will appea...

Page 29: ...DTV or double click on the FusionHDTV icon in the program folder to execute FusionHDTV When you first execute the program it will ask for a channel scan Please say Yes for the channel scan By clicking Exit Button the software is terminated 4 2 Display setup FusionHDTV Software composed with View panel and control panel 4 2 1 Video Window It shows the HDTV picture inside the window If you click rig...

Page 30: ...artifact CUT mode file playback Change cut edit playback mode Always On Top Shows FusionHDTV application always on top Second language Second language can be heard with checking Audio Second Language option when it is available in digital broadcasting Show WallPaper ALT W Time Shifting On Off Change Time Shifting mode Teletext On Off On Off Teletext browser Subtitle On Off Change Subtitle mode Fil...

Page 31: ...re 16 Video status 17 Audio status 18 Playback button Is used to play an input signal or file 19 Pause button Is used to pause playing or replay 20 Start button Is used to go to the first scene 21 End button Is used to go to the end of a scene 22 Review button Is used to search backward 23 FF button Is used to search forward 24 Stop button Tip You can press stop when recording if you want to recor...

Page 32: ...elects between multiple external video sources You can select antenna input between Tuner OTA or Cable FusionHDTV5 Lite doesn t support the S video and Composite input Cropping flickering lines near the top or bottom of the picture can be removed with cropping function Video tap is possible with adjust Brightness contrast Hue Saturation Sharpness Click on the OK and you can play adjusted display ...

Page 33: ... scroll bar on the controller of the FusionHDTV it automatically pause when this option turned on FullScreen Refresh it automatically sets the refresh rate of Screen to 60Hz to optimum display Use VMR Renderer You can play the WinDVD or other MPEG2 player while FusionHDTV runs Aspect Ratio De interlacing Select BOB or WEAVE in DxVA video decoder Weave Best for less moving picture BOB Best for movi...

Page 34: ...Pentium 4 CPU 1 6GHz AGP 4X AMD Athlon XP CPU 1600 AGP 4X High Intel Pentium 4 CPU 2 4GHz FSB 533 AGP 4X AMD Athlon XP CPU 2400 AGP 4X Highest Intel Pentium 4 CPU 2 4GHz FSB 800 AGP 8X AMD Athlon XP CPU 2400 AGP 8X Zulu HDTV DxVA Video Decoder For DxVA compatible graphics cards ATI Radeon Geforce4 MX Ti series cards Audio Decoder Is used to select the audio decoder ...

Page 35: ...files being recorded Limitless Recording If the record drive is formatted with NTSF you are able to record a file continuously on a hard drive REC SIZE per file sets maximum file size to be recorded The program will create a new file and start recording if the current file exceeds this limit Deleting File Query When the hard disk is full this dialog box will appear Snapshot Folder Sets the folder ...

Page 36: ...ual Tune Check uncheck wanted unwanted channels You can change the station name by clicking on names Auto Scan Scan starts for currently available channels Abort Cancel channel scan and return to the original UP Down Key As UP DOWN arrow key of keyboard remote can be mapped to favorite channels RF channels all sub channels default is the favorite channels if 0 items in it then RF channels Modulati...

Page 37: ...em Hit the STAR button above the Channel number Click Insert button and add programs from Channel list to Favorite list Click Delete button and delete the programs from Favorite list Click Insert All button and add all of the programs from Channel list to Favorite list Click Delete All button and delete all of the programs from Favorite list Click OK and set up current favorite list ...

Page 38: ...ideo you can set the input of sound card FusionHDTV 5 Lite need to connect the internal audio cable 4 pin when the analog TV is played Analog Audio Attenuation Analog audio level can be adjustable Digital Audio Output is used to select the audio output 2 CH SPEAKER 5 1CH SPEAKERS or S PDIF Supports the second language in digital broadcasting Second language can be heard with checking Audio Second ...

Page 39: ... 576 MPEG 1 320 288 MPEG2 720 576 DVD 720 576 Quality When MPEG 1 MPEG 2 DVD You can select Lowest Low Normal High Highest Record Audio Level when recording the analog signals The audio level can be adjustable Audio Bitrate When MPEG 1 MPEG 2 you can select audio bitrate You can use Composite Video S VHS Analog Audio Input by using the converting cable 5 Lite model is not supported White Left Ster...

Page 40: ...D settings Show OSD Is used to show channel and v olume on screen display Show Signal Strength Is used to show Signal Check or db Use BIG OSD Is used to FusionRemote Advanced OSD If you click MENU button on remote controller you can use advancedOSD Setting You can use File open for playback to the file list only tp files ...

Page 41: ...on is available Windows XP Service Pack 2 or above Instant replay seconds will be applied when you press the Instant replay button and it s adjustable from 2 to 60 seconds Time shifting buffer size means that temporary buffer size of FusionHDTV for the time shifting functionality like pause FF REW instant replay time shift slider bar and it s adjustable from 1 to 120 minutes Time Shifting ON You c...

Page 42: ... be saved If you want to cancel recording click on the Cancel button When you click the cancel button while recording you ll get a message selecting Yes or No EXTEND You can extend the recording time while manual reservation recording DVHS Recording After Record target select If you want record On Air to DVHS click Record button on FusionHDTV s controller FusionHDTV5 Lite model doesn t support the...

Page 43: ...2 Recording Scheduler This mode is enabled by pressing popup menu Recording Scheduler You can easily set the Channel Date start time Duration Cycle of the TV program you want to record Click Insert button and add Recording Schedule list Click Delete button and delete Recording Schedule list ...

Page 44: ...tted for HDTV tpl file is a file that represents multiple files when one program is recorded to multiple files You can conveniently play one program by selecting this tpl file mpgl Native MPEG Record file list 4 6 SnapShot Capturing FusionHDTV provides high resolution still screen capture capability in live playback as well as in file playback mode Click the snapshot button for capturing a snapsho...

Page 45: ...rogram and click Button Recording Scheduler list shows the program that you reserved If you need to cancel reservation select the program and click button 4 7 2 TitanEPG EPG Electronic Program Guide tells you exactly what you can see at your location You can use EPG to see quickly what s on for digital and analog broadcasts and data casting services When you first visit TitanTV Click TitanTV icon ...

Page 46: ...ided lengthwise by station channel number and widthwise by time in three hour increments You may have to scroll to see all channels programs available to you 1 TitanTV logo in top left hand corner 2 Watch Now icon must be present 3 PVR icon must be present Red HD must be present in one or more program cells 4 All channels must have program listings data 5 Variety of networks in channel lineup 6 Va...

Page 47: ...m by Start Program DViCO FusionHDTV Agent Press Hide Menu C and you can hide popup menu 2 Select FusionHDTV Agent TIP If you select the Suspend mode or Hibernation mode Automatic Application Start is changed to Minimize on Silent mode because of existence of Password 3 If you select Schedule View you can found reservation list Shutdown the program when every scheduled recording is done Shutdown th...

Page 48: ...t button Mark in out button also brings the cut editing window 2 You can set the prefix name on the Prefix edit box to generate the prefix of cut edited file name automatically 3 You can set the output folder by pressing the right side button of output folder edit box The generated cut edited files will be saved at that folder 4 Hit the Mark In button to set the start point and Mark out button to ...

Page 49: ...x and up down buttons will appear for you to change the position To change the hour minute second click each area you want Then type the actual position or hit the up down arrow button to adjust 6 You can delete unwanted clips by hitting the Delete key on the keyboard 7 After all mark IN OUT done hit the Cut button to start the cutting Cut files will be generated like this Prefix _ number tp seque...

Page 50: ...ing For FusionHDTV Volume Up Down Snapshot Aspect ratio Rewind MUTE PC OFF Record STOP PLAY PAUSE Fast Forward Display Size toggle Numeric Key File Open DTV ATV or LiveTV Channel Up Down Instant replay Instant forward Alt Tab Input change EPG Profile start Configuration Before Channel MCE DVD MENU User profile PowerDVD start WinAMP start FusionHDTV start Direction Enter MCE start Exit ...

Page 51: ...All specifications and information are subject to changes without further notices 51 4 9 2 Using other Windows 1 UP button 2 LEFT button 3 Enter button 4 RIGHT button 5 DOWN button Œ Œ Ž Œ Œ Œ ...

Page 52: ...on the remote transceiver for customizing the remote transceiver keys for the program you selected Volume Change Open Directory Repeat playback Rewind Minimize PC OFF Exit WinAMP Stop Play Fast Forward Toggle Shuffle Play Numeric Key Open File Open URL Next Track Instant replay Instant Forward Alt Tab TAB Key Select Skin Start profile Show File information User Profile Change WinAMP Start Directio...

Page 53: ...customizing the remote transceiver keys for the program you selected Volume Change Select Audio Repeat Playback Rewind Mute PC OFF Exit PowerDVD Stop Play Pause Fast Forward Display Size Change Numeric Key Open Disk SubTitle On Off Before Chapter Play Bookmark Add Bookmark Alt Tab TAB Key Skin Toggle Profile Start Configuration Select Source SPACE Key User Profile Change PowerDVD Start Direction E...

Page 54: ...tton on the remote transceiver for customizing the remote transceiver keys for the program you selected 반복 재생 버튼 Volume Change SnapShot Full mode Rewind Mute PC OFF Exit Media Player STOP Play Pause Fast Forward Display Size Toggle Numeric Key File Open SubTitle On Off Before File Alt Tab TAB Key Profile Start Configuration Shuffle play User profile Change Direction Enter Next File Skin Mode ...

Page 55: ...ansceiver for customizing the remote transceiver keys for the program you selected TV Guide Volume Up Down Snapshot Pause Rewind Mute PC Off Record Stop Play Fast Forward Toggle Display Size Numeric key Recorded File open TV Start Channel Up Down REPLAY SKIP Alt Tab MORE info Profile Start Main Menu BACK User profile change PowerDVD Start WinAMP Start FusionHDTV Start Direction Enter DVD MENU MCE ...

Page 56: ...acement of the keyboard You can define the key button mapping of any program you want to use with the FusionRemote Please refere to the instruction below 1 Create the profile you want to define like the picture below 2 After pressing the New button input the profile name and the execution path of the program The program will be started by pressing the red start button of the remote transceiver ...

Page 57: ...changes without further notices 57 3 After adding the profile please press the button to select the profile for key define 4 Please press the blue button on the remote transceiver for customizing the remote transceiver keys for the program you selected ...

Page 58: ...All specifications and information are subject to changes without further notices 58 5 If you press the Customize button on the picture above you will see the remote transceiver pop up ...

Page 59: ...s 59 6 Please press button on the remote transceiver and input the keys or shortcut keys you want to map to the button Press SaveAll button when you are done 7 Clear button clears the button defined 8 You can set the OSD setting in accordance to each profile like the picture below ...

Page 60: ...ing the Signal Checker program Please do not execute Fusion Program and signal checker at the same time They only work one at a time 1 Start Program Dvico FusionHDTV Signal Checker 2 Press Scan CHs Scan Channels button to search the channel 80 or more signal strength is recommended 3 You can change the channel number of your preference to check the strength ...

Page 61: ...ngle sub channel 3 Press Start button to initiate the conversion If you press stop button conversion will stop and converted file up to the point will be saved If you want to cancel converting click on the Cancel button 4 Converting OK Dialog appears when done 5 Pressing will pop up option windows You can change size aspect ratio bit rate smoothness and interlace option PC OFF Is used to turn the ...

Page 62: ...ion are subject to changes without further notices 62 Use interlace option if you watch converted motion file on a TV or on both TV and a PC Use MP2 Audio format option if you burn the DVD authoring tool Ex Ulead Videostudio 7 SE DVD ...

Page 63: ... Backspace Instant Replay ALT Enter Fullscreen CTRL Space Mute CTRL B Repeat all Aspect ratio CTRL C 16 9 4 3 4 3 Pan Scan toggle CTRL D DVHS Mode CTRL E Recording Scheduler CTRL F File open CTRL H Edit favorite channel list CTRL I I Snapshot CTRL L LIVE TV CTRL M Configuration CTRL O Go before Channel CTRL P Input Source CTRL R R Manual record CTRL S Stop CTRL T Always on TopTV CTRL F6 Hide Contr...

Page 64: ...ico support you better If you sign up you will get 1 Automatic emailing of FusionHDTV latest update news tips techiques 2 You can place questions requests at your own MyQA section Hidden from others 3 Prompt and quick response to your questions requests 4 Your questions comments and our responses will be maintained at this WEB 5 Automatic email response to your questions as soon as we respond at t...

Reviews: