background image

12

Press  , choose right, turn telescope at counterclockwise, then sight target 1 with 
cross line center. Press 

 ,horizontal angle of Target 1 turn to be “0” position, then 

sight target 2 with cross line center,display horizontal angle between 1 and 2 (turning 
left).

Rotate telescope 180 degree, repeat steps. 

Horizontal angle lock and release

In the procedure of horizontal angle observation, if you want to retain the measured 
value,press 

 .“left, right, horizontal” characters flicker at lower left of the display and 

the horizontal angle value will not change even if you rotate the instrument when you 
sight at any direction.

Press 

 again to release lock function.

Note: lock and release of 

 is only valid for horizontal angle.

Horizontal angle quadrant setting

Sight at the first object and then press 

 to set the horizontal angle to zero. 

Turn the instrument around the vertical axis until the beep starts, displaying 

  .

Lock the instrument by the clamp screw and set the horizontal angle to 90° 00’ 00”  by 
the tangent screw. Then, fix the quadrant target direction by the telescope reticule.

Repeat to setting quadrant target point of 180°, 270°. The buzzer beeps when the read-
ing passes any of 0°, 90°, 180°, 270°.

Note: The beep can be canceled when we do initial setting.

Summary of Contents for SitePro SKT05

Page 1: ...itePro us com Operating Safety Instructions Consignes de fonctionnement s curit Instrucciones de funcionamiento y seguridad model SKT05 SKT05L IMPORTANTE Leer antes de usar IMPORTANT Lire avant usage...

Page 2: ...of this laser are to be performed only by SitePro or authorized service centers When attaching the instrument to a tripod make sure the instrument is securely fixed The tripod leg clamps should be se...

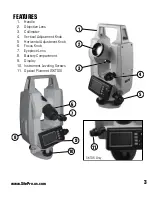
Page 3: ...2 4 11 SKT05 Only FEATURES 1 Handle 2 Objective Lens 3 Collimator 4 Vertical Adjustment Knob 5 Horizontal Adjustment Knob 6 Focus Knob 7 Eyepiece Lens 8 Battery Compartment 9 Display 10 Instrument Lev...

Page 4: ...Icon Description Vertical angle gradient percentage Angle unit GON Battery capacity Slope distance Horizontal distance Height difference Distance unit meter distance unit foot DISPLAY SYMBOLS AND KEY...

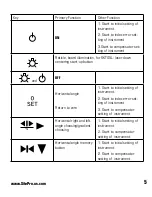
Page 5: ...start up button and OFF Horizontal angle Return to zero 1 Start to initial setting of instrument 2 Start to index error set ting of instrument 3 Start to compensator setting of instrument Horizontal...

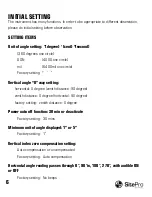
Page 6: ...l angle 0 way setting horizontal 0 degree zenith distance 90 degree zenith distance 0 degree horizontal 90 degree factory setting zenith distance 0 degree Power auto off function 30 min or deactivate...

Page 7: ...follows 1 Press key to turn power on entering into initial setting status 2 Buzzer prompt of horizontal angle position NO BEEP no buzzer prompt in horizontal angle Press key and for choosing 90 BEEP t...

Page 8: ...h Insert and remove battery Turn off power press the top button of battery box and then remove battery Insert the battery box into the groove and then press the top button of battery Battery message F...

Page 9: ...evel the tripod head and lock Put the instrument on the tripod head and lock with the screws Leveling Level the instrument with circular vial Turn B and C to let the bubble move to centre line Turn kn...

Page 10: ...s knob until both images relative rest and can be seen clearly ANGLE MEASUREMENT Normal reversed position telescope Normal position telescope means that the shaft disc is on the left side of the teles...

Page 11: ...There are two way of measuring vertical angle zenith 0 degree and 90 degrees Measurement Sight target 1 with cross line centered Press horizontal angle setting of target 1 is 0 00 00 Turning clockwise...

Page 12: ...ngle value will not change even if you rotate the instrument when you sight at any direction Press again to release lock function Note lock and release of is only valid for horizontal angle Horizontal...

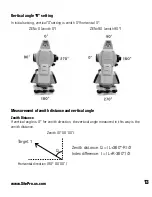
Page 13: ...0 zenith 0 ZEN 90 zenith 90 Measurement of zenith distance and vertical angle Zenith Distance If vertical angle is 0 for zenith direction the vertical angle measured in this way is the zenith distance...

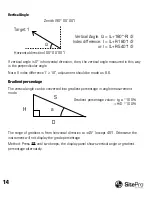
Page 14: ...o gradient percentage in angle measurement mode The range of gradient is from horizontal direction to 45 except 45 Otherwise the instrument will not display the grade percentage Method Press until two...

Page 15: ...djust the two leveling screws and position the bubble in the center of the vial by turning the screws in opposite directions at the same time Rotate the instrument 180 If the bubble is in the center a...

Page 16: ...t on tripod and level Sight at an object A approximately 50m far from instrument through the telescope and lock the horizontal and vertical clamp screws Move point A to the edge of the field of view b...

Page 17: ...spection and adjustment until 2C 16 Cover the cover of reticule back Vertical index zero compensation The instrument with vertical disc which be equipped with auto compensation and zero storing device...

Page 18: ...n After leveling the instrument press key and release when display charac ters and release until three beeps The instrument displays In normal position Sight at a clear and stable object A which is ne...

Page 19: ...ent Mode Absolute Angle Encoder System Minimum count 1 5 Mode of detection H double line V double line Precision 5 Measure ment Unit DEG MIL GON Display LCD two sides Compensation Inclination sensor A...

Page 20: ...f vertical disc compensator out of range re level instrument If no change send the instrument to an authorized service dealer for repair maintenance Note the instrument can measure data even turn off...

Page 21: ...www SitePro us com 21...

Page 22: ...the tool transportation prepaid along with any relevant paperwork RGA number if you have obtained one proof of purchase contact information and any request for new accessories etc to our Service Depar...

Page 23: ...www SitePro us com 23...

Page 24: ...Dave White s SitePro LLC Otterbein IN UM 29SKT05 12 12 mQ Printed in China...

Reviews: