line of the same information.
The LoggerStor allows the user to select from 1 to 10 degrees
of temperature change, or 1 to 10% of humidity change to
print. Note that only ONE parameter may be used as a filter.
What this means is that data samples that are less than the
selected temperature or humidity change are ignored and only
when the temperature or humidity has changed by the
selected amount is a sample printed. That temperature or
humidity becomes the new value to compare to and the
temperature or humidity will have to change again by the
selected amount before another sample is printed.
The display will show:
Press
SET/MENU
to view all the temperature data, or press
RETRIEVE/UP ARROW
to scroll from 1 to 10 degrees of
temperature filtering.
Press
PRINT/DOWN ARROW
to do the same for the second
temperature probe if your are using a LCL22 or for humidity if
your are using a LCL20.
After selecting the desired filter, press
SET/MENU
to begin
printing the recording.
You can exit the printing function at any time by pressing
SET/MENU
.
Printer Error Messages
If a printer is not connected to the set to operate, an error
message will be displayed to alert the user to a printer prob-
lem
.
There are several possible problems that may occur if the
printer is not ready. The LoggerStor will alert the user to a
problem with the printer. As each printer has its own set of
controls and settings, the user is recommended to consult the
owner’s manual supplied with the printer.
This is an error message that appears
when the printer is not connected or is
turned off. Make sure the printer cable
is attached to both the printer and the LoggerStor and that
power is supplied to the printer.
This is an error message to alert the
user that the printer has run out of
paper. Refer to the owner’s manual of
the printer for instructions on paper replacement.
This is an error message that will indi-
cate the printer has not been set to ON
LINE. Refer to the owner’s manual for
specific instructions on setting the printer controls.
Using the LoggerStor to Set a Data Logger Sampling
Interval
The LoggerStor can be used to set the sampling rate of a
LCL10, LCL20 or LCL22. This is useful when a user would like
to make a change in the field without returning the logger to a
location that has a PC available. The LoggerStor cannot
change the user information. A PC is required to do this.
To set a logger, first plug it into the LoggerStor using the
supplied cable. The display will show
the logger type and the first 16 char-
acters of the user message.
Press
SET/MENU
and the display will
change to the message to use the
message to use the arrow keys.
After a short delay the display will then
indicate the present sampling rate of
the logger.
Use the
RETRIEVE/UP ARROW
and the
PRINT/DOWN
ARROW
keys to select a sampling rate suitable to the appli-
cation.
For a recording to accurately reflect a series of events, it is up
to the user to select a recording interval that best suits the
particular application. In some situations maximum recording
time may be sacrificed so that more frequent sampling may be
accomplished. Frequent sampling is best suited when moni-
toring short-term events, such as defrost cycles or start up
operation, that benefit from highly detailed recording. Long
term monitoring will require less frequent sampling in favor of
longer recording times. This type of recording is often used to
monitor equipment performance over long periods of time.
After choosing a sampling rate, press
SET/MENU
and the display will
change to a menu that will allow you to
save or cancel the sampling rate selected.
Push
SET/MENU
to save the desired sampling rate.
The display will advise that the
sampling rate has been saved and
then return to the opening display
describing the logger that is plugged into the LoggerStor.
Connecting the LoggerStor to a PC
When the LoggerStor is connected to
a PC and the DwyerLog program is
running, all functions are controlled
from the PC. The LoggerStor display will show a message
prompting you to press
SET/MENU
after you have finished
retrieving recordings to a PC.
This display will remain until you press
SET/MENU
or turn off
the LoggerStor.
The automatic shutoff is disabled while the LoggerStor is
connected to a PC, so extra care should be taken to avoid
draining the battery unnecessarily.
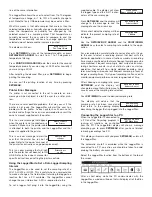
Select the LoggerStor function from the buttons at the top of
the screen.
After a short delay while the PC communicates with the
LoggerStor, a window will open that will display all of the Bins
in the LoggerStor.
Send out all of
The Temp 1 Data
Please connect
the Printer
Printer is Out
of Paper
Printer is not
on Line
Found LCL22
Dwyer LCL22 Data Logger
Use Arrow Keys
To Select Rate
Sampling Rate:
1 Minute
Push SET to Save
Other to Cancel
New Sampling
Interval Saved
Unplug PC & Push
SET When Done


