background image


- 3 - 

Chapter 7 - Tuning 


Understanding Trap Calibration 

43 

Hustler

®

 Traps 

44 

Hustler

®

 Trap Calibration - Resonance Adjustment Procedure 

46 

Tuning the 80 Meter Resonator Whip for the 5-BTV and 6-BTV 

47 


Chapter 8 - Guying the Hustler

®

 BTV Antenna System 

48 


Chapter 9 - Reference Information 


Elevated Mounting of the Hustler

®

 BTV Antenna 

49 

The Quarter-Wave Vertical on a Metal Roof 

50 

What Trap Do I Have? 

52 

Hustler

®

 BTV Replacement Parts Diagram 

53 

Weatherproofing Coaxial Cable Connections 

54 

Lightning Protection - For Any Installation 

54 

Hustler

®

 BTV Specifications 

55 


Chapter 10 - Additional Operating Bands 


Adding Additional Operating Bands to your Hustler

®

 BTV Antenna 

57 


Chapter 11 - Recommended Accessory Items 


For Assembly 

58 

For Quick Tilt Action 

59 

For Tuning 

60 


Additional Accessories for Your Hustler

®

 BTV 

61 


Technical Support and Warranty 

64 


Note:   DX Engineering is constantly upgrading information and developing new products to 

enhance your amateur radio experience. Please check the DX Engineering web site for the


latest 

information:  

www.DXEngineering.com


The Hustler

®

 Antenna Company introduced this product over 50 years ago, with little attention to 

maximizing performance.  It was designed to be an easy-to-install antenna with minimal grounding, 
which provided easy - or no - tuning and wide bandwidth but mediocre performance. 


DX Engineering decided to take this popular product and show how its performance could be 
greatly increased by proper installation, including the addition of an adequate radial ground 
system.  This results in lowering the resonant frequency, and also altering the impedance at 
resonance.  Hence - the need to adjust the traps, which was not “allowed” by the manufacturer, and 
the possible addition of a shunt coil at the feedpoint. 


You can install the antenna according to the New-Tronics instructions and make some contacts with 
little attention to ultimate performance.  Our BTV Guide takes you into areas which result in 
departing from the simple installation and the need to make more adjustments than originally 
described.  That is the reason we designed the tilt base, for easy raising and lowering between 
adjustments. 


The overall experience should be an effort which started with an inexpensive trap vertical, and 
finished with a high performance antenna installation providing very satisfying results. 


Summary of Contents for 4-BTV

Page 1: ...gn please assemble and install your new antenna according to these DX Engineering Assembly and High Performance Installation Instructions These instructions are intended to replace those originally su...

Page 2: ...mbly 19 Hustler 5 BTV Package Contents Assembly 21 Six Blade Spider for the 4 BTV and 5 BTV only 23 Three Blade Spider for the 5 BTV only 23 80 Meter Resonator and Whip Installation for the 5 BTV and...

Page 3: ...stler Antenna Company introduced this product over 50 years ago with little attention to maximizing performance It was designed to be an easy to install antenna with minimal grounding which provided e...

Page 4: ...na will enable you to achieve an outstanding presence on the amateur bands for years to come Over 50 Years Ago The Hustler HF Base Four Band Trap Vertical antenna was a new concept in 1959 This unique...

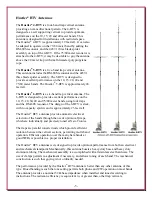
Page 5: ...nd the RM 80S resonator The design of the 6 BTV is sleek with no capacity spiders and is approximately 25 feet tall The Hustler BTV antennas provide automatic electrical selection of the bands through...

Page 6: ...ve that the Hustler BTV antenna is great and can be installed quickly to get you on the air making contacts Through years of experience DX Engineering has engineered and manufactured add ons that will...

Page 7: ...nditions and may not protect you from electric shock Keep your distance Remember the 10 foot rule When carrying and using ladders and other long tools keep them at least 10 feet away from all overhead...

Page 8: ...Plate and Radial System 10 Tuning 5 Install the Tilt Base Assembly 11 Add optional DX Engineering Add On Kits 6 Mount the BTV base to the Tilt Base for 12 17 and 60 meters and make adjustments Site Se...

Page 9: ...the DXE TB 3P Tilt Base A thick walled steel pipe with a minimum thickness of 1 8 1 4 preferred should be used The standard 1 1 2 galvanized water pipe with its 1 9 OD is just fine for this applicati...

Page 10: ...e mounting pipe and the earth to collect and distribute antenna currents Unfortunately the soil and a steel pipe usually does not provide efficient RF conduction Therefore the use of many ground radia...

Page 11: ...take advantage of all of the performance that your Hustler HF Multi Band Vertical has to offer Here are a few facts about the HF quarter wave vertical antenna For best results plan for a ground mount...

Page 12: ...is another important consideration when comparing ground mounting to roof top or elevated mounting of your quarter wave vertical The DX Engineering Tilt Base offers a safer and easier ground mounted...

Page 13: ...e idea behind this is to get the grass of your lawn to grow over the radials and protect them from the mower First mow the grass pretty short in the areas where you will be laying the radials down Not...

Page 14: ...wave vertical antenna multi band or single band is completely dependent upon the quality of its radial system A few local or medium range contacts may be possible using a minimal installation without...

Page 15: ...DX Engineering current choke instead of coiled coaxial cable to reduce RF feedback RFI To avoid damage from radial installation and for proper RF decoupling the coaxial cable should be buried several...

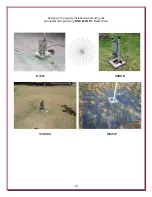
Page 16: ...16 Examples of properly installed radials using the optional DX Engineering DXE RADP 3 Radial Plate K7CIE N8DOD N5RMM W0ZSP...

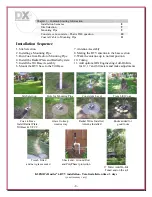
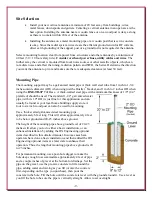
Page 17: ...venting corrosion or oxidation When assembling any telescoping aluminum tubing sections you should take the following steps 1 Make sure the edges are smooth and not sharp Deburring may be necessary si...

Page 18: ...ctions depending on your antenna for element clamps tubing and trap placement Slide all the clamps over each section before putting them together You can lightly tighten the clamps just below the slit...

Page 19: ...tainless Steel 2 3488 6 U Bolts 4 2491 5 1 4 Split Lock Washers 1 3609 5 Spider Hub 1 2194 15 6 32 x 3 4 long Screw 1 2382 1 10 32 Hex Nut Stainless Steel 7 2832 31 6 32 Hex Nut Stainless Steel 4 2832...

Page 20: ...ical Sections Assemble the 4 BTV as shown in these pictures The dimensions between the aluminum sections and the traps are shown in the chart below The six bladed spider is mounted just above the 20 M...

Page 21: ...IN PLASTIC BAG 7 3152 4 Clamp 12 Stainless Steel 2 3488 6 U Bolts 4 2491 5 1 4 Split Lock Washers 1 3609 5 Spider Hub 1 2194 15 6 32 x 3 4 long Screw 1 2382 1 10 32 Hex Nut Stainless Steel 7 2832 31 6...

Page 22: ...shown in these two pictures The dimensions between the aluminum sections and the traps are shown in the chart below The six bladed spider is mounted just above the 20 Meter trap The three blade spider...

Page 23: ...nsertion of the whip antenna about 4 beyond the set screws as shown below Snug the Allen set screws in place to hold the whip in place During tuning you will be making adjustments to this length Insta...

Page 24: ...6 1 RM 80S Eighty Meter Resonator w Whip 1 6747 Hardware Kit Consisting of the following IN PLASTIC BAG 2 2233 41 1 2 OD x 3 16 ID Washer 1 2382 1 10 32 Hex Nut Stainless Steel 4 2491 5 1 4 Split Lock...

Page 25: ...25 Assembly of the 6 BTV Antenna Vertical Sections Assemble the 6 BTV as shown in these two pictures The dimensions between the aluminum sections and the traps are shown in the chart below...

Page 26: ...ase Assembly HSR 4098 1 is pre assembled from the factory The following diagram shows all the parts including the parts that are used for basic mounting on a 1 inch to 1 3 4 inch OD mounting pipe usin...

Page 27: ...easy to install The use of JTL 12555 Jet Lube SS 30 Pure Copper Ant Seize is recommended to be used between all aluminum antenna sections to help ensure complete RF connections and to help keep out a...

Page 28: ...sion to the required spacing as shown in the charts below Tighten the element clamp 4 BTV and 5 BTV Approximate Starting Dimensions Type of Installation A1 On a roof with 4 ft pipe and radials 2 1 8 O...

Page 29: ...required This diagram also shows connecting the feedline direct to the Hustler base using the supplied lugs for coax connections For radial wires the better alternative is to use an optional DXE RADP...

Page 30: ...be necessary However a broad low SWR over an entire band or all bands is an indication of poor efficiency If at all possible the addition of radials will improve performance as detailed in Chapters 4...

Page 31: ...ackage High Performance HF Vertical System DXE HSR 6BTV P1 For a high performance HF ground mounted vertical system the DX Engineering Hustler 6 BTV Package provides 80 75 40 30 20 15 10 meter band co...

Page 32: ...Pure Copper Anti Seize for elements and hardware 1 SUM 900031 Automatic Wire Stripper Crimper Cutter 24 10 Gauge I wish I would have ordered Suggested items for better performance and ease of installa...

Page 33: ...ll allow easy access to install the radial wire hardware The DXE RADP 3 Radial Plate comes with 20 sets of stainless steel hardware for mounting the radial wires Mount the plate as shown in relation t...

Page 34: ...s Steel Radial Plate is an ideal optional item which provides an excellent system for attaching radial wires to your vertical antenna system feedpoint Radial wires can be laid on the roots of the gras...

Page 35: ...each nut BTV Antenna Base Section to the optional DXE TB 3P Tilt Base Using the new hardware included with DXE TB 3P Tilt Base install the four hex head bolts four flat washers four split washers and...

Page 36: ...enna toward the Tilt Base while raising Push up while raising but not toward the base since this could cause the pivot bolt to lift out of the slot and allow the mechanism to bind up and bend the lowe...

Page 37: ...the diameter of pipe 1 1 4 to 2 1 2 diameter being used Refer to the DXE OMNITILT 1P manual for details on the assembly of the basic OMNI TILT Tilt Base OMNI TILT Tilt Base Tilt Action 1 To tilt down...

Page 38: ...5 16 18 x 4 1 2 long Hex Head Bolt Full Thread Stainless Steel 8 5 16 Washer Flat Stainless Steel 16 5 16 Washer Split Lock Stainless Steel 8 5 16 18 Hex Nut Stainless Steel 8 1 Using the hardware sup...

Page 39: ...rdware Kit For Trap Verticals Hustler BTV series Hy Gain AVQ series Qty 1 4 20 x 1 long Hex Bolt Stainless Steel 4 1 4 Washer Split Lock Stainless Steel 4 1 4 Washer Flat Stainless Steel 4 1 4 20 Hex...

Page 40: ...ation you may install the DXE AOK DCF in one of three ways The direction of the SO 239 will depend on your particular installation set up Ensure the direction chosen allows the coaxial cable to be pro...

Page 41: ...rtical Feedline Current Choke for connection to the base of the Hustler BTV series antenna It is also not required if you use the DXE AOK DCF SO 239 add on kit for direct connection of your coaxial ca...

Page 42: ...d is connected to the feedpoint refer to the VFCC manual for details Ensure the tinned copper braid is not shorting out and the tilt action works correctly The optional DXE UHF FDFB KIT can be used to...

Page 43: ...rtical antennas as supplied by the manufacturer will normally resonate at frequencies much lower than desired and especially when installed on very good soil saltwater or a metal roof Readjusting ante...

Page 44: ...r Traps The manufacturer sets the traps to specific dimensions Since you are optimizing the antenna system using a good radial system adjustments will have to be made For reference the photo below sho...

Page 45: ...y assembled traps cannot be adjusted before assembly It is not necessary to remove each trap from the larger tubing below it or measure it in order to make the trap sleeve adjustment to tune the anten...

Page 46: ...It is not necessary and counter productive to readjust the spacing A2 B2 C2 or D2 to the original chart dimension after a trap sleeve adjustment In some cases you may need to increase these spaces be...

Page 47: ...gth and verify you are going in the proper direction Use the old adage Measure twice cut once If you desire to use two frequencies that are far apart CW vs SSB you may want to have two whips One whip...

Page 48: ...d ground anchors DXE GUY100 200 400 or 1000 KIT Some vertical antenna manufacturers indicate their antennas do not need guying During times of high winds or ice loading some of these verticals may sus...

Page 49: ...an SWR meter is used to make resonant elevated radials For the Hustler BTV series and most other quarter wave vertical antennas it is best to start with the highest band usually 10 meters Determine th...

Page 50: ...be installed on a metal roof or large metal awning as a ground plane The potentially less efficient installation uses direct grounding of the coax shield and antenna bracket to the metal roof This mi...

Page 51: ...vertical at one end of the roof will affect the omni directional pattern However the signal reduction of a few dB in the direction away from the metal roof or any very good radial system will not prev...

Page 52: ...ew Tronics applies a colored label to the trap sleeve just below the trap cover 10M Orange 15M Red 20M Green and 30M is Blue If your trap label is missing you will have to open up the trap and count t...

Page 53: ...53 Hustler BTV Replacement Parts Diagram...

Page 54: ...wrap the TES 2155 When wrapping stretch the rubber splicing tape up to twice its normal length Wrap tightly around the coaxial cable and connectors Overlap each wind of the tape by about 50 Use the TE...

Page 55: ...55 Antenna Specifications Copyright New Tronics Antenna Corporation 225 Van Story St Mineral Wells Texas 76067 Re printed with permission...

Page 56: ...56 Copyright New Tronics Antenna Corporation 225 Van Story St Mineral Wells Texas 76067 Re printed with permission...

Page 57: ...on the air with an additional band US Patent No 7 554 500 Power Rating 850 Watts PEP Bandwidth Covers the Entire 17M band with a SWR of 1 5 1 or less DXE AOK 12M Add On Kit 12M for the Hustler BTV Ser...

Page 58: ...ctor 0 13 Service rating 65 degrees F 54 degrees C to 1800 degrees F 820 degrees C SS 30 Resistivity ohm CM x 108 5 This products are limited to domestic UPS Ground shipping only For Quick Tilt Action...

Page 59: ...E OMNITILT 1P for Hustler BTV series and Hy Gain AVQ series Trap Vertical Antennas Both antenna types use the supplied DXE TVA HWK Trap Vertical Mounting Hardware kit For STEEL pipe from 1 25 to 2 5 O...

Page 60: ...For Tuning RigExpert Antenna Analyzers RigExpert Antenna Analyzers are powerful antenna analyzers designed for testing checking tuning or repairing antennas and antenna feed lines Mainly these are SWR...

Page 61: ...ance with a ground mounted vertical install as many radials as possible These bulk radial wire kits use insulated wire that is UV resistant hard to see and lays down easily unlike the wire that is com...

Page 62: ...the handle and listen for the click That s the sound of another perfect wire stripping job performed in about 2 seconds a fraction of the time it takes your pocket knife to do the same job An adjustab...

Page 63: ...foam polyethylene dielectric 97 coverage bare copper shield and a PVC jacket Connectors are soldered rather than crimped and an adhesive lined shrink tubing provides weather protection DXE 8XDU002 24...

Page 64: ...by DX Engineering are warranted to be free from defects in material and workmanship for a period of one 1 year from date of shipment DX Engineering s sole obligation under these warranties shall be to...

Reviews: