background image


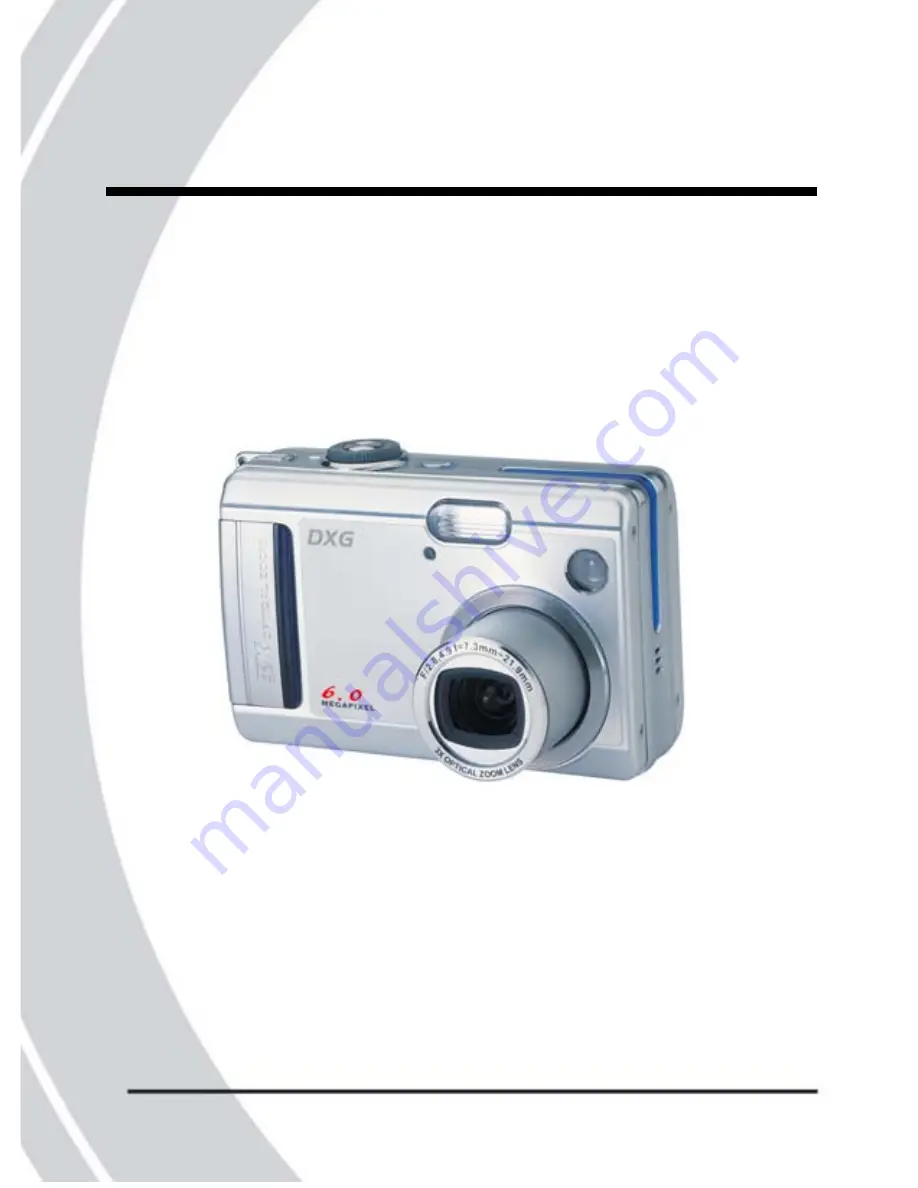
DXG-608 

User’s Manual


DXG

USA


Summary of Contents for DXG DXG-608

Page 1: ...DXG 608 User s Manual DXGUSA ...

Page 2: ... tally with the camera please take the camera as a criterion DXG reserves the right to change the contents of this manual or the technical specifications of the camera without prior notification If the accessories do not tally with the actual package please take the actual package as the criterion Copyright Copyright 2005 All rights reserved No part of this publication may be reproduced translated...

Page 3: ... shorten the life of electronic devices damage batteries and warp or melt certain plastics Do not store the product in cold areas When the product warms up to its normal temperature moisture can form inside and may damage the electronic circuits Do not attempt to open the casing Do not drop or knock the product Rough handing may damage the internal components Do not use harsh chemicals cleaning so...

Page 4: ...g 8 About the camera 9 Front view 9 Top View 10 Back view 10 Getting started Charging the battery 11 Inserting the battery 12 Inserting an SD card 13 Turning on for the first time 14 Before you start 14 Setting the date and time 14 Setting the beep function 15 Setting the language 17 Changing modes 18 Taking your first still picture 19 ...

Page 5: ...g the camera LCD display 24 Changing the LCD display 24 Shutter priority mode 27 Using shutter priority mode 27 Icons 28 Flash 30 Macro 31 Zoom 31 Menu options 32 Auto Mode 33 Using auto mode 33 Icons 33 Flash 35 Macro 35 Zoom 35 Menu options 35 Manual mode 36 Using auto mode 36 Icons 36 Flash 38 Macro 38 Zoom 38 Menu options 38 Scene mode 42 ...

Page 6: ... time 46 Insert date 46 Format 46 Power saving 47 Beep vol 47 Shutter vol 47 Start Screen 48 Rec review 48 Language 49 Reset 49 Frequency 49 TV out 50 Connect 50 Using connect mode 50 Video mode 51 Using video mode 51 Icons 52 Menu options 53 Playback mode 53 Using playback mode 53 ...

Page 7: ...nu options 53 Continuous mode 57 Using continuous mode 57 Menu options 58 DPS mode 59 Installing the software and drivers Drivers 60 Presto Video Works 6 62 Presto Mr Photo 3 63 Appendix Specifications 64 ...

Page 8: ... camera requires a host PC with the following specifications Windows XP 2000 ME operating system Intel Pentium Ⅲ 500 MHz CPU or higher At least 256 MB of RAM or higher Standard USB 1 1 port or higher 4x speed CD ROM drive or higher At least 200 MB of available disk space Note A USB 1 1 port will enable you to transfer files to and from your host PC but transfer speeds will be much faster with a US...

Page 9: ...xels Digital camcorder Mass storage device Voice recorder Additionally the camera also features 3X optical zoom 4X digital zoom and a direct print function 1 3 Unpacking All the following items should be present in the camera package If any item is missing or appears damaged contact your dealer immediately ...

Page 10: ...8 1 4 About the camera Refer to the following diagrams to familiarize yourself with the buttons and controls of the camera 1 4 1 Front view 9 ...

Page 11: ...1 4 2 Top view 1 4 3 Back View ...

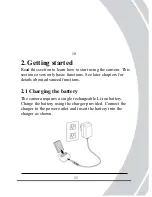
Page 12: ...vers only basic functions See later chapters for details about advanced functions 2 1 Charging the battery The camera requires a single rechargeable Li ion battery Charge the battery using the charger provided Connect the charger to the power outlet and insert the battery into the charger as shown ...

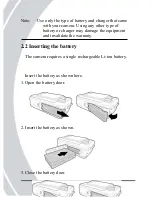
Page 13: ...y other type of battery or charger may damage the equipment and invalidate the warranty 2 2 Inserting the battery The camera requires a single rechargeable Li ion battery Insert the battery as shown here 1 Open the battery door 2 Insert the battery as shown 3 Close the battery door ...

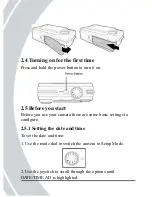
Page 14: ...e installed in the camera to provide dditional storage space for still images videos or other files a To install an SD card 1 Open the battery door 2 Insert an SD card as shown Make sure the gold contacts are facing up as shown 3 Close the battery door ...

Page 15: ...5 Before you start Before you use your camera there are some basic settings to configure 2 5 1 Setting the date and time To set the date and time 1 Use the mode dial to switch the camera to Setup Mode 2 Use the joystick to scroll through the options until DATE TIME AD is highlighted ...

Page 16: ...d right to move through the year month date hours minutes and format field 5 Use the joystick up and down to change the selected field 6 Press the center joystick button to complete the change 2 5 2 Setting the beep function To set the beep function 1 Use the mode dial to switch the camera to Setup Mode ...

Page 17: ...2 Use the joystick to scroll through the options until BEEP VOL is highlighted ...

Page 18: ...tton The BEEP VOL submenu is displayed 4 Use the joystick up and down to select the Beep On or Beep Off 5 Use the joystick left and right to adjust the volume slider as required 6 Press the center joystick button to complete the change ...

Page 19: ...ough the options until LANGUAGE is highlighted 3 Press the center joystick button The LANGUAGE submenu is displayed 4 Use the joystick left and right to scroll through the available language options Icon Language Icon Language Chinese English German Spanish French Italian Japanese 5 Press the center joystick button to complete the change ...

Page 20: ...is set Priority by the user The camera sets the aperture Auto For still pictures The camera sets everything Manual For still pictures The user sets all options Scene For still pictures Fifteen preset scene programs to choose Setup To configure settings common to all camera modes Connect To connect to TV computer or printer Video For video capture Playback To review videos and still pictures stored...

Page 21: ...een to frame the picture 3 Press the shutter button to capture the picture The picture will automatically be saved with a unique file name 2 8 Shooting your first video Before shooting your first video ensure you have read Before you start on 2 5 To shoot a video 1 Turn on the camera and make sure it is in video mode See Changing modes on 2 6 2 Use the viewfinder or LCD screen to frame your video ...

Page 22: ...nnect the camera to a host computer and to a TV 2 9 1 Connecting to a TV Connect the camera to a TV as shown with the AV cable provided to view images and videos on a bigger screen See Connecting to a TV on 3 8 1 for more details about displaying images on a TV screen ...

Page 23: ...a computer Connect the camera to a host computer using the USB port as Shown with the USB cable provided to transfer and store files See Connecting to a computer 3 8 1 for more information about connecting to a host computer ...

Page 24: ... 3 Using the camera Read this section to learn how to configure the camera and use the advanced features 3 1 Using the camera buttons All buttons are located on the top and the back of the camera Back Top ...

Page 25: ...ode Flash To cycle through the flash modes Menu Press to display the main OSD menu Joystick Use to navigate the OSD menus Power Press to turn power on or off Mode Use to select Shutter Priority Auto Manual Scene Setup Connect Video Playback or Continuous mode Shutter Press to capture a picture in Shutter Priority Auto Manual or Scene mode or start stop video recording in Video mode The shutter but...

Page 26: ... or that you don t want the LCD screen to display anything Use the Display button to cycle through the display modes When you turn the camera on the LCD display shows icons and picture by default Press the Display button once to display important icons Press the Display button a second time to turn off the icons and display only the LCD image Press the Display button a third time to turnoff LCD im...

Page 27: ...eaning of the LEDs Photo SCN mode Back Green Back Red Front Red Top Blue Power on Power off Self timer Flash charging Record busy Focusing Ready to shoot Error Picture captured Playback Mode Back Green Back Red Front Red Top Blue Power on Power off Error ...

Page 28: ...ack Green Back Red Front Red Top Blue Power on Power off Self timer Record busy Focusing Ready to shoot Error Video captured Other Back Green Back Red Front Red Top Blue Power saving Legend LED on LED blinking LED off ...

Page 29: ...a slow shutter speed the camera will set a small aperture which will give a large field of focus meaning that more of the subject area will be in sharp focus With a slow shutter speed the camera will set a wider aperture and therefore a smaller field of focus To set the shutter speed 1 Use the mode dial to switch the camera to S Mode 2 Use the joystick up and down to set the shutter speed when pro...

Page 30: ...ity mode icons and their descriptions Icon Name Description 1 White Indicates the current white balance setting balance 2 Photo Indicates how many pictures are stored number in memory the total number of photos that will fit in memory 3 Macro Indicates macro mode is active ...

Page 31: ...ation set ting 7 Battery Indicates current battery status 8 Memory Indicates memory card status card 9 Quality Indicates current quality setting 10 Resolution Indicates current resolution setting 11 ISO Indicates current ISO setting 12 Metering Indicates current metering setting 13 Mode Indicates current mode 14 Flash Indicates current flash setting ...

Page 32: ...ash fires only in low light conditions Auto flash with red eye reduction the flash fires in low light conditions and flashes briefly before the photo is taken to reduce the red eye effect Force flash with red eye reduction the flash always fires and flashes briefly before the photo is taken to reduce the red eye effect Slow sync flash This mode is designed for low light conditions and long shutter...

Page 33: ...cro mode is enabled Note The macro function works in shutter priority auto manual scene and video modes 3 3 5 Zoom The zoom function enables you to get up close to far away subjects or move away from very close subjects A rocker switch on the rear of the camera controls the zoom action Press the left hand W side of the zoom control to zoom out or move away from the subject Press the right hand T s...

Page 34: ...ame as those in Manual mode see Menu options on 3 5 6 However there is an additional option in shutter priority mode that can be used to change the shutter speed To change the shutter speed setting 1 Press the menu button to display the menu 2 Use the joystick left and right to highlight the SHUTTER option and press the center joystick button to confirm 3 Use the joystick up and down to highlight ...

Page 35: ...ny settings 3 4 1 Using auto mode 1 Use the mode dial to switch the camera to A Mode 2 Compose your picture using the viewfinder or LCD screen 3 Press the shutter button to capture the shot 3 4 2 Icons The following screen shows the auto mode icons and their descriptions Icon Name Description 1 White Indicates the current white balancesetting balance ...

Page 36: ...rent date and time 5 EV Indicates current EV compensation setting 6 Battery Indicates current battery status 7 Memory Indicates Memory card status card 8 Quality Indicates current quality setting 9 Resolution Indicates current resolution setting 10 ISO Indicates current ISO setting 11 Metering Indicates current metering setting 12 Mode Indicates current mode 13 Flash Indicates current flash settin...

Page 37: ...o on 3 3 4 3 4 5 Zoom See Zoom on 3 3 5 3 4 6 Menu options The menu options in auto mode are almost exactly the same as those in Manual mode see Menu options However in auto mode you are not able to set the WB option or the focus option in the detail menu ...

Page 38: ...e configurable 3 5 1 Using manual mode 1 Use the mode dial to switch the camera to M Mode 2 Compose your picture using the viewfinder or LCD screen 3 Press the shutter button to capture the shot 3 5 2 Icons The following screen shows the auto mode icons and their descriptions ...

Page 39: ...active 4 Date Time Shows current date and time 5 EV Indicates current EV compensation setting 6 Battery Indicates current battery status 7 Memory Indicates memory card status card 8 Quality Indicates current quality setting 9 Resolution Indicates current resolution setting 10 ISO Indicates current ISO setting 11 Metering Indicates the current metering setting 12 Mode Indicates current mode 13 Flas...

Page 40: ...cture being captured b To set the self timer option 1 Press the menu button to display the menu 2 Use the joystick left and right to highlight the SELF TIMER option Off and press the center joystick button to confirm 3 Use the joystick up and down to highlight a self timer setting and press the center joystick button to confirm 4 Press the menu button to exit the menu The new self timer setting wi...

Page 41: ...new pixel setting will remain active until you change it Quality The Quality option lets you change the quality of the captured picture To change the quality setting 1 Press the menu button to display the menu 2 Use the joystick left and right to highlight the QUALITY option and press the center joystick button to confirm 3 Use the joystick up and down to highlight a quality set ting and press the...

Page 42: ...n be set to values between 2 0 2 0 in 1 3 steps 4 Press the menu button to exit the menu The exp comp setting will remain active until you change it WB he WB option lets you set the white balance T 1 Press the menu button to display the menu 2 Use the joystick left and right to highlight the WB option and press the center joystick button to confirm 3 Use the joystick up and down to highlight a WB ...

Page 43: ... color black and white or sepia Chroma and Sharpness can be set to standard or increased or decreased The focus mode can be set to auto area spot or anual m Auto focus is entirely automatic Area spot focus will cause the camera to focus just on the area in the center of the picture marked with a cross on the LCD screen Manual focus lets you choose an area center up down left or right on hich to fo...

Page 44: ...de 1 Use the mode dial to switch the camera to SCN Mode 2 Choose a preset program when prompted using the joy stick up and down Press the center joystick button to confirm 3 Compose your picture using the viewfinder or LCD screen 4 Press the shutter button to capture the shot 3 6 2 Icons The following screen shows the auto mode icons and their descriptions 42 ...

Page 45: ... Date Time Shows current date and time 5 EV Indicates current EV compensation setting 6 Battery Indicates current battery status 7 Memory Indicates memory card status card 8 Quality Indicates current quality setting 9 Resolution Indicates current resolution setting 10 ISO Indicates current ISO setting 11 Metering Indicates the current metering setting 12 Mode Indicates current mode 13 Flash Indica...

Page 46: ...ring action in low light con ditions with localized bright spots Sport For capturing fast moving subjects in good light conditions Backlight For capturing images with strong backlight Self To capture images including the pho portrait tographer Portrait For capturing fairly close subjects in normal light conditions Macro For capturing very close subjects in good light conditions Beach For capturing...

Page 47: ...limited because everything is automatically set You can however change the pixel and quality options see Pixel and Quality You can lso change the scene setting a To change the scene setting 1 Press the menu button to display the menu 2 Use the joystick left and right to highlight the SCENEoption and press the center joystick button to confirm 3 Use the joystick up and down to highlight a scene set...

Page 48: ... right Press the center joystick button to confirm 3 Use the joystick up and down to highlight the on or offoption Press the center joystick button to confirm 3 7 3 Format Use the format option to format the camera memory or memory card To use the format option 1 Set the camera to set up mode using the mode dial 2 Highlight the format option using the joystick left andright Press the center joysti...

Page 49: ...ystick button to confirm 3 Use the joystick up and down to highlight the power saving option you require off 1 5 or 10 minutes Press the center joystick button to confirm 3 7 5 Beep vol See Setting the beep function on 2 5 2 3 7 6 Shutter vol Use the shutter volume option to set the shutter sound volume To set the shutter volume 1 Set the camera to set up mode using the mode dial 2 Highlight the s...

Page 50: ...ght the start screen option you require 4 Press the center joystick button to confirm 3 7 8 Rec review Use the rec review option to set the amount of time a picture taken in shutter auto manual and SCN mode remains in heLCD before disappearing t To set the rec review time 1 Set the camera to set up mode using the mode dial 2 Highlight the rec review option using the joystick left and right Press t...

Page 51: ... to the factory default 3 7 11 Frequency Use the frequency option to set the LCD screen frequency to the same frequency as the mains power supply in your area This is to limit flickering on the screen when viewed under rtificial light a To set the frequency 1 Set the camera to set up mode using the mode dial 2 Highlight the frequency option using the joystick left and right Press the center joysti...

Page 52: ... joystick button to confirm 3 8 Connect Use connect mode when you want to connect to an external device Use the USB TV out cable to connect to a TV com puter or printer 3 8 1 Using connect mode 1 Use the mode dial to switch the camera to connect Mode 2 Use the joystick to highlight the TV computer or printer icon and press the center joystick button to confirm The camera is then ready to connect t...

Page 53: ...uter for the first time make sure ou have read Drivers on 4 1 y Connecting to a printer If your printer supports direct printing you can connect your camera to it using the USB cable supplied See DPS mode on 3 12 for details about how to print directly to your printer 3 9 Video mode Use video mode to record video footage 3 9 1 Using video mode 1 Use the mode dial to switch the camera to video Mode...

Page 54: ...ion 1 White Indicates the current white balance setting balance 2 Macro Indicates macro mode is active 3 Date Time Shows current date and time 4 Battery Indicates current battery status 5 Memory Indicates memory card status card 6 Quality Indicates current quality setting 7 Mode Indicates current mode 52 ...

Page 55: ...ight to scroll through the pictures and videos stored in the camera 3 Press the center joystick button to start and stop videos 3 10 2 Menu options Menu options in playback mode let you adjust the display add a sound to photos protect a file erase files rotate a picture auto play or print set DPOF format Press the menu utton to display menu options b Display The display can show a single picture f...

Page 56: ...e joystick left and right to highlight the RECORDER option and press the center joystick button to confirm 4 Press the center joystick button to begin recording You can record up to 30 seconds of audio 5 Press the center joystick again to end the recording 6 Press the menu button to exit the menu The new audio recording will be associated with the chosen picture The recording can be played when th...

Page 57: ...tch the camera to playback mode and display the picture or video to erase on the screen 2 Press the menu button to display the menu 3 Use the joystick left and right to highlight the ERASE option and press the center joystick button to confirm 4 Use the joystick up and down to highlight the execute or cancel option Press the center joystick to confirm The current picture or video is deleted You ca...

Page 58: ...menu button to exit the menu Auto play Use the auto play option to automatically display the pictures and videos stored in the camera To use the auto play function 1 Press the menu button to display the menu 2 Use the joystick left and right to highlight the AUTO PLAY option and press the center joystick button to confirm The auto play submenu is displayed 3 Use the joystick up and down to select ...

Page 59: ...tick button to confirm The Print Setting menu is displayed 3 Use the joystick up and down to select any of the items to change and use the joystick right to make the change 4 Use the joystick up and down to highlight the print option and press the joystick button to confirm The print settings are applied to the current picture or pictures You can then take your memory card to a photo shop and rint...

Page 60: ... to highlight a cont setting and press the center joystick button to confirm Bracketing BKT Select between 3 Continuous Shots and 5 Continuous Shots Select a scope for the Standard Exposure Value you can adjust foraccording to the Standard Exposure Value Auto Continuous Capture Continuous capture settings are automatically set and cannot be adjusted Zoom Continuous Capture Continuous capture shots...

Page 61: ...e camera to a printer To use the DPS function 1 Use the mode dial to switch the camera to DPS Mode 2 Connect the camera to the printer using the USB cable Connect the printer the same way you would connect a PC as described in Connecting to a computer on 2 9 2 3 Press the joystick left and right to select the image and press the MENU button to confirm The selected picture is output to the printer ...

Page 62: ...s digital camera as an SD device You will only need to install a driver for the camera if your operating system is Windows 98SE Windows XP ME 2000 are plug and play operating systems and do not require a driver to be manually loaded When the driver has been installed and the camera is connected the camera memory and any installed mini SD card will appear as Mass Storage in Windows Explorer Files c...

Page 63: ...automatically boot use Windows Explorer to execute the InstallMgr exe file in the root directory The following screen is displayed Install button 3 Click the install button to install the driver and finish the camera 4 Follow the on screen instructions 5 Click Finish to restart the computer driver installation ...

Page 64: ... drive 2 If the CD ROM doesn t automatically boot use Windows Explorer to execute the InstallMgr exe file in the root directory The following screen is displayed Install button 3 Click the install button to begin the installation process follow the instructions on screen More information about Presto Video Works 6 can be found in the help files when the application is started ...

Page 65: ...62 ...

Page 66: ...e 2 If the CD ROM doesn t automatically boot use Windows Explorer to execute the InstallMgr exe file in the root directory The following screen is displayed Install button 3 Click the install button to begin the installation process follow the instructions on screen More information about Presto Mr Photo 3 can be found in the help files when the application is started ...

Page 67: ...ivity definable Lens 3X optical zoom lens Wide F2 8 f 7 3mm Tele F4 9 f 21 9 Focus range Normal 12 in inf Macro 12 in wide only Still image Formats JPEG EXIF DCF DPOF Direct Print DPS Resolution VGA 2M 4M 6M 8M 10M firmware interpolation Quality Fine Normal Basic Movie clips AVI 320 x 240 pixels 25 fps Zoom 3x optical zoom 4x digital zoom LCD screen 2 0 inch LTPS High resolution TFT 558 x 234 pixe...

Page 68: ... compensation 2 0 EV 2 0 EV in 1 3 EV steps Self timer Off 2 or 10 seconds PC interface USB 2 0 full speed TV out format NTSC PAL Shutter Mechanical and electronic shutter 8 1 2000 second Auto power off Off 1 5 or 10 minutes user definable Power supply Single rechargeable Li ion battery Dimension 3 74 L x 1 45 D x 2 54 H Weight 5 47 ounces without batteries ...

Page 69: ... dxgusa com for any product updates or special announcements You can also check out our online support desk where you can register your product send emails to our technical support and find a list of frequently asked questions DXGUSA ...

Reviews: