Customer Service 1-888-707-1880
Dyaco Canada Inc. 2016
Email: customerservice@dyaco.ca
9
STEP 1
1.
Take out the treadmill from the carton and lay it aside on the smooth ground.
2.
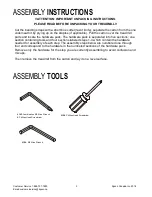
Remove(L/R) Flat Head Socket Bolts (102) using the L Allen Wrench (104) and then remove 2 pcs
Fixing Plate Stabilizer (101) and dispose.
3.
Slide the
UPRIGHT COVERS (L 52, R 53)
onto the
LEFT AND RIGHT UPRIGHTS (4, 5)
.
4.
Slide the
CONSOLE MAST SIDE CAPS (L 98, R99)
onto the
LEFT AND RIGHT UPRIGHTS (4, 5)
under the Upright Covers.
5.
Connect the
LOWER COMPUTER CABLE (33)
to the
MIDDLE COMPUTER CABLE (32)
. Be sure
not to pinch the cable or damage may occur.
6.
Insert the
LEFT AND RIGHT UPRIGHTS
into the
MAIN FRAME (1)
and use the
COMBINATION
WRENCH AND PHILLIPS SCREW DRIVER (103)
to secure 4
BOLTS (100)
and 4
Curved Washers
(124)
into place.
7.
Use the
L-SHAPED ALLEN WRENCH (104)
to tighten the
LEFT AND RIGHT GUSSET (7, 8)
with 6
Bolts (123),
6
FLAT WASHERS (79)
, and 6
SPRING WASHERS (86)
.
HARDWARE
#
100
. 5/16” 3/4"
Button Head Socket
Bolt (4pcs)
#
86.
.Ø 10 × 2.0T
Spring Washer
(6 pcs)
#
123
. 3/8” x 2-1/2”
Button Head Socket
Bolt (6 pcs)
#
79.
3/8" ×19 × 1.5T
Flat Washer
(6 pcs)
#
124
. 8 × 23 × 1.5T
Curved Washer (4 pcs)


