PREPARATION PRIOR TO TESTING A STONE
The presence of dust, dirt, film and moisture on a stone may produce an inaccurate indication. Therefore, it is
prudent to routinely clean the surface of each stone to be tested by using a damp soft clean fabric followed by
drying using a dry soft clean fabric.
Remove the protective cover from the probe.
The tip of the probe should be cleaned frequently by wiping the tip across the surface of a piece of bonded
paper or a business card. Copier paper and fax paper are to be avoided.
The tip of the probe may be damaged by accidental drop. Always place the protective cover over the probe
immediately after use. Probe tip damage is exempted from the warranty.
During testing the users hands should be clean and dry. Do not wear gloves.
The stone to be tested should be allowed to reach room temperature.
For maximum accuracy, minimize handling of the stone prior to testing. If the item to be tested consists of a
setting containing many stones requiring more than ten seconds to test user must avoid heating the setting
with his hand; allow the item to be untouched for about fifteen seconds.
Loose stones may be placed on the testing platform (9) at any time and be tested immediately.
Best results are obtained by performing tests in still air. Avoid fans, drafts or air movement from air
conditioning or heating sources. Avoid breathing directly on the probe tip while testing.
“AUTO” TESTING
“Auto”-Testing can be performed when the temperature is within 70-88 F and the stone size is between .08 and .75
Karats. For all other conditions use the manual mode and adjust to the calibration chart (p.3). The automatic testing
mode (“Auto”-Testing) is achieved by rotating the thumbwheel counter-clockwise until a “click” is felt.
1.
Perform the operational checkout as described above.
2.
The twelve lamp Auto/Manual Range Indicator is segmented as follows:
3.
The ambient temperature should be between 70
F and 88
F for “Auto” Testing. Normally Lamp #3 will be
lit.
4.
Hold the diamond tester in your hand so that your fingers are in contact with the conductive panel (6).
5.
With the other hand pick up the stone to be tested by its setting or place a loose stone in the appropriate
well in the testing platform held with that hand.
6.
Guide the probe tip to the center of a facet on the stone.
7.
Touch the probe tip to the stone so that the probe tip is firmly and squarely against the facet of the
stone. Excessive force which might bend or break the tip must be avoided.
8.
Make sure the probe is perpendicular to facet of stone while testing.
9.
After each test the display should return to the original lamp.
10.
As always some stones require further testing to determine what they are. In the case of some
Moissanite Stones especially the
“Forever One” Moissanite stone try using UV lignt on the stone while
testing will help like the ones used for counterfeit money e.t.c.
Congratulations on your purchase of the Prestige Series II,
the world’s finest diamond tester. With this unique
Instrument you will obtain the most information about the
stones you are testing. You also will have the versatility
of selecting between
the “auto” mode with valuable
sensitivity or the “manual” mode which allows for
adjustments for extremes in temperature or stone size.
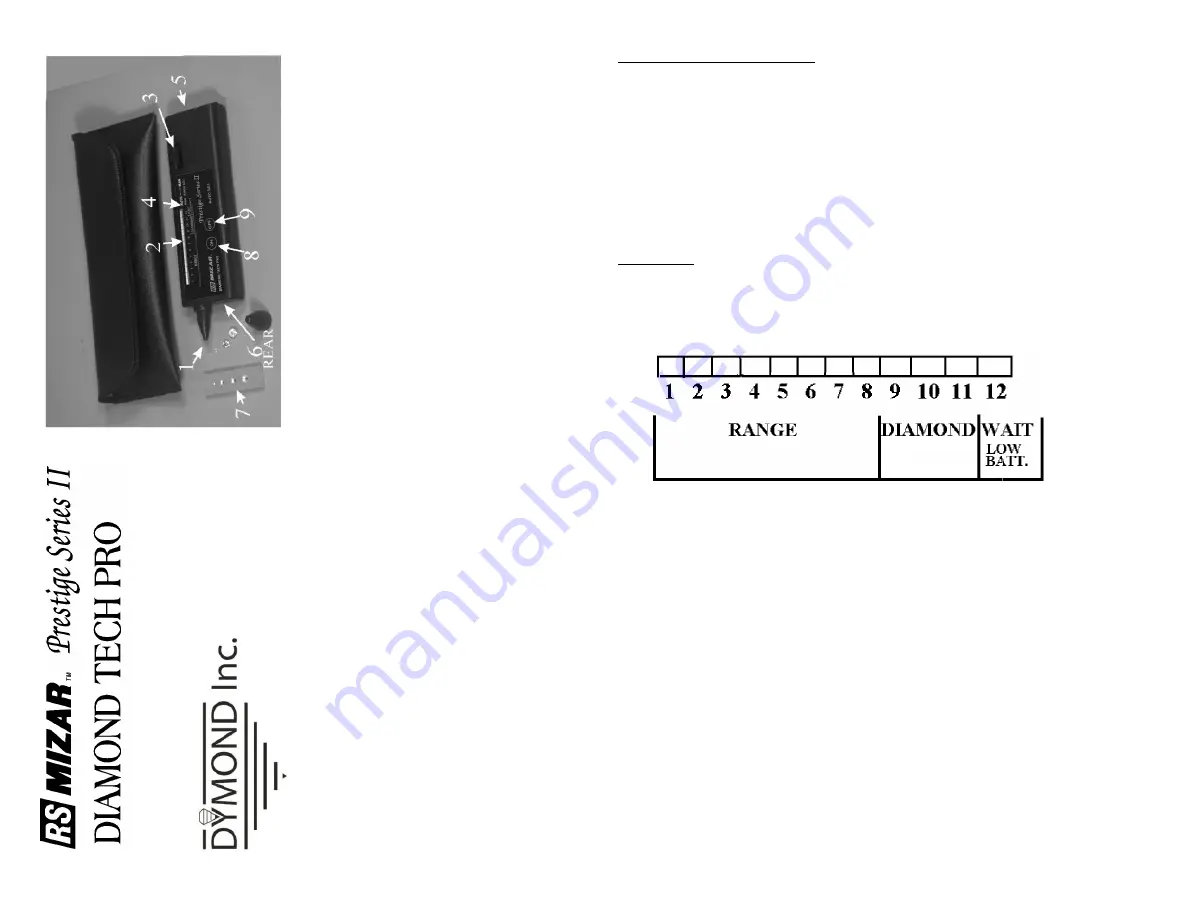
IDENTIFICATION OF PARTS
1. Probe
2. Range Indicator
3. Auto/Manual Range Adj.
4. Wait/Low Battery Lamp
5. Battery Compartment
6. Conductive Panel
7. Testing Platform for Loose Stones
8. “ON” Button
9. “OFF” Button
*PRIOR TO TESTING, IT IS RECOMMENDED THAT THE
TIP OF THE PROBE BE CLEANED BY GENTLY WIPING
ACROSS A CLEAN SHEET OF PAPER *
OPERATIONAL CHECKOUT
1. Rotate the Thumbwheel (3) in a counter-clockwise
direction beyond the “click”.
2. Press the “ON” button (8).
3. The Wait Lamp (4) will be lit.
4. All other display lamps will remain extinguished for
the wait period, which is typically less than nine
seconds at room temperature. The time can increase
with low temperatures or a weak battery. After the
wait period there is a single beep.
5. If the waiting time exceeds twenty seconds or the Wait
Lamp fails to extinguish replace the battery.
6. The Diamond Tester is ready to use after the Wait Lamp
extinguishes and a display lamp (#1 to #8) is lit. In the
“Auto” mode display lamp 3 is normally lit after the
unit has warmed up, typically ten to twenty seconds.
7. If the ambient temperature is not within the range of
the automatic circuitry (70-88 F, 21-31 C) the diamond
tester is still able to test a stone by testing with the
Manual Range Adjust (3).
8. When testing is completed press the “OFF” button.
Always turn off the unit after testing to increase
battery life.
“AUTO-SET”
This adjustment affects the sensitivity of the “automatic
range” only. It is pre-set at the factory to lamp #3. If you
prefer a higher sensitivity for diamonds you may adjust
the “auto-set” (through the bottom of the front label) to
lamp #4. To make this adjustment, turn the thumbwheel
(3) fully counter-clockwise until clicked. Turn the unit on
and wait twenty seconds to allow the probe to reach
maximum temperature. Then with a jeweler’s screwdriver
adjust the “Auto-Set” to “the center of” lamp #4. If you
prefer a lower sensitivity follow the above procedure and
adjust to “the center of” lamp #2. This adjustment will
not affect the Manual mode.
AUTOMATIC SHUT-OFF
The Diamond Tester will automatically shut off after 90
seconds of inactivity. Whenever the “On” button is
pressed the timer resets to 90 seconds. If the unit is shut
off before you have completed your test simply press the
on button and continue your testing as soon as the
display comes on. Always
press the “OFF” button after
testing to prolong battery life.


