


When operating this equipment, basic precautions should always be strictly followed
including the instructions listed below:
4.
Keep children away.
Do not let visitors contact tool. All visitors should be kept away from work area.
5.
Do not force tool.
It will do a better and safer job at its intended rate.
6.
Use the right tool.
Do not force a small tool or attachment to do the job of a heavy duty tool. Do not use tool for purposes not intended.
7.
Dress properly.
Do not wear loose fitting clothing or jewelry. Clothes can be caught in moving parts. Wear protective hair covering to
contain long hair.
8.
Use safety glasses.
Also use face-shield or dust mask if operation area is dusty.
9.
Do not abuse cord.
Never carry tool by cord or yank it to disconnect from receptacle. Keep cord from heat, oil and sharp edges.
10.
Do not overreach.
Keep proper footing and balance at all times.
11.
Maintain tools with care.
Keep tools clean for better use and safer performance. Follow instructions for changing accessories. Inspect tool
cords periodically and if damaged, have repaired by authorized service facility. Inspect extension cords periodically and replace if damaged. Keep
handles dry, clean and free from oil and grease.
12.
Do not leave tool running.
Disconnect tools when not in use, before servicing, when changing abrasive, etc.
13.
Remove keys and wrenches.
Form a habit of checking to see that all keys and adjusting wrenches are removed from tool before turning it on.
14.
Avoid accidental starting.
Be sure switch is off when plugging in.
15.
Out-door use extension cords.
When tool is used outdoors, use only extension cord suitable for outdoor use. They should be marked with the
suffix W-A (for UL) or W (for CSA in Canada).
16.
Stay alert.
Watch what you are doing. Use common sense. Do not operate tool when you are tired.
17.
Check damaged parts.
Before further use of the tool, a guard or other part that is damaged should be carefully checked to determine that it will
operate properly and perform its intended function. Check for alignment of moving parts, breakage of moving parts, binding of moving parts, mounting
and any other conditions that may affect its operation. A guard or other part that is damaged should be properly repaired or replaced by an authorized
service center unless otherwise indicated elsewhere in this instruction manual. Have defective switches replaced. Do not use tool if switch does not
turn tool on or off.
18.
Avoid gaseous areas.
Do not operate electric tools in gaseous or explosive atmospheres. Switches can create spark, and the sparks
can ignite fumes.
19.
Do not alter or misuse tool.
This tool is precision built. Any alteration or modification not specified is misuse and may result in a dangerous condition.
Only these accessories and attachments that are found in this instruction manual are acceptable for use with this tool. The use of any other accessory or
attachment might present a risk to the operator.
20.
Replacement parts.
When servicing, use only identical replacement parts. When ordering replacement parts, please specify model and serial
numbers of your machine.
21.
Do not operate tool without guards.
Always replace guards after changing accesory or abrasives.
22.
Do not mix grind material. There is a potential combustion hazard if ferrous and non-ferrous grinding dust is mixed. Clean inside machine
between materials.
23. Use hearing protection.
Permanent hearing loss can result from high process noise levels.
24. Use correct size abrasive.
Using a size abrasive that was not designed for this tool can be unsafe.
25. Mount tool securely.
Always fasten tool to bench or other support structure to prevent tipping.
Voltage Warning:
Before connecting the tool to a power source (receptacle, outlet, etc.), be sure the voltage supplied is the same as what is specified on the nameplate
of the tool. A power source with greater than that specified for tool can result in
serious injury
to the user as well as damage to the tool. Using a power
source with voltage less than the nameplate rating is harmful to the tool’s motor. If in doubt,
do not plug in the tool.
Polarized Plugs:
To reduce the risk of electric shock, this equipment has a polarized plug (one blade is wider than the other). This plug will fit in a polarized
outlet only one way. If the plug does not fit in the outlet, reverse the plug. If it still does not fit, contact a qualified electrician to install the proper outlet.
Do not change the plug in any way.
Warning:
Keep extension away from the immediate working area.
Carefully Read and save all instructions before operating or servicing any Dynabrade® Abrasive Power Tool.
Products offered by Dynabrade are not to be modified, converted or otherwise altered from the original design without expressed
written consent from Dynabrade, Inc.
Warning:
When using electric tools, basic safety precautions should always be followed to reduce the risk of a fire, electric shock, and personal injury,
including the following:
1.
Keep work area clean.
Cluttered areas and benches invite accidents.
2. Consider work area environment.
Do not expose tools to rain. Keep work area well lit. Do not use power tools in damp or wet locations.
Do not use tools in the presence of flammable liquids or gases.
3.
Guard against electric shock.
Be certain machine is adequately grounded before operating.
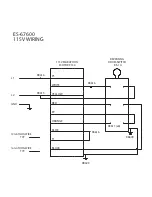
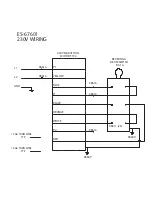
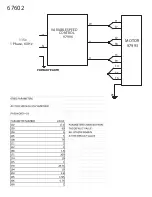
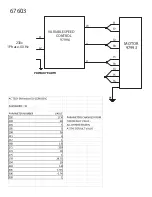
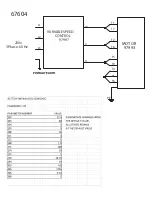
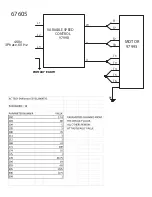
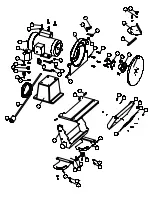
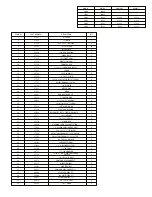
Summary of Contents for 67600
Page 16: ......


