


Important Operating, Maintenance and Safety Instructions
Carefully read all instructions before operating or servicing any Dynabrade
®
Abrasive Power Tool.
Warning:
Hand, wrist and arm injury may result from repetitive work motion and overexposure to vibration.
Operating Instructions:
Warning:
Eye, face, respiratory, sound and body protection must be worn while operating power tools. Failure to do so may result in serious injury or death.
Follow safety procedures posted in workplace.
1.
With power source disconnected from tool, securely position abrasive belt on tool (see abrasive belt/contact arm change instructions).
2.
Connect power source to tool. Be careful
not
to depress throttle lever in the process.
3.
Check tool speed with tachometer. If tool is operating at a higher speed than the RPM marked on the tool or operating improperly, the tool should be
serviced to correct the cause before use.
4.
Always work off the return side of the abrasive belt. This will ensure superior tracking and less down time of machine.
Abrasive Belt/Contact Arm Change Instructions:
To Change Belt:
To Change Contact Arm Assembly:
1.
Disconnect power source.
1.
Disconnect power source.
2.
Remove
11592
Cover Guard.
2.
Remove
11592
Cover Guard.
3.
Release
11551
Belt Tension Lever.
3.
Remove abrasive belt (see instructions).
4.
Pull belt backwards and to the left until belt
4.
Remove
95419
Rough Adjustment Knob.
5.
Remove Contact Arm and replace with desired contact arm.
5.
Reverse process for applying new belt.
6.
Replace
95419
Knob. Do not tighten knob at this point.
6.
Connect power source.
7.
Replace abrasive belt.
7.
Depress throttle lever to start motor
8.
With abrasive belt in proper position, push contact arm assembly forward until the
and belt rotation.
contact wheel is tight against abrasive belt.
8.
Adjust belt tracking by turning
95232
9.
Tighten
95419
Knob.
10.
Replace
11592
Cover Guard.
11.
Reset
11551
Belt Tension Lever.
12.
Connect power source and depress throttle lever to start motor and abrasive belt rotation.
13.
Adjust belt tracking by turning
95232
Belt Tracking Knob on contact arm assembly to the left
or right accordingly.
Maintenance Instructions:
Products offered by Dynabrade should not be converted or otherwise altered from original design without expressed written
consent from Dynabrade, Inc. All Dynabrade rotary vane air tools must be used with a filter-regulator-lubricator to maintain
all warranties.
1.
Check tool speed regularly with a tachometer. If tool is operating at a higher speed than the RPM marked on the tool, the tool should be serviced
to correct the cause before use.
2.
Some silencers on air tools may clog with use. Clean and replace as required.
3.
All Dynabrade rotary vane air motors should be lubricated with two drops of Dynabrade Air Lube (P/N
95842
: 1pt. 473ml.) every four hours of use.
4.
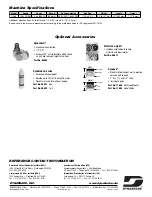
It is strongly recommended that all Dynabrade rotary vane air tools be used with a Filter-Regulator to minimize the possibility of misuse due to unclean air,
wet air or insufficient lubrication. Dynabrade recommends the following:
10681
Air Line Filter- Regulator-Lubricator — Provides accurate air pressure regulation,
two-stage filtration of water contaminant's and micro-mist lubrication of pneumatic components. Operates 55 SCFM @ 100 PSIG has 1/2" NPT female ports.
3
•
Important:
User of tool is responsible for following accepted safety codes such as those published by the American National Standards Institute (ANSI).
•
Warning:
Eye, face, respiratory, sound and body protection must be worn when operating power tools. Failure to do so may result in serious
injury or death.
•
Products offered by Dynabrade should not be converted or otherwise altered from original design without the expressed written consent
of Dynabrade,Inc.
•
Tool RPM rating must never exceed abrasive/accessory RPM rating, regardless of tools capacity.
•
Operate machine for one minute before application to workpiece to determine if machine is working properly and safely before work begins.
•
Always use proper guards. Make sure guards are in proper position, secure and in good repair.
•
Always disconnect power supply before changing abrasive or making machine adjustments.
•
Inspect abrasives for damage or defects prior to installation on tools. Make sure belts are mounted properly; check for proper tension and belt tracking.
•
Please refer to Dynabrade’s Warning/Safety Operating Instructions Tag for more complete safety information.
Safety Instructions:
Products offered by Dynabrade should not be converted or otherwise altered
from original design without expressed written consent from Dynabrade, Inc.
is released from drive wheel.
Belt Tracking Knob on contact arm
assembly to the left or right accordingly.


