3
( ) Using a small screwdriver, remove the four (4) screws securing the “PC-3” circuit board to
chassis, carefully remove old circuit board.
REASSEMBLY
( ) Using a small screwdriver, install new circuit board (79-001A) from BOTTOM SIDE of
chassis, orient circuit board so C2 and C8 face front of amplifier and C1, C9 face output
transformers.
NOTE:
amplifier will not work properly and may be damaged if circuit board is
installed from the top
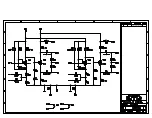
( ) Using a soldering iron, connect wire from pin #5 of left power supply socket (LPSS) to eyelet
#3 on new circuit board (PCB).
( ) Using a soldering iron, connect bare wire from left RCA connector (ground terminal) to eyelet
#24 on PCB.
( ) Using a soldering iron, connect 10 ohm (brown, black, black) resistor from pin #3 of LPSS to
eyelet #8 of PCB.
( ) Using a soldering iron, connect bare wire from right RCA connector (ground terminal) to
eyelet #25 on PCB.
( ) Using a soldering iron, connect wire from right RCA connector (signal terminal) to eyelet #17
on PCB.
( ) Using a soldering iron, connect 10 ohm (brown, black, black) resistor from pin #3 of right
power supply socket (RPSS) to eyelet #10 of PCB
( ) Using a soldering iron, connect wire from pin #5 of RPSS to eyelet #18 on new circuit board
(PCB).
( ) Using a soldering iron, connect wire from V1, pin #6 to eyelet #2 on PCB.
( ) Using a soldering iron, connect two wires from LPSS, pins #1and #2 to eyelets #4 and #5 on
PCB.
( ) Using a soldering iron, connect wire from chassis ground lug to eyelet #9 on PCB.
( ) Using a soldering iron, connect two wires from RPSS, pins #1and #2 to eyelets #15 and #16
on PCB.
( ) Using a soldering iron, connect wire from V3, pin #6 to eyelet #23 on PCB.
( ) Using a soldering iron, connect wire from V2, pin #6 to eyelet #1 on PCB.
( ) Using a soldering iron, connect wire from left RCA connector (signal terminal) to eyelet #7 on
PCB.
( ) Using a soldering iron, connect wire from left bias potentiometer to eyelet #6 on PCB.
( ) Using a soldering iron, connect wire from V1, pin #4 to eyelet #11 on PCB.
Summary of Contents for Dyna Stereo 70
Page 5: ...PRELIMINARY RELEASE ...
Page 6: ...PRELIMINARY RELEASE ...


