background image


Calibration 

The digital types of Block Heaters can easily be calibrated to show any blocks/vials and 
tubes’ temperature in the displayed LED.  Due to the differences in the mass of the various 
aluminum blocks, environmental air temperature, thermal radiation, and many other factors, 
the Block Heater may need to be re-calibrated when switching different blocks and when the 
environmental changed.  The DB-3-200-01 has been calibrated based on 16 mm Blocks.  

DB-3-200-01 can be calibrated using one to five points.  The calibration steps are described 
in the followings: 

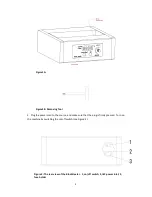
1.  Prepare the thermistor, or thermometer temperature measurement devices.  You can 
calibrate the block or even the temperature of the solution in the vials/tubes.  Make sure 
the thermistor or sensor well contacted with the blocks or vials/tubes solution. 

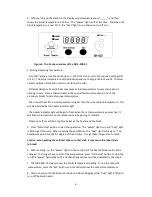
2.  Calibration could not be made during running (i.e. the “Power” light on).  Press 
“Start/stop” button first to stop run if the machine is running.  

3.  Press “mains” turning knob (please note that it should be “press” not “turn”) first, then 
press “Start/stop” button, simultaneously release both, the display will show “

C _ _ X

”, 

which X indicates the stage of the calibration.  For example, in the first calibration, it will  
display “

C _ _ 1

”. 

4.  Press “set” button, and turn the “mains” turning knob to the desired temperature  
calibration point, release the “set” button, and press “mains” to start the calibration.  In this 
time, the “power” light will be on, and the “heat” light will be flashing.  The display showed  

C _ _ X

” flashing. 

5.  When reaching the equilibrium set temperature, the display will stop flashing.  In this 
stage, you can enter the actual block or vial temperature from reading the block or vial  
temperature from external temperature measurement device:  Press “set” button and  
turning the “mains” knob to the actual temperature value, release the “set” button, and 
press the “mains” knob.  The machine will take the real value to take effect in the next run.  
In this case the CL-201 will display “C _ _ X+1” (X + 1 indicates the next number of the 
calibration stage) and continue to flash:  Repeat the step 4 to enter the next calibration set 
temperature.  

 The maximum calibration point is five.  When finishing five point of the calibration, the  
machine will automatically exit from the calibration program and return to the pre-start  
status: the “power” light will go off and the “heat” light will go “on” when temperature is 
over 50 ˚C. 

6.  The calibration can be interrupted anytime by pressing “Start/stop” button and “mains” 
knob as indicated in step 3: If the process interrupted before the completion of the  
calibration stage, the machine will only take the previous calibration point. For example, if 
the process interrupted between the first and second point calibration stages, then the 
 machine will take the first calibration point and becomes one-point calibration; If the  

Summary of Contents for DB-1-130-01

Page 1: ...1 BLOCK HEATER MODELS DB 3 200 01 DB 3 130 01 DB 2 130 01 DB 2 200 01 DB 2 200 02 DB 1 130 01 and DB 1 200 01 OPERATING MANUAL VERSION 3 11 Dynalab Corp Inc November 2017 v1 0 ...

Page 2: ...2 BEFORE USE Please read the following instructions Warning Check the line supply is sufficient to meet the power requirement of the unit ...

Page 3: ... IN TORT CONTRACT CIVIL LAW OR OTHER THEORIES OF LIABILITY INCLUDING STRICT LIABILITY EVEN IF ADVISED IN ADVANCE OF THE POSSIBILITY OF SUCH DAMAGES THE COMPANY S TOTAL LIABILITY INCLUDING BUT NOT LIMITED TO LIABILITY FOR INDEMNITY DEFENSE AND HOLD HARMLESS OBLIGATIONS IS LIMITED TO NO MORE THAN THE AMOUNT PAID TO THE COMPANY UNDER THE CUSTOMER S ORDER AND THE CUSTOMER AGREES TO INDEMNIFY THE COMPA...

Page 4: ...e set temperature is higher than the current block temperature This will be indicated by the heater indicator light 4 The heater indicator light will begin to flash when the set temperature is approached It will flash more slowly when the temperature is beginning to stabilize Please note there will be a lag time between the heater and the block Operation of Digital Unit For the digital DB 3 200 01...

Page 5: ...2 Plug the power cord to the source and make sure that the plug is firmly pressed Turn on the machine by switching the on off switch see Figure 2 Figure 2 The rear view of the Block Heater 1 on off switch 2 IEC power inlet 3 fuse holder ...

Page 6: ...The heater indicator light will begin to flash when the set temperature is approached It will flash more slowly when the temperature is beginning to stabilize Please note there will be a lag time between the heater and the block 5 Press Start stop button to start the operation The power light is on and heat light is flashing at this point When reaching the equilibrium the heat light is steady on T...

Page 7: ...ation point release the set button and press mains to start the calibration In this time the power light will be on and the heat light will be flashing The display showed C _ _ X flashing 5 When reaching the equilibrium set temperature the display will stop flashing In this stage you can enter the actual block or vial temperature from reading the block or vial temperature from external temperature...

Page 8: ...e of the block vial that actually measured from external temperature measurement device For DB 2 200 02 Figure 4 DB 2 200 02 Overview Ch1 The left hand side with six hole block Ch2 The right hand side with 20 hole block Figure 5 The front panel view of the DB 2 200 02 Please make sure that the correct channel corresponding to the designated block before to do the operation The DB 2 200 02comes wit...

Page 9: ...9 2 ml 20 10 5 X 33 DB0010 13 mm 20 13 5 X47 DB0013 1 5 ml 20 10 7 X 14 9 taper DB0015 12 mm 20 12 5 X 47 DB 0015 33 12 mm 20 12 5 X 33 DB0016 16 mm 12 16 5 X 47 DB0017 2 ml 20 10 5 X 47 DB0018 19 mm Block 8 19 5 X 47 DB0019 33 mm Block 4 33 5 X 47 Technical Specification Working temperature range Ambient 5 C to 200 C Settable temperature range 0 0 C to 200 0 C Temperature stability 0 1 C at 40 C ...

Page 10: ...EN 61326 1 2006 and fulfill EMC testing requirement of Medical Device Directive 2004 108 EC listed in the report number CE2012 OTE8003E and EN 61010 1 plus EN 61010 2 010 2003 of the LVD di rective2006 95 EC in the listed report numberCE2012 AVE8006S mark affixed 2012 Signed Date ...

Page 11: ...cal earth continuity 5 Electrical Insulation 6 Electrical Flash Test Functional 1 Visual acceptance 2 Appropriate control function 3 Indicators Quality Control Inspector Dynalab Corp 175 Humboldt Street Suite 300 Rochester NY 14610 Tel 800 334 7585 Fax 585 334 0241 www dynalon com E dynaloninfo dyna labware com ...

Reviews: